Helix AMPLIFY 201 X-OVER handleiding
Handleiding
Je bekijkt pagina 17 van 24
17
en
level input is disabled, and the amplier will
only turn on via the remote input. This setting
is recommended if there are e.g. noises while
switching on / o the amplier. In this case,
the remote input (page 17, point 5) must be
connected.
5. Connection to power supply & remote
Make sure to disconnect the battery before
installing the AMPLIFY 201 X-OVER.
Ensure correct polarity.
+12 V: Connector for the positive cable.
Connect the +12 V power cable to the posi-
tive terminal of the battery. The positive wire
from the battery to the ampliers power termi-
nal needs to have an inline fuse at a distance
of no more than 12 inches (30 cm) from the
battery. The value of the fuse is calculated
from the maximum total current input of the
whole car audio system (201 X-OVER = max.
80 A RMS at 12 V RMS power supply). If your
power wires are short (less than 1 m / 40”)
then a wire gauge of 10 mm² / AWG 8 will be
sucient. In all other cases we strongly rec-
ommend gauges of 16 - 25 mm² / AWG 6 – 4!
GND: Connector for the ground cable. The
ground wire should be connected to a com-
mon ground reference point (this is located
where the negative terminal of the battery is
grounded to the metal body of the vehicle) or
to a prepared metal location on the vehicle
chassis, i.e., an area cleaned of all paint resi-
dues. The cable should have the same gauge
as the +12 V wire. Inadequate grounding
causes audible interference and malfunctions.
REM:
The remote input is used to switch on
and o the amplier. It is mandatory to connect
this input to the remote output of the precon
-
nected device that provides the input signal to
the AMPLIFY 201 X-OVER.
This input does
not need to be assigned if a highlevel signal
is used.
We do not recommend controlling the remote
input via the ignition switch to avoid pop noise
during turn on / o.
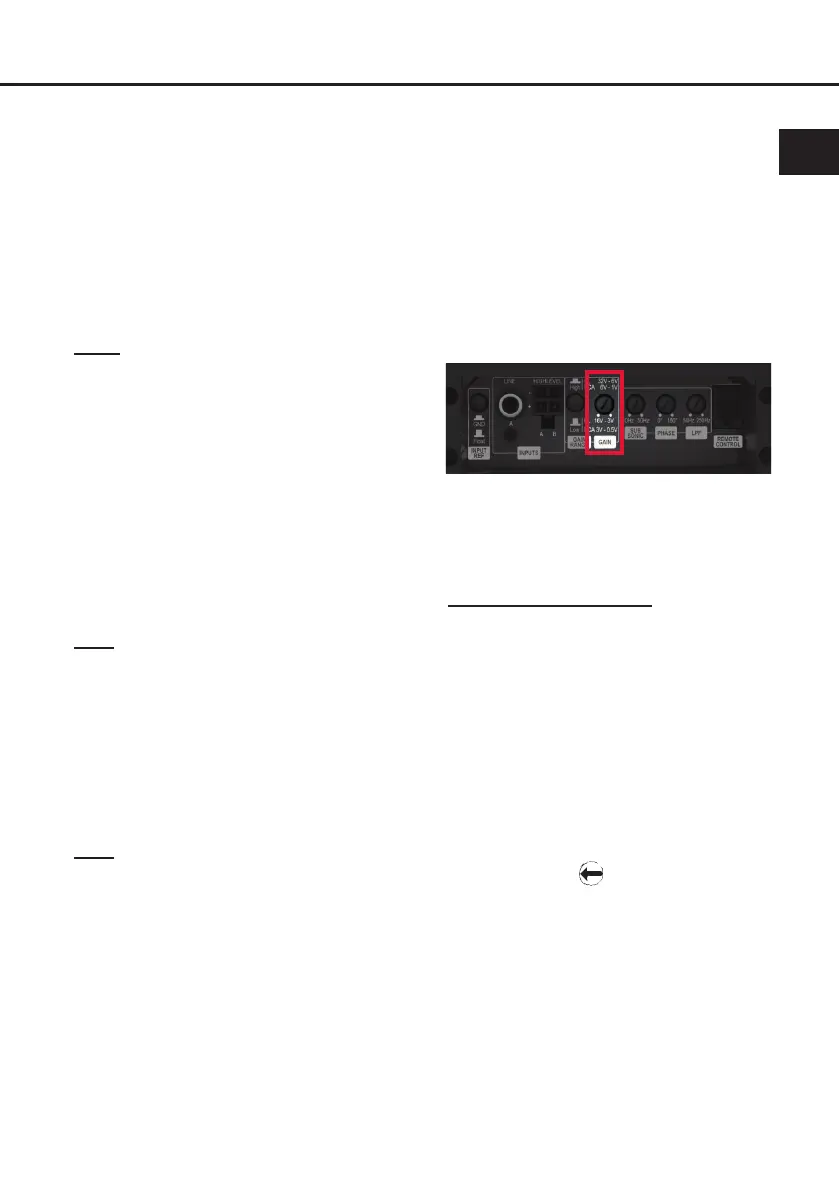
6. Adjustment of the input sensitivity
ATTENTION: It is mandatory to properly
adapt the input sensitivity of the AMPLIFY
201 X-OVER to the signal source to achieve
the best possible signal quality and avoid
damage to the amplier. It is also manda-
tory to adjust the input voltage range to
the output voltage of your signal source
(page 16, point 1).
The input sensitivity can be optimally adapted
to the signal source using thee gain control
(page 14, point 5).
This is not a volume control; it’s solely for ad-
justing the amplier´s gain.
The setting of the control aects both the low-
level line input and highlevel input.
The Gain control ranges are:
Input voltage range “Low”:
Highlevel: 3 - 16 Volts
RCA / Cinch: 0.5 - 3 Volts
Input voltage range “High”:
Highlevel: 6 - 32 Volts
RCA / Cinch: 1 - 6 Volts
If the speaker outputs (highlevel) of a conven-
tional radio are used we recommend an input
sensitivity of roughly 9 Volts. For this purpose,
turn the control from max. CCW position to
9 o’clock position.
If you are not sure regarding the signal
source’s output voltage, please contact your
HELIX specialist dealer.
Bekijk gratis de handleiding van Helix AMPLIFY 201 X-OVER, stel vragen en lees de antwoorden op veelvoorkomende problemen, of gebruik onze assistent om sneller informatie in de handleiding te vinden of uitleg te krijgen over specifieke functies.
Productinformatie
| Merk | Helix |
| Model | AMPLIFY 201 X-OVER |
| Categorie | Niet gecategoriseerd |
| Taal | Nederlands |
| Grootte | 3093 MB |


