H-Tronic RS 12 handleiding
Handleiding
Je bekijkt pagina 2 van 2
RAIN SENSOR
RS 12
ITEM NO.: 111 52 75
The RS 12 rain sensor reacts to rain, snow
and hail. With an electric control system, in
the event of precipitation you can e.g.
retract a sunshade or awning,
close a skylight or
only have the precipitation signalled.
A heater prevents icing up or condensation
and ensures functional safety.
1. Target group,
qualification
Qualified electricians are trained for the
specific scope of their work and know the
relevant standards and regulations. They can
perform work on electrical systems and inde-
pendently recognise and avoid potential dan-
gers based on their training and experience.
Users have read these operating instructions
and are aware of the possible dangers asso-
ciated with improper behaviour.
2. Safety
2.1 Depiction used
WARNING
Possibility of serious bodily
injury or death
` Preventive measures
Note
Instructions for use/ useful information
2.2 Intended use
The rain sensor is intended for use in
the private and commercial sector. It
is installed outdoors and detects and
signals precipitation. The rain sensor
can be connected to an electric con-
trol system.
Using the rain sensor in any way that
is different from or beyond this is con-
sidered improper use.
Modifications are prohibited.
2.3 Electricity risks
Observe to the operating param-
eters, see 3Technical data.
Never supply voltage directly to
the OUT terminal.
Use the high-strength cable gland
as cable bushing.
Only use insulated tools.
Only use cables that are in per-
fect condition. Check cables for
insulation faults and breaks. Re-
place defective cables immedi-
ately.
Do not pinch or crush the cables.
Do not operate the rain sensor if:
- the rain sensor or cables are
damaged,
- the rain sensor has fallen
down,
- in case of moisture ingress.
2.4 Provisions for persons
with limited abilities
Persons with limited physical,
sensory or mental abilities or per-
sons with insufficient experience
or knowledge must neither install
the rain sensor nor connect it
electrically.
There is a risk of choking through
plastic bags and if swallowed.
Keep children away from the
packaging material.
Children underestimate the dan-
ger of electrical appliances. Do
not leave children unsupervised
with the rain sensor.
2.5 Behaviour in case of an
emergency
De-energise the rain sensor and
connected loads from the power
supply if there is a:
risk of injury,
risk of damage to the rain sensor
or other property.
In the event of an accident, take
immediate action and, if required,
call the EU-wide emergency num-
ber 112.
6. Commissioning
6.1 Electrical connection
WARNING
Possibility of electric
shock due to incorrect
connection.
` The rain sensor must be
connected by qualified electri-
cians.
` Incorrect connection of the
terminals can lead to a short
circuit and injury or damage
to property.
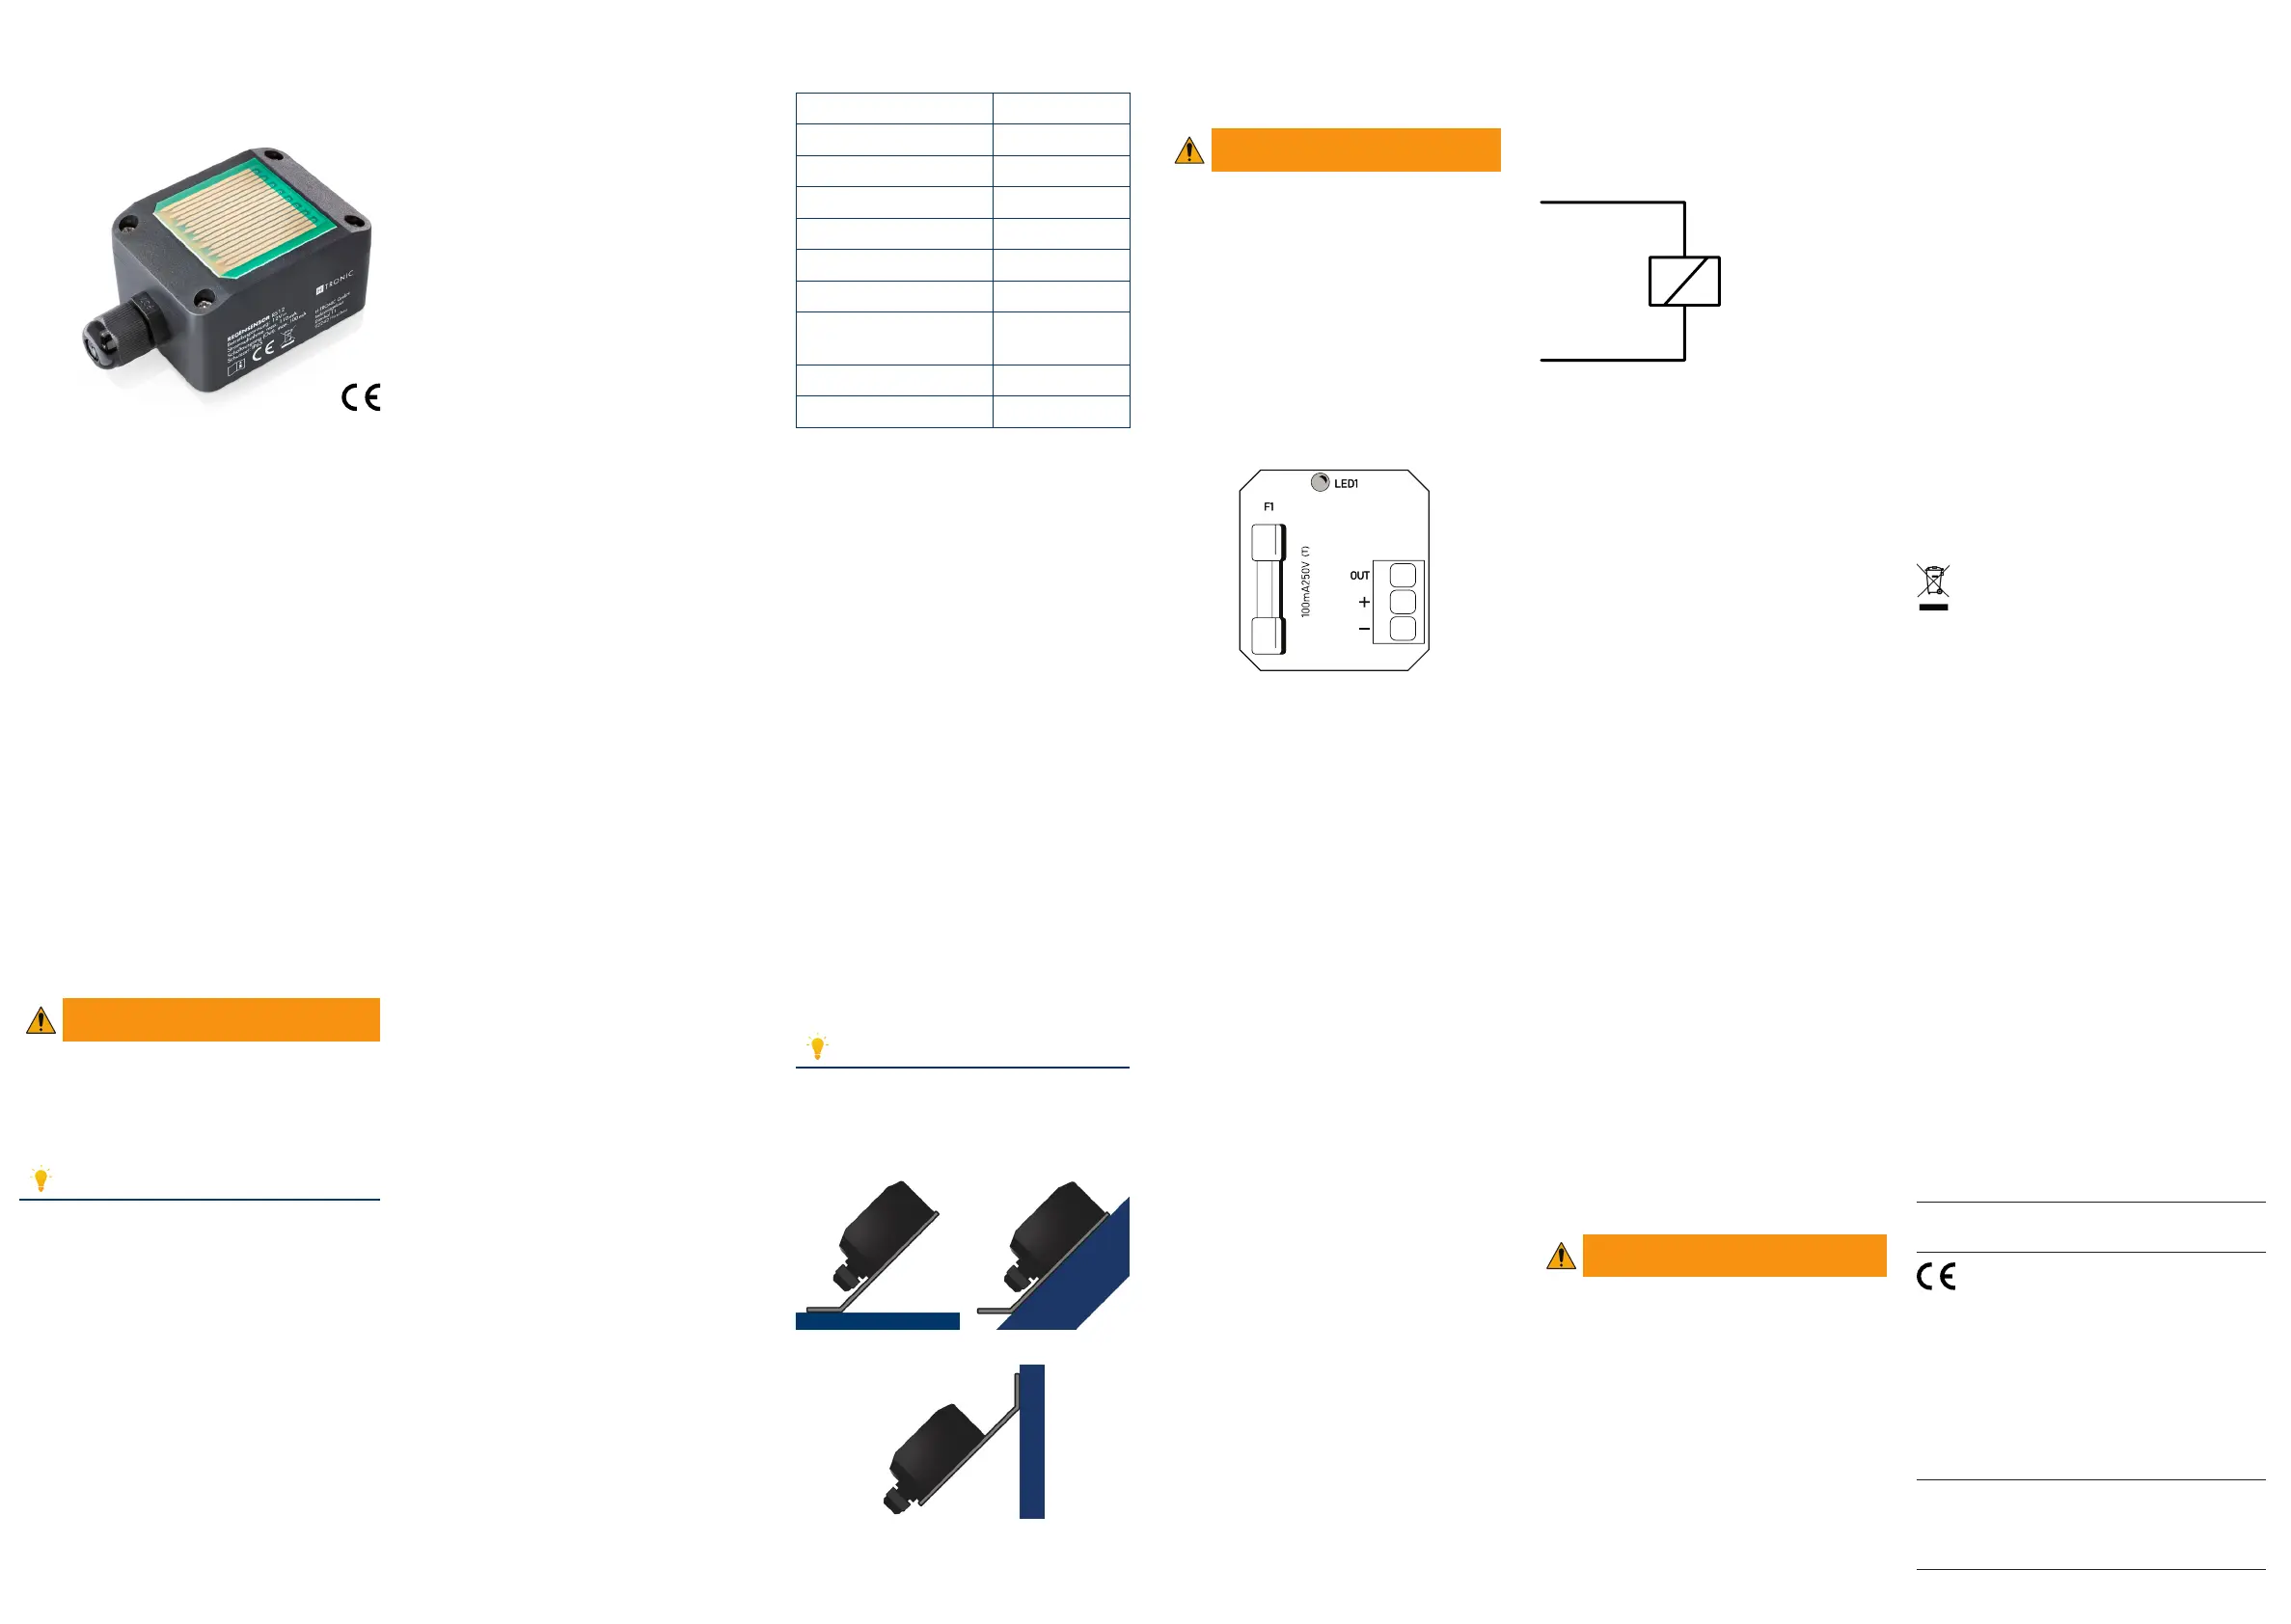
Figure 3 Layout of the electrical connection
Requirements:
Rain sensor de-energised
Stored loads discharged
To connect the rain sensor:
1. Loosen the 4screws M3x 8mm on
the top of the housing and remove the
cover.
2. Connect the operating voltage with
the correct polarity to the plus (+) and
minus (-) terminals.
3. Install the cover and tighten the
4 screws M 3 x 8 mm alternately.
This prevents moisture from getting
inside.
9 The rain sensor is operational.
6.2 Switching output (Out)
The rain sensor is equipped with an Open-
Collector output (OC):
No precipitation (standby):
positive voltage to ground at switching
outputOUT
Precipitation:
switching output OUT is switched to
ground.
The rain sensor is equipped with a protec-
tive diode (flyback diode).
You can connect the rain sensor to the sen-
sor input of an electric control system via
the switching output (Out). For example,
the following connections are possible:
Relay
Signal lamp 12V DC
LED 12V
Control signal for PLC
To switch power with the rain sensor, con-
nect a small relay to the plus (+) and OUT
terminals.
If the LED lights up red, the connected relay
must react as well.
+12V DC
OUT
Relay 12V DC/
max. 100mA
Figure 4 Example of a relay connection
6.3 Checks
To check the function of the rain sensor:
1. Touch the sensor surface with a slightly
moistened finger.
¨ The red LED lights up.
The heating switches on and the sen-
sor surface heats up.
¨ Once the sensor surface is dry, the red
LED goes out and the heating of the
sensor surface switches off.
9 The rain sensor is functional.
In case of faults, check the electrical con-
nection.
7. Troubleshooting
Have the rain sensor checked and repaired
by qualified electricians only.
Only use original spare parts.
8. Maintenance and care
8.1 Maintenance
The rain sensor does not require regular
maintenance.
If the fuse (F1) in the rain sensor is defective
after tripping:
Decommission the rain sensor immedi-
ately.
Have the rain sensor checked and the
fuse (F1) replaced by qualified electri-
cians.
8.2 Cleaning
WARNING
Possibility of electric shock
due to incorrect cleaning.
` Never completely immerse the
rain sensor in water.
If it is very dirty, wipe the rain sensor with
a soft cloth and neutral cleaner, e.g. dish
detergent.
3. Technical data
Ambient temperature -20 ... +60°C
Length 65mm
Width 50mm
Height 35mm
Rain sensor weight 64g
Bracket weight 30g
Operating voltage 12V DC
Power consumption
with heating
max. 110mA
Switching output (Out) max. 100mA
Protection class IP65
4. Scope of delivery
Rain sensor
45° mounting bracket
4screws M2.6x 8mm
5. Installation
To install the rain sensor on the mounting
bracket
1. Observe the final installation position
at the place of use.
2. Place the rain sensor on the long side
of the mounting bracket.
3. Tighten the 4screws M2.6x 8mm
alternately.
9 The rain sensor is installed on the
mounting bracket.
To install the rain sensor at the place of
use
Outdoors,
Sensor surface up,
Tips of the conductors down
Mounting bracket for an inclination of
45° to ensure good precipitation run-
off.
Note
Use fastening material that is suitable for
the respective surface.
Installation options
Figure 1 Flat roof Pitched roof
Figure 2 Wall
RS12 Rain Sensor Operating Instructions
Version 1.0 – translated from German
The rain sensor complies with the essential
requirements and other relevant terms and
conditions of Directives 2014/30/EU,
2014/35/EU and 2011/65/EU.
The corresponding declarations and documents
are deposited with the manufacturer:
H-TRONIC GmbH, Industriegebiet Dienhof 11,
D-92242Hirschau
Technical support +49 (0) 9622 7020-0
technik@h-tronic.de
These operating instructions are protected by
copy right. All rights reserved, especially the right
of reproduction and electronic processing.
© 2022 H-TRONIC GmbH
www.h-tronic.de
9. Decommissioning
Requirements:
Rain sensor de-energised
Stored loads discharged
To decommission the rain sensor:
1. Loosen the 4screws M3x 8mm on
the top of the housing and remove the
cover.
2. Remove any connections installed on
the switching output (Out).
3. Remove the operating voltage from the
minus (-) and plus (+) terminals.
4. Install the cover and tighten the 4screws
M3x 8mm alternately.
5. Loosen the 4 screws M 2.6 x 8 mm
on the mounting bracket and remove it
with the rain sensor.
9 You have decommissioned the rain sen-
sor.
10. Disposal and recycling
The rain sensor must not be disposed
of with household waste.
Disposal of the rain sensor, including oper-
ating materials and any cleaning fluids, is
governed by local disposal regulations and
environmental laws.
Waste equipment from private households
can be handed in at municipal collection
points or at retail take-back points. For more
information please contact your local munic-
ipal authority.
Please dispose of materials that can be recy-
cled in a correct and environmentally friend-
ly way.
Bekijk gratis de handleiding van H-Tronic RS 12, stel vragen en lees de antwoorden op veelvoorkomende problemen, of gebruik onze assistent om sneller informatie in de handleiding te vinden of uitleg te krijgen over specifieke functies.
Productinformatie
| Merk | H-Tronic |
| Model | RS 12 |
| Categorie | Niet gecategoriseerd |
| Taal | Nederlands |
| Grootte | 983 MB |
