Grillmeister GGPO 4000 A1 handleiding
Handleiding
Je bekijkt pagina 13 van 38
GB/NI12
3. Before commissioning
3.1 Set up the appliance
Remove all packaging material and all trans-
port locks from the appliance.
Fold out the feet 9 and place the pizza oven
1 in the desired position.
To ensure safe and fault-free operation of the ap-
pliance, the installation site must fulfil the following
requirements:
The floor must be firm, flat, dry and level.
Minimum distances of 2 m to the side, 2 m up-
wards, 2.5 m to the rear and 3.5 m to the front
must be maintained from the housing.
Do not set up the appliance in a hot, wet or
very humid environment or in the vicinity of
flammable material.
A sufficient number of fire extinguishing systems
must be available.
The installation site must be sufficiently ventilat-
ed and vented.
3.2 Assembly
Note: Please refer to the assembly instructions on
the fold-out pages of these operating instructions for
the individual assembly steps for the pizza oven. The
supplied screws and washers
7 are also required
for this.
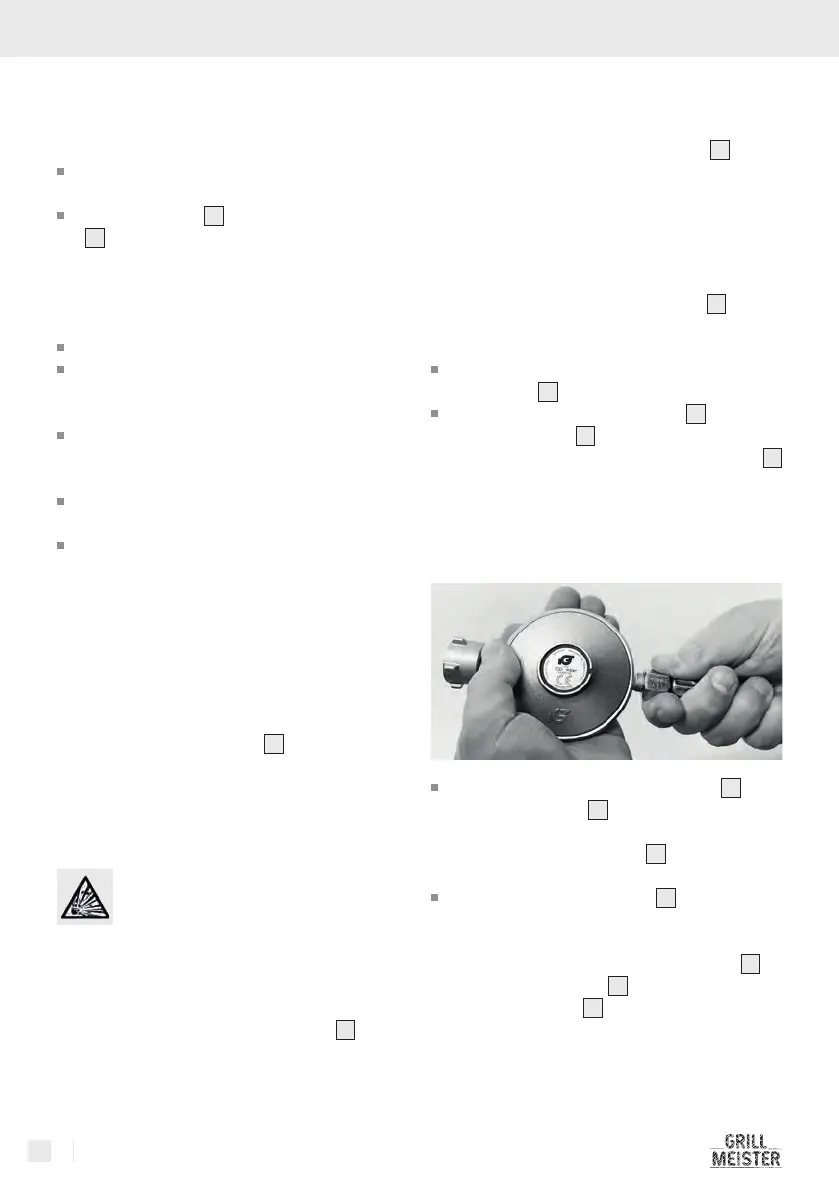
3.3 Connecting the gas cylinder
Explosion hazard!
Only use suitable tools and do not twist
the pressure regulator after installation!
This can damage the gas cylinder valve.
A leak in the gas connection can cause
explosions!
Note: The supplied pressure regulator
6 is only
suitable for gas cylinders from the countries of des-
tination.
Note: If you have transported the gas cylinder,
leave it to stand for 1 hour before installation.
Note: The supplied pressure regulator
6 is only
suitable for liquid gas in accordance with EN289
propane-butane.
Note: The appliance is suitable for gas cylinders
with a filling weight of 5 kg or 11 kg.
Note: Only use the pressure regulator
6
A127is
in accordance with EN 16129/EN 12864.
Remove the protective cap from the gas hose
connection
11 on the appliance.
Manually connect the gas hose 5 to the gas
hose connection
11 provided on the appliance
by screwing the union nut of the gas hose
5
anti-clockwise onto the gas hose connection of
the appliance.
Note: Left-hand threads are used.
Connect the loose end of the gas hose
5
to the
pressure regulator
6
by hand by screwing the
union nut of the gas hose anti-clockwise onto
the gas hose connection
11
of the pressure
regulator.
Make sure that the gas hose
5
is not kinked or
twisted.
Note: Tighten the union nuts of the gas hose
5
on
the gas hose connection
11
of the appliance and
the pressure regulator
6
using a suitable open-end
spanner.
Bekijk gratis de handleiding van Grillmeister GGPO 4000 A1, stel vragen en lees de antwoorden op veelvoorkomende problemen, of gebruik onze assistent om sneller informatie in de handleiding te vinden of uitleg te krijgen over specifieke functies.
Productinformatie
| Merk | Grillmeister |
| Model | GGPO 4000 A1 |
| Categorie | Niet gecategoriseerd |
| Taal | Nederlands |
| Grootte | 4091 MB |


