Genesis GLMT20BH handleiding
Handleiding
Je bekijkt pagina 8 van 32
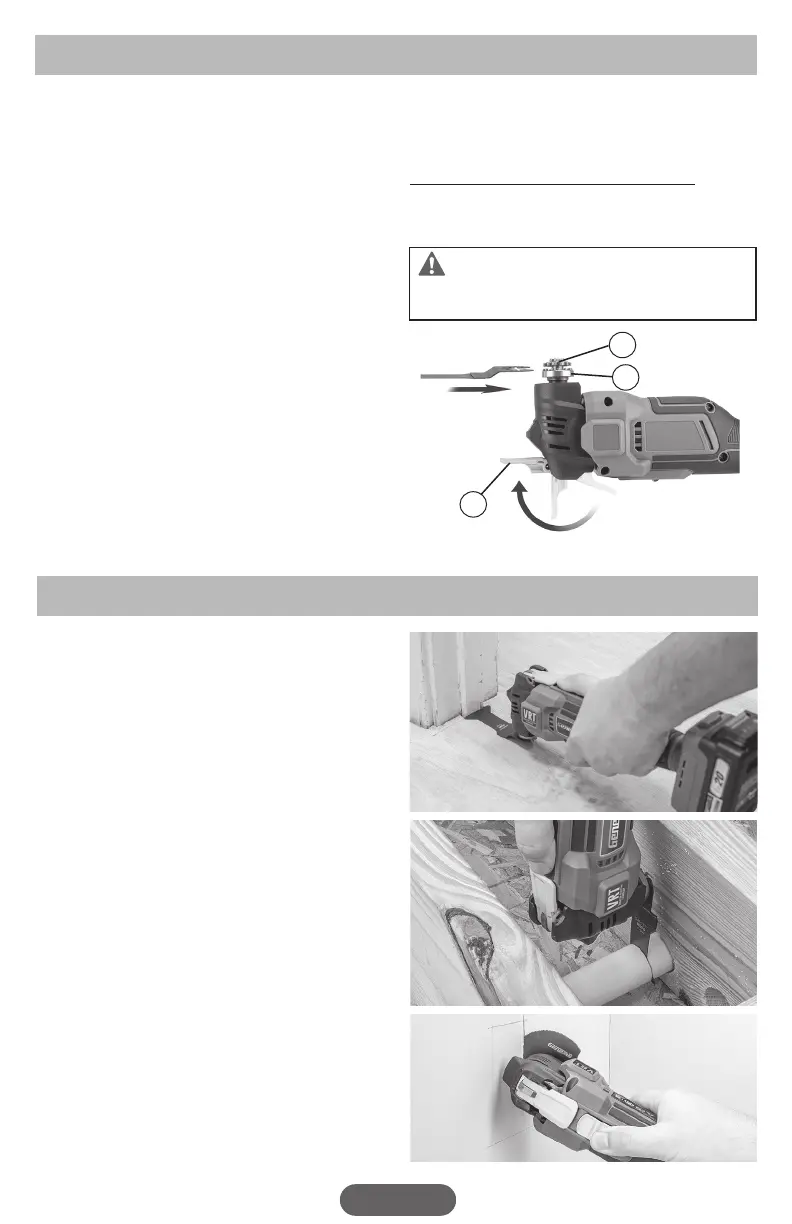
FIG 7
FIG 8
FIG 9
FIG 6
2
4b
4a
FIG 6
ENGLISH
OPERATION
APPLICATIONS
LED WORK LIGHT
Your tool has a built-in LED work light (3-FIG 1) to illuminate
the work area. When you turn on the tool, the work light will
automatically turn on.
VRT (VIBRATION REDUCTION
TECHNOLOGY)
Oscillating multi-tools generate significant vibration,
leading to user fatigue. This tool features Vibration-
Reduction Technology (VRT), which eliminates up to 90% of
vibration at the grip, helping to reduce fatigue and enhance
user comfort.
INSTALLING AND REMOVING
ACCESSORIES (FIG 6)
1. Flip the accessory quick-change Lever (2) forward
completely to the unlocked position. See FIG 6.
2. Slide the open-end of the accessory into the gap
between the blade flange (4a) and the shaft flange (4b).
The shaft flange of this tool comes with a 12-pin design.
Place the accessory over the pins on the shaft flange.
Make sure the holes on the accessory properly engage
8 of those 12 pins.
3. Flip the accessory quick-change Lever back to locked
position to secure the accessory in place.
NOTE: Some accessories, such as a saw blade, may
be mounted either straight on the tool, or at an angle to
enhance usability. Always make sure 8 of the 12 pins are
engaged as described in step 2 above.
To Remove Accessories from the Tool, flip the
accessory quick-change lever forward completely,
disengage the accessory from the pins, and pull the
accessory off the tool.
WARNING: Accessories which have just
been used may be hot. Allow accessories to cool before
attempting to remove.
NOTE: The accessories in this section may or may not
be included with the tool. Please refer to the unpacking and
contents section for a list of included accessories.
NOTE: Recommended accessories for this tool are the
GENESIS
®
Universal Quick-Fit oscillating tool accessories.
Please refer to the "Genesis Oscillating Tool Accessory
Reference Guide" enclosed for details.
This oscillating multi-tool is intended for cutting and
sanding wood, plastic, plaster and non-ferrous metals. It is
especially suitable for cutting in tight spaces and for flush
cutting. Following are a few typical uses.
CUTTING (FIG 7 - 9)
Use a flush cutting saw blade (or “E-cut blade”) for making
precise cuts in tight areas, close to edges, or flush to a
surface. It is important not to force the tool during the flush
cutting. If you are experiencing a strong vibration during
cut, it indicates too much hand pressure is on the tool. Back
off on the pressure and let the speed of the tool do the
work. See FiG 7, 8 for examples of using the flush cutting
saw blade.
NOTE: It is suggested that you have a piece of scrap
material supporting the blade when making a flush cut. If
you need to rest the blade on a delicate surface, you need
to use cardboard or masking tape to protect the surface.
Bekijk gratis de handleiding van Genesis GLMT20BH, stel vragen en lees de antwoorden op veelvoorkomende problemen, of gebruik onze assistent om sneller informatie in de handleiding te vinden of uitleg te krijgen over specifieke functies.
Productinformatie
| Merk | Genesis |
| Model | GLMT20BH |
| Categorie | Niet gecategoriseerd |
| Taal | Nederlands |
| Grootte | 6650 MB |


