Genesis GLAG2045B handleiding
Handleiding
Je bekijkt pagina 8 van 30
ENGLISH
OPERATION
WARNING: To reduce the risk of serious
personal injuries, read and follow all important safety
warning and instructions before using this tool.
WARNING: Always be sure that the tool
is switched off before insertion or removal of the battery
pack.
CHARGING THE BATTERY (FIG 5)
NOTE: Always check that the power supply corresponds
to the voltage on the ratings plate.
• Plug the charger (11) into a 120 Volt AC power source.
The green indicator light on the charger will illuminate,
confirming it is powered.
• Connect the charger to the battery (10) as shown in
FIG 5. The red light on the charger will illuminate,
indicating that the battery is charging. Meanwhile, the
power indicator lights (8) on the battery pack will flash,
indicating the charging status.
• All three indicate lights will turn solid green once
charging is complete.
• It is normal for the battery pack to become warm while
charging.
• If the battery pack is hot after continuous use in the
tool, allow it to cool down to room temperature before
charging. This will extend the life of your batteries.
ASSEMBLY AND ADJUSTMENTS
WARNING: When using a depressed
center grinding wheel, flex wheel, wire wheel, cut-off
wheel, or abrasive mop disc, the wheel guard must be
fitted on the tool so that the closed side of the guard
always points towards the operator.
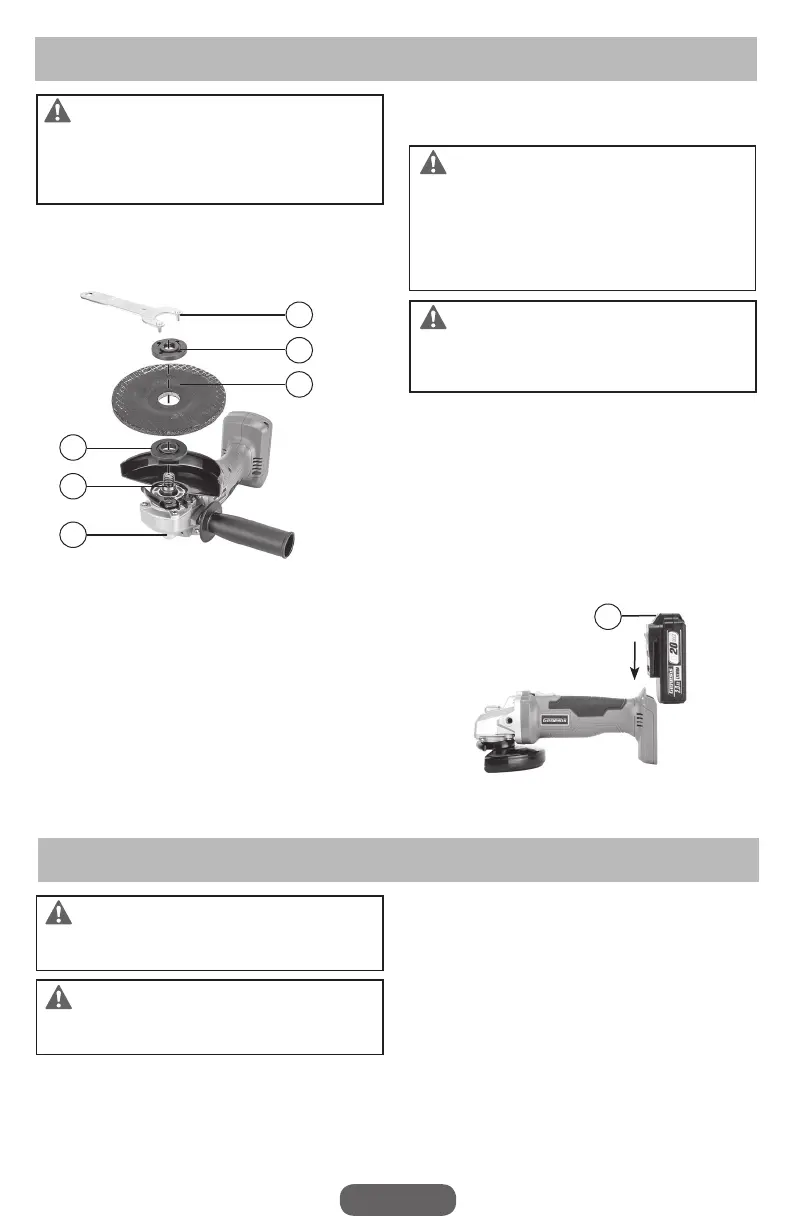
INSTALLING AND REMOVING
DEPRESSED CENTER GRINDING
WHEELS (FIG 3)
1.
Mount the inner flange (6b) with the machined "flats"
side down onto the spindle. Slowly rotate the inner
flange until it engages the corresponding matching
machined “flats” on the spindle shaft.
2.
Slide the grinding wheel (5), crown side down and
depressed side up, over the spindle shaft (12) and over
the raised shoulder on the inner flange.
3.
Screw the outer flange (6a) onto the spindle with the
shouldered side down.
4.
Press down on the spindle lock (3) firmly to stop the
spindle from turning. Then, use the spanner wrench (10)
to tighten the outer flange by turning it clockwise until
it's secure.
5.
To remove the wheel, follow the installation procedure
in reverse.
WARNING: Always install grinding wheel
with the depressed center against the disc flange.
Failure to do so will cause the grinding wheel to crack
when tightening the clamp nut. This could result in
serious personal injury because of loose particles
breaking off and being thrown from the grinder. Do not
overtighten.
WARNING: Always use the supplied
guard when a depressed center grinding wheel is on
the tool. The wheel can shatter during use and the guard
helps reduce the chances of personal injury.
INSTALLING AND REMOVING THE
BATTERY PACK (FIG 4)
• To install the battery pack, slide the battery pack into the
end of the tool housing all the way until it locks in place
with a click, as shown in FIG 4. Lightly pull on the battery
to ensure it is locked into place and will not accidentally
fall out of the tool, causing an injury.
• To remove the battery pack, pull the battery away from
the tool while depressing the battery locking tab (7).
FIG 3
5
3
10
6a
6b
12
FIG 4
7
Bekijk gratis de handleiding van Genesis GLAG2045B, stel vragen en lees de antwoorden op veelvoorkomende problemen, of gebruik onze assistent om sneller informatie in de handleiding te vinden of uitleg te krijgen over specifieke functies.
Productinformatie
| Merk | Genesis |
| Model | GLAG2045B |
| Categorie | Niet gecategoriseerd |
| Taal | Nederlands |
| Grootte | 5365 MB |


