Extron EBP 105P handleiding
Handleiding
Je bekijkt pagina 5 van 14
5
Product Category
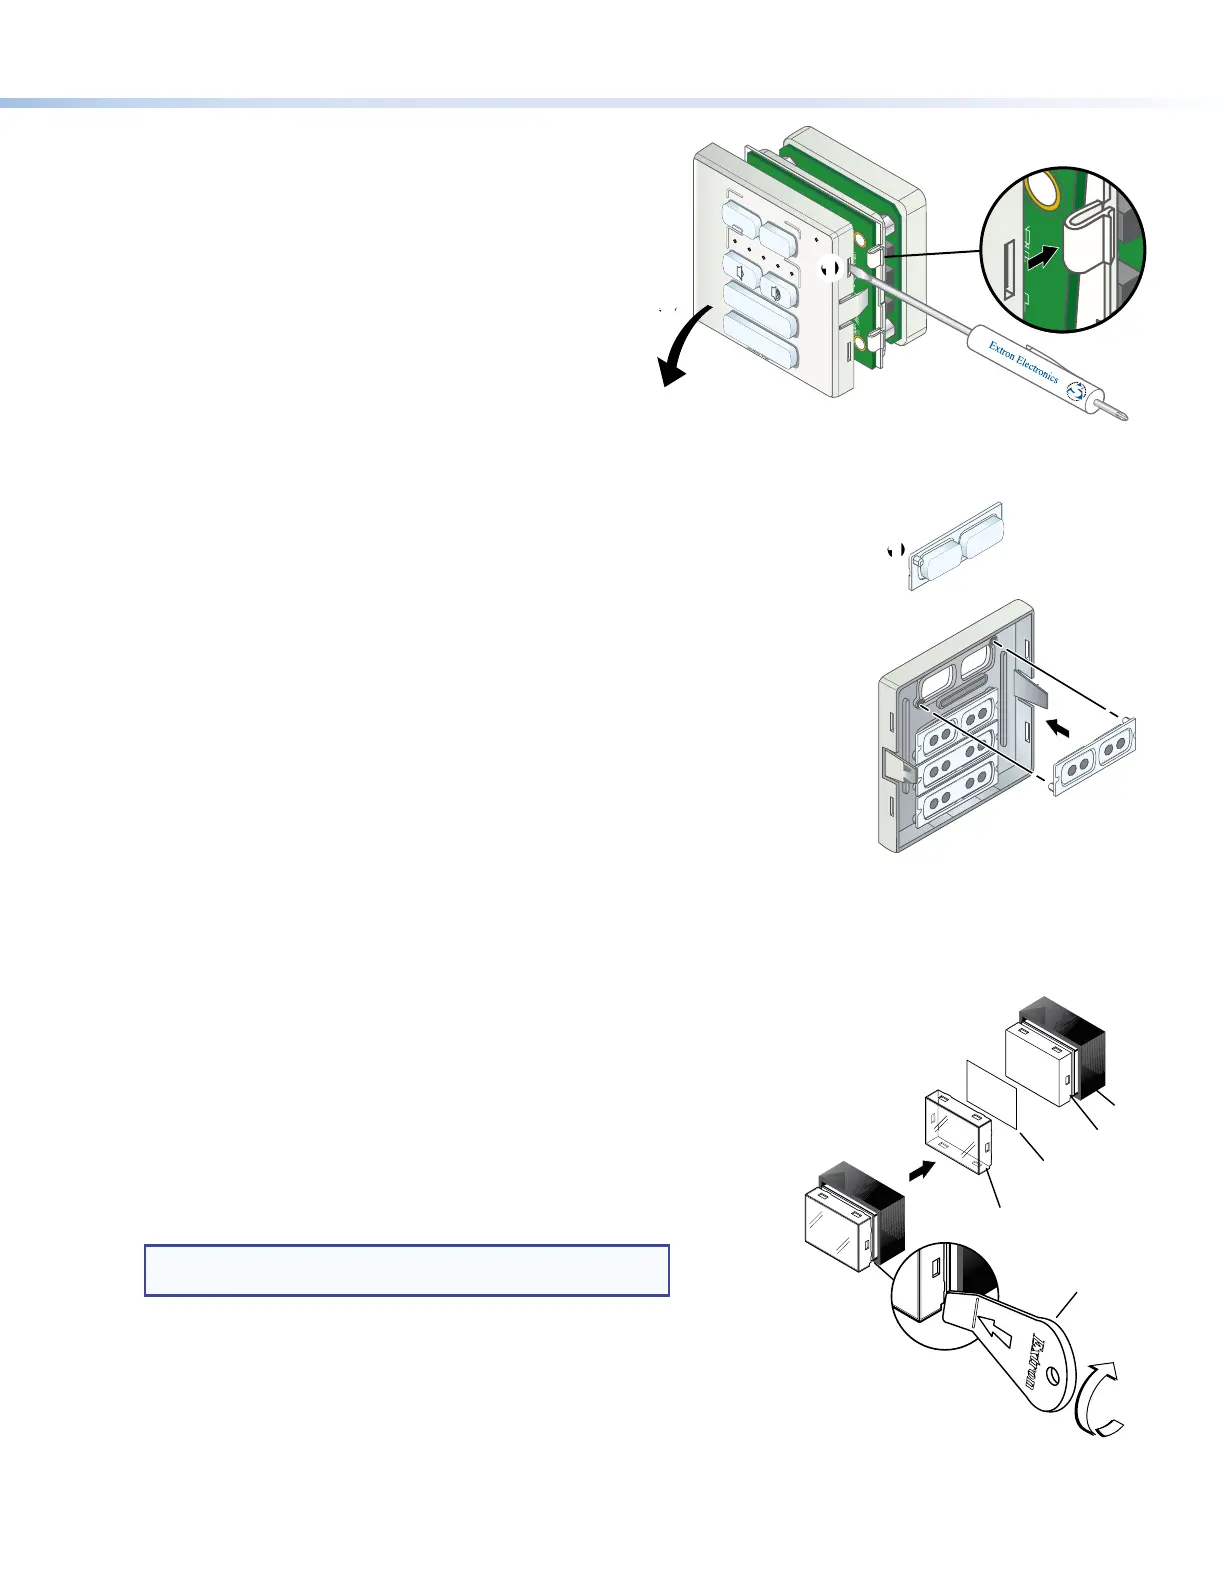
Replace buttons for all models (except EBP 104 EU and EBP 104 MK)
1. From the front of the bezel, press the button or button pair to be replaced backward
through its slots in the bezel until the membrane containing the button is free.
2. On the back of the bezel, insert the replacement button or button pair into the
appropriate slots. Ensure the text is in the correct orientation. Align the two pegs in
the button membrane (see gure 7,
1
) with the holes located at opposite corners of
the empty space in the faceplate.
3. Press the two buttons into the bezel until the pegs on the membrane are seated in
the corresponding holes.
4. Repeat steps 5 through 7 for any other buttons that you want to replace.
5. Align the button board with the bezel, and press it into place. The four tabs released
in steps 1 through 3 of the previous section snap back into place. Ensure the bezel
is in the correct orientation, reattach the frame, and press the bezel back into the
mounting bracket, using the two catches released in Remove the bezel (except the
EBP 104 EU and EBP 104 MK) on the previous page.
6. EBP VC1 EU and EBP VC1 MK only: Replace the rotary encoder knob by reversing
the procedure that was described in Remove the rotary encoder knob
(VC1 models only) on the previous page.
MUTE
LAPTOP
11
Figure 7. Replacing Buttons
Replace buttons for the EBP 104 EU and EBP 104 MK
You can replace one or more of the labels within the buttons. Some button labels ship with the unit. You
can create and print your own customized labels using Extron Button Label Generator software.
To change a label, follow these instructions.
1. Remove the bezel on the EBP 104 EU or EBP 104 MK as described on the previous
page.
2. Separate the button plate from the control plate.
3. Gently separate the button lens button cap from its white diffuser: insert the
end of the provided Extron removal tool into the corner notch and gently
twist the tool (see gure 8,
1
).
4. Remove the label insert from the button cap. software.
TIP: If the insert does not come out easily, use a piece of
sticky tape to pull it out of the button cap.
5. Select one of the button labels from the printed label sheets included
with the unit. Remove the label from its backing and remove the
clear, protective lm from the front of the label.
6. Insert the button label into the button cap (
2
).
7. Align the cap with the white diffuser and the panel opening, and
press the clear cap into place on the button.
8. Reattach the faceplate to the EBP as described in Mounting EBP EU
or EBP MK Devices to an Electrical Wall Box on page 12 or
Mounting EBP EU Devices in a Raceway on page 13.
TEXT
Separate the
two-piece button
here at the corner.
Diffuser
Base
Insert
button label.
Button
Lens Cap
Removal
Tool
1
2
Figure 8. Replacing Buttons on the EBP 104 EU
and EBP 104 MK
Separate the bezel from the button board
(all models)
1. Insert a small at-bladed screw driver into one
of the slots (see gure 6,
1
). There are two
slots on each side.
2. Press in the blade of the screw driver until the
tab is pushed out of the slot (there is an audible
click when this happens).
3. Repeat steps 1 and 2 to release all four tabs
holding the bezel to the button board.
4. Tilt the top of the bezel forward so the buttons
do not fall out as you remove it (
2
).
VOLUME
DISPLAY
OFF
ON
11
2
2
LAPTOP
VIDEO
Figure 6. Releasing the Button Plate
Bekijk gratis de handleiding van Extron EBP 105P, stel vragen en lees de antwoorden op veelvoorkomende problemen, of gebruik onze assistent om sneller informatie in de handleiding te vinden of uitleg te krijgen over specifieke functies.
Productinformatie
| Merk | Extron |
| Model | EBP 105P |
| Categorie | Niet gecategoriseerd |
| Taal | Nederlands |
| Grootte | 3602 MB |
Caratteristiche Prodotto
| Kleur van het product | Black, White |
| Gewicht | 100 g |
| Breedte | 81 mm |
| Diepte | 13 mm |
| Hoogte | 81 mm |


