Handleiding
Je bekijkt pagina 15 van 34
EN - 15
Changing injectors Hob
burners
•
Cut off the main gas supply and unplug
the appliance from the mains electrical
supply.
•
Remove the burner caps and the
adapters.
•
Use a 7 mm spanner to unscrew the
injectors.
• Replace the injector with the ones
from the gas conversion kit, with
the correct diameters for the type
of gas that is going to be used,
according to the gas injector table.
Adapter
Spanner
Adapter
Cup
Burner
cap
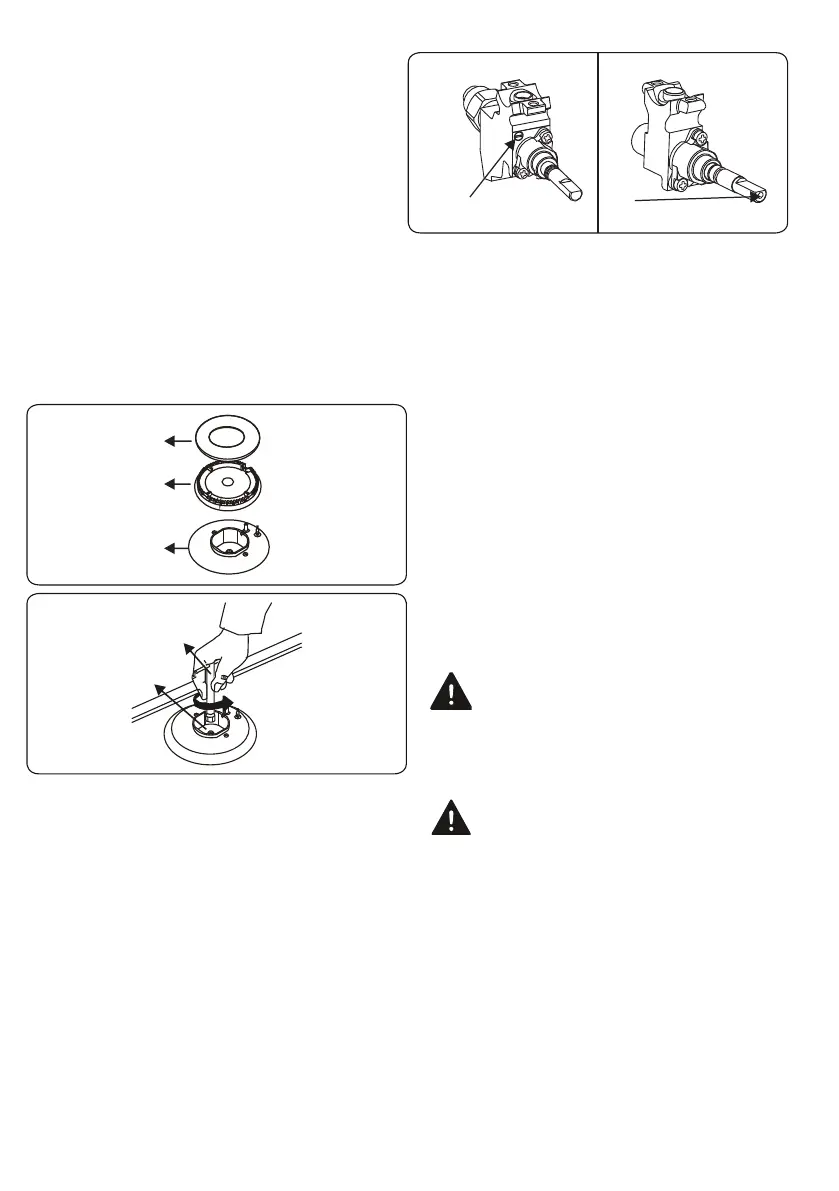
Adjusting the minimum flame position:
First of all, make sure that the appliance is
unplugged from the mains electrical supply and
that the gas feed is open. The minimum flame
position is adjus
ted with a flat screw located on
the valve. For valves with a flame failure safety
device, the screw is located on the side of the
valve spindle as shown in the figures. To make
adjusting the flame position easier, we
recommend that you remove the control panel
(and the micro switch if your model has one)
during the alteration. The bypass screw must
be loosened for conversion from LPG to NG.
For conversion from NG to LPG, the bypass
screw must be tightened.
Bypass screw
Screw(i
nside
the
hole)
Valve with flame failure
device
Valve with flame failure
device
Determini
ng the minimum flame position
T
o determine the minimum position, ignite the burners
and leave them on in the minimum position. Remove
the knobs because the screws are accessible only
when the knobs are removed. With the help of a small
screwdriver, fasten or loosen the bypass screw by
around 90 degrees. When the flame has a length of at
least 4mm, the gas is well distributed. Make sure that
the flame does not die out when passing from the
maximum position to the minimum position. Create an
artificial wind with your hand towards the flame to see
if the flames are stable.
Changing the gas inlet
For some countries, the gas inlet type
can be different for NG/LPG gases. In
this case, remove the current connection components
and nuts (if any) and connect the new gas supply
accordingly. In all conditions, all components used in
gas connections should be approved by local and/or
international authorities. In all gas connections, refer to
the “Assembly of gas supply and leakage check”
clause explained above.
2.5 Electrical Connection
and Safety (if available)
WARNING: The electrical connection of this
appliance should be carried out by a licensed
electrician
according to the instructions in this guide and in
compliance with the current local regulations.
WARNING: THE APPLIANCE MUST BE EARTHED.
• Before connecting the appliance
to the power supply, the voltage
rating of the appliance (stamped
on the appliance identification
plate) must be checked for
correspondence to the available
mains
supply voltage, and the
mains electric wiring should be
capable of handling the
appliance’s power rating (also
indicated on the identification
plate).
Bekijk gratis de handleiding van Euromaid EMFS60DODFSS, stel vragen en lees de antwoorden op veelvoorkomende problemen, of gebruik onze assistent om sneller informatie in de handleiding te vinden of uitleg te krijgen over specifieke functies.
Productinformatie
| Merk | Euromaid |
| Model | EMFS60DODFSS |
| Categorie | Oven |
| Taal | Nederlands |
| Grootte | 3342 MB |


