Definitive Technology Dymension Outdoor LS-6.1 handleiding
Handleiding
Je bekijkt pagina 4 van 33
3
English
IMPORTANT: To prevent potential damage to the amplifier caused by short circuiting of the speaker wires, do not
connect the speaker wires to the amplifier until after all speaker connections are made and secure.
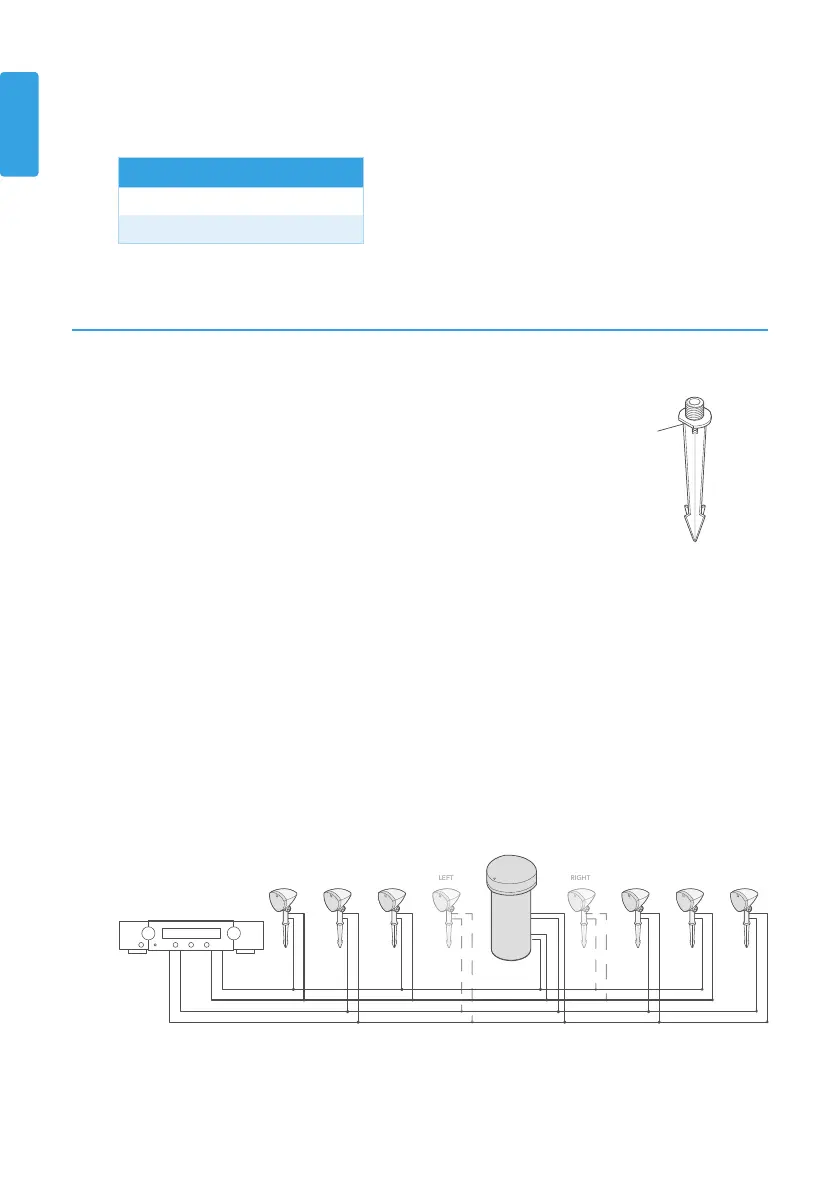
Figure 3
RIGHT RIGHT
LEFT / RIGHT
LEFT
RIGHTLEFT
LEFT LEFTRIGHT
_
+
_
+
RIGHT
LEFT
NOTE: Use only direct-burial wire to prevent corrosion and prolong signal integrity. Alternatively, low-voltage lighting
wire can be used, but note that it is only available as a 2-conductor wire. If using a 2-conductor wire, run two pairs of
wires: one for the left amplifier channel/speakers and one for the right. The included wire nuts can accommodate a wire
gauge of up to 14 AWG.
4. Choosing the Speaker Wire Type
We recommend using color-coded, 4-conductor direct-burial speaker wire, such as ‘14/4’ (14-gauge, 4-conductor). Refer
to the wiring chart below to determine the minimum required wire gauge for a given distance.
Wire Gauge Distance
16 AWG Up to 150' (45 meters)
14 AWG Up to 250' (80 meters)
Getting Started
1. Set the satellite speakers and subwoofer in the approximate mounting locations determined in section 3 “Planning
the Installation” on the previous page.
2. Using a rubber mallet, carefully pound the included satellite ground stakes into the ground at the predetermined
mounting locations. Note the flat indicator on the stake and ensure this indicator faces the desired speaker
direction (see Figure 2).
3. Screw the satellite speakers into the mounted ground stakes, ensuring they are pointed in the intended direction.
4. Dig a trench between the speaker locations for running the speaker wires. Be sure to follow local codes for
trenching limitations.
5. Run the speaker wire through the trench as described in the wiring instructions in section 6 “Installing the Satellite
Speakers” on the next page. We recommend leaving 14-16" of excess wire per speaker so that the wire doesn’t
kink or pull taut when covering the wire with dirt in the trench. Figure 3 shows the wiring of a complete system
using a stereo amplifier. Note that an additional pair of satellites can be purchased and installed for slightly larger
applications.
5. Preparing for Speaker Installation
Recommended Items
• Shovel
• Wire stripper that accommodates up to 14-gauge wire
• Round cable stripper or utility knife
• Speaker wire spool with sufficient speaker wire for the planned installation
• Wire/zip ties
• Electrical tape
• Rubber mallet
• Measuring tape
Figure 2
INDICATES
SPEAKER
DIRECTION
IMPORTANT: Connect the subwoofer only as shown. Do not connect the two subwoofer channels in parallel, as doing so
would cause the impedance to drop too low and potentially damage the amplifier/receiver.
Bekijk gratis de handleiding van Definitive Technology Dymension Outdoor LS-6.1, stel vragen en lees de antwoorden op veelvoorkomende problemen, of gebruik onze assistent om sneller informatie in de handleiding te vinden of uitleg te krijgen over specifieke functies.
Productinformatie
| Merk | Definitive Technology |
| Model | Dymension Outdoor LS-6.1 |
| Categorie | Speaker |
| Taal | Nederlands |
| Grootte | 4026 MB |


