Handleiding
Je bekijkt pagina 22 van 52
6 Configuration
Installation and operation manual
22
SERHQ020~032BAW1 + SEHVX20~64BAW
Split packaged air-cooled water chiller
4P508019-1D – 2019.11
Item Description
DIP switches ▪ DS1 (1): COOL/HEAT selector
▪ DS1 (2~4): NOT USED. DO NOT CHANGE
THE FACTORY SETTING.
▪ DS2 (1~4): NOT USED. DO NOT CHANGE
THE FACTORY SETTING.
▪ DS3 (1+2): NOT USED. DO NOT CHANGE
THE FACTORY SETTING.
Mode 1 and 2
Mode Description
Mode 1
(monitoring
settings)
Mode1 can be used to monitor the current
situation of the outdoor unit. Some field setting
contents can be monitored as well.
Mode 2
(field settings)
Mode2 is used to change the field settings of
the system. Consulting the current field setting
value and changing the current field setting
value is possible.
In general, normal operation can be resumed
without special intervention after changing field
settings.
Some field settings are used for special
operation (e.g., 1 time operation, recovery/
vacuuming setting, manual adding refrigerant
setting, etc.). In such a case, it is required to
abort the special operation before normal
operation can restart. It will be indicated in
below explanations.
To continue the configuration of the system, it is required to give
some input to the PCB of the unit. This chapter will describe how
manual input is possible by operating the pushbuttons/DIP switches
on the PCB and reading the feedback from the LEDs.
INFORMATION
If you get confused in the middle of the process, push BS1.
Then it returns to setting mode 1 (H1P is off).
6.1.2 Field setting components
The components to make field settings are as follows:
BS2
SET
BS1
MODE
BS3
RETURN
BS4
TEST
BS5
RESET
H7P
MODE
TEST:
L.N.O.P. DEMAND
C/H SELECT
HWL:
IND MASTER SLAVE
MULTI
H1P H2P H3P H4P H5P H6P H8P
H1P~H8P LEDs
BS1~BS5 Pushbuttons
DS1~DS3 DIP switches
ON (
) OFF ( ) Flashing ( )
Pushbuttons
Use the pushbuttons to make the field settings.
BS1 MODE: For changing the set mode
BS2 SET: For field setting
BS3 RETURN: For field setting
BS4 TEST: For test operation
BS5 RESET: For resetting the address when the wiring is
changed or when an additional indoor unit is installed
LEDs
The LEDs give feedback about the field settings, which are defined
as [Mode-Setting]=Value.
H1P Shows the mode
H2P~H7P Shows the settings and values, represented in binary code
H8P NOT used for field settings, but used during initialisation
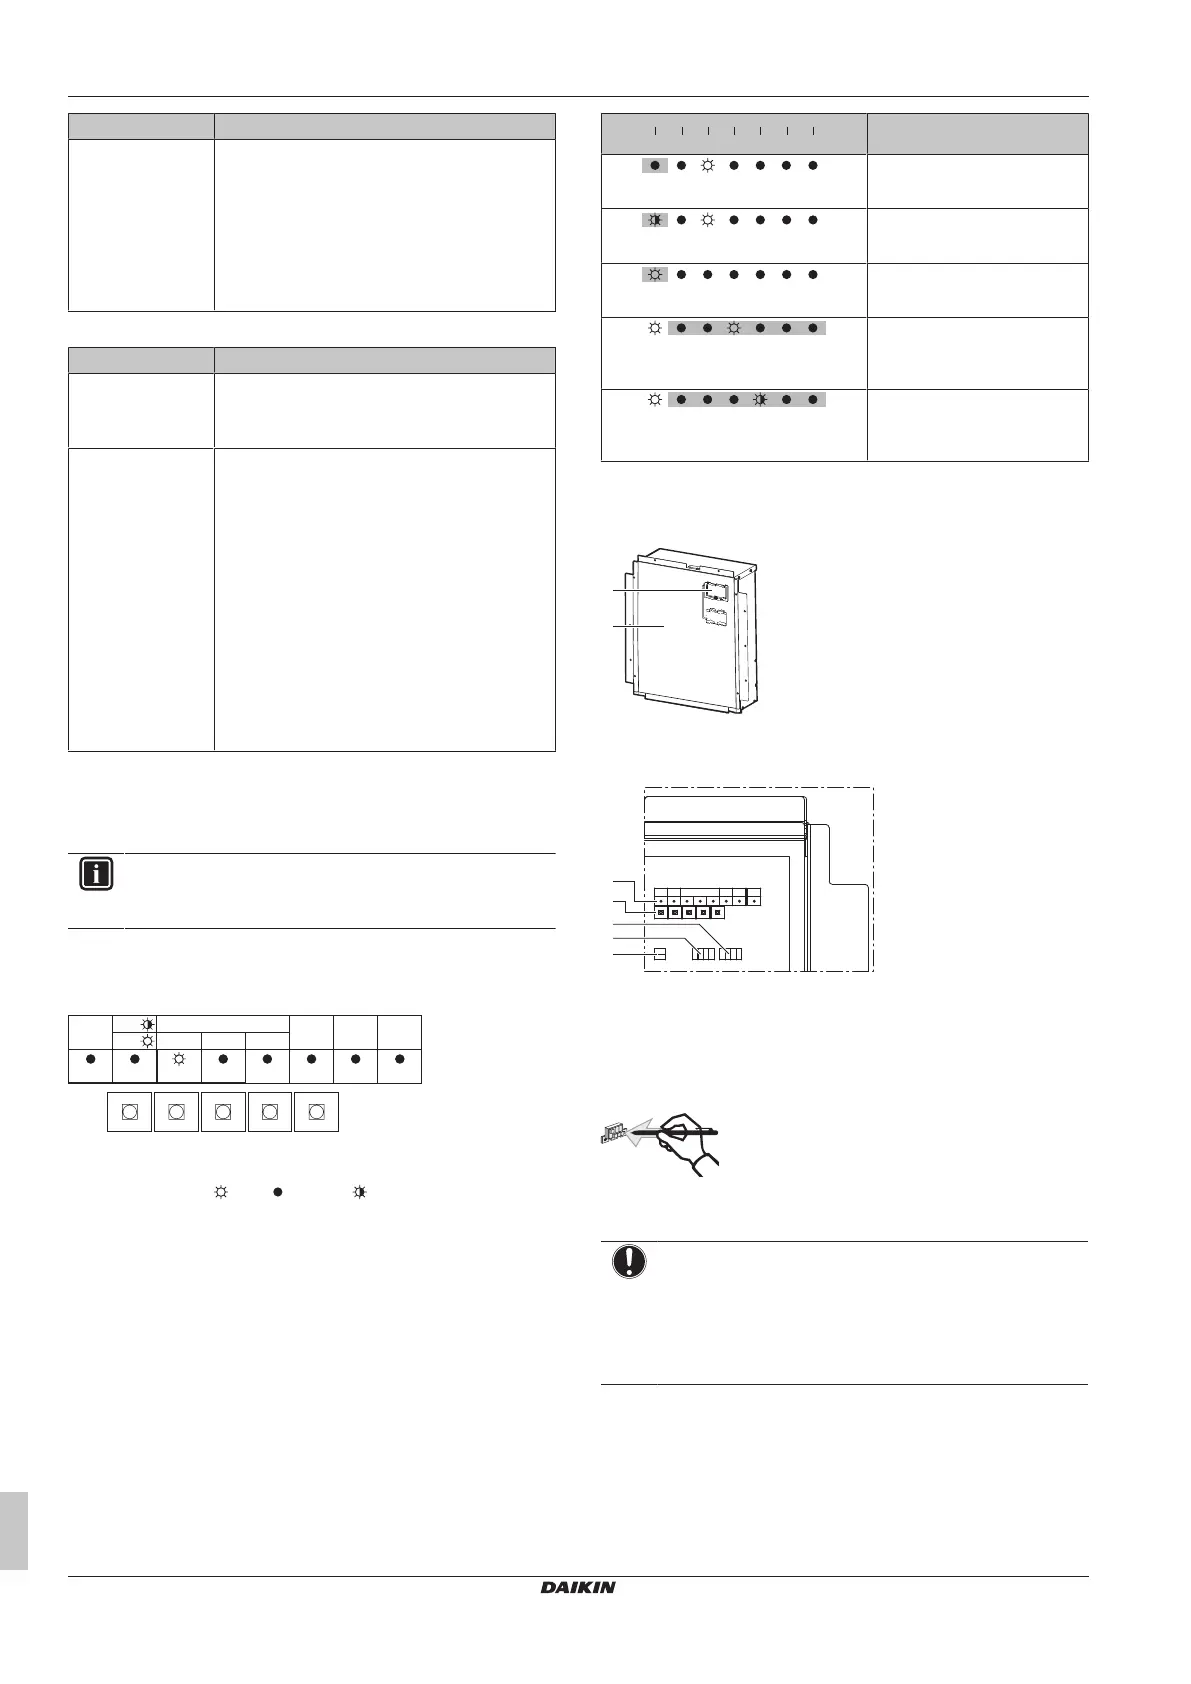
Example:
H1P
H2P H3P H4P H5P H6P H7P
- + + + + +
[
H1P
32 16 8 4 2 1]
Description
(H1P OFF)
Default situation
(H1P flashing)
Mode 1
(H1P ON)
Mode 2
+ + + + +0 0 8 0 0 0
(H2P~H7P = binary 8)
Setting 8
(in mode 2)
+ + + + +0 0 0 4 0 0
(H2P~H7P = binary 4)
Value 4
(in mode 2)
6.1.3 To access the field setting components
Remove the inspection cover to carry out field settings.
b
a
a Inspection cover
b Switch box cover
You can see the 5 pushbuttons, 8 LEDs and 3 DIP switches.
a
b
d
c
e
a H1P~H8P LEDs
b BS1~BS5 pushbuttons
c DS1 DIP switch 1
d DS2 DIP switch 2
e DS3 DIP switch 3
Operate the switches and pushbuttons with an insulated stick (such
as a closed ball-point pen) to avoid touching of live parts.
Make sure to re-attach the inspection cover into the electrical
component box cover after the job is finished.
NOTICE
Make sure that all outside panels, except for the service
cover on the electrical component box, are closed while
working.
Close the lid of the electrical component box firmly before
turning on the power.
6.1.4 To access mode 1 or 2
After the unit is turned ON, the display goes to its default situation.
From there, you can access mode1 and mode2.
Bekijk gratis de handleiding van Daikin SEHVX40BAW, stel vragen en lees de antwoorden op veelvoorkomende problemen, of gebruik onze assistent om sneller informatie in de handleiding te vinden of uitleg te krijgen over specifieke functies.
Productinformatie
| Merk | Daikin |
| Model | SEHVX40BAW |
| Categorie | Airco |
| Taal | Nederlands |
| Grootte | 8378 MB |


