Handleiding
Je bekijkt pagina 32 van 48
15 Electrical installation
Installation and operation manual
32
BS4~12A14AJV1B9
VRV 5 branch selector unit
4P797565-1 – 2024.11
b
a
Ø
6.35
mm
Ø
9.5
mm
Ø
12.7
mm
Ø
15.9
mm
Ø
9.5
mm
a Liquid branch pipe
b Gas branch pipe
3 Connect the branch pipes. The liquid and gas branch pipe
diameters to be used depend on the connected indoor unit
capacity class. For information on which branch pipes to
connect, see "To set the DIP switches when joining branch pipe
ports"[435].
4 Install stopper pipes (accessory) for unused header pipes
(when the BS unit is not connected in refrigerant flow-through
with another BS unit) and unused branch pipes (when no indoor
unit is connected to that branch pipe port).
14.3.2 Joining branch pipe ports
To make a connection with e.g. FXMA200A and FXMA250A, join
branches with joint kit EKBSJK. Only the following combinations are
possible. E.g.: it is not possible to join ports B and C.
Model Possible port combinations
BS4A A+B C+D
BS6A E+F
BS8A G+H
BS10A I+J
BS12A K+L
Note: When using the joint kit, change the DIP switch settings. See
"15.4To set the DIP switches"[435].
14.4 To insulate the refrigerant piping
After finishing the leak test and vacuum drying, the piping must be
insulated. Take into account the following points:
To insulate stopper pipes
In case of stopper pipes: install stopper pipe insulation tubes
(accessory). Adding additional insulation might be required
depending on the ambient conditions. Follow the rules for the total
minimum insulation thickness.
1 Attach an insulation tube against the tube on the BS unit.
2 Apply a tape to close the seam so that air does not enter.
c
e
f
b
da
a Insulation tube (accessory)
b Cut surface (branch pipes only)
c Tape (field supply)
d Insulation tube (attached to the BS unit)
e BS unit
f Adherence surface
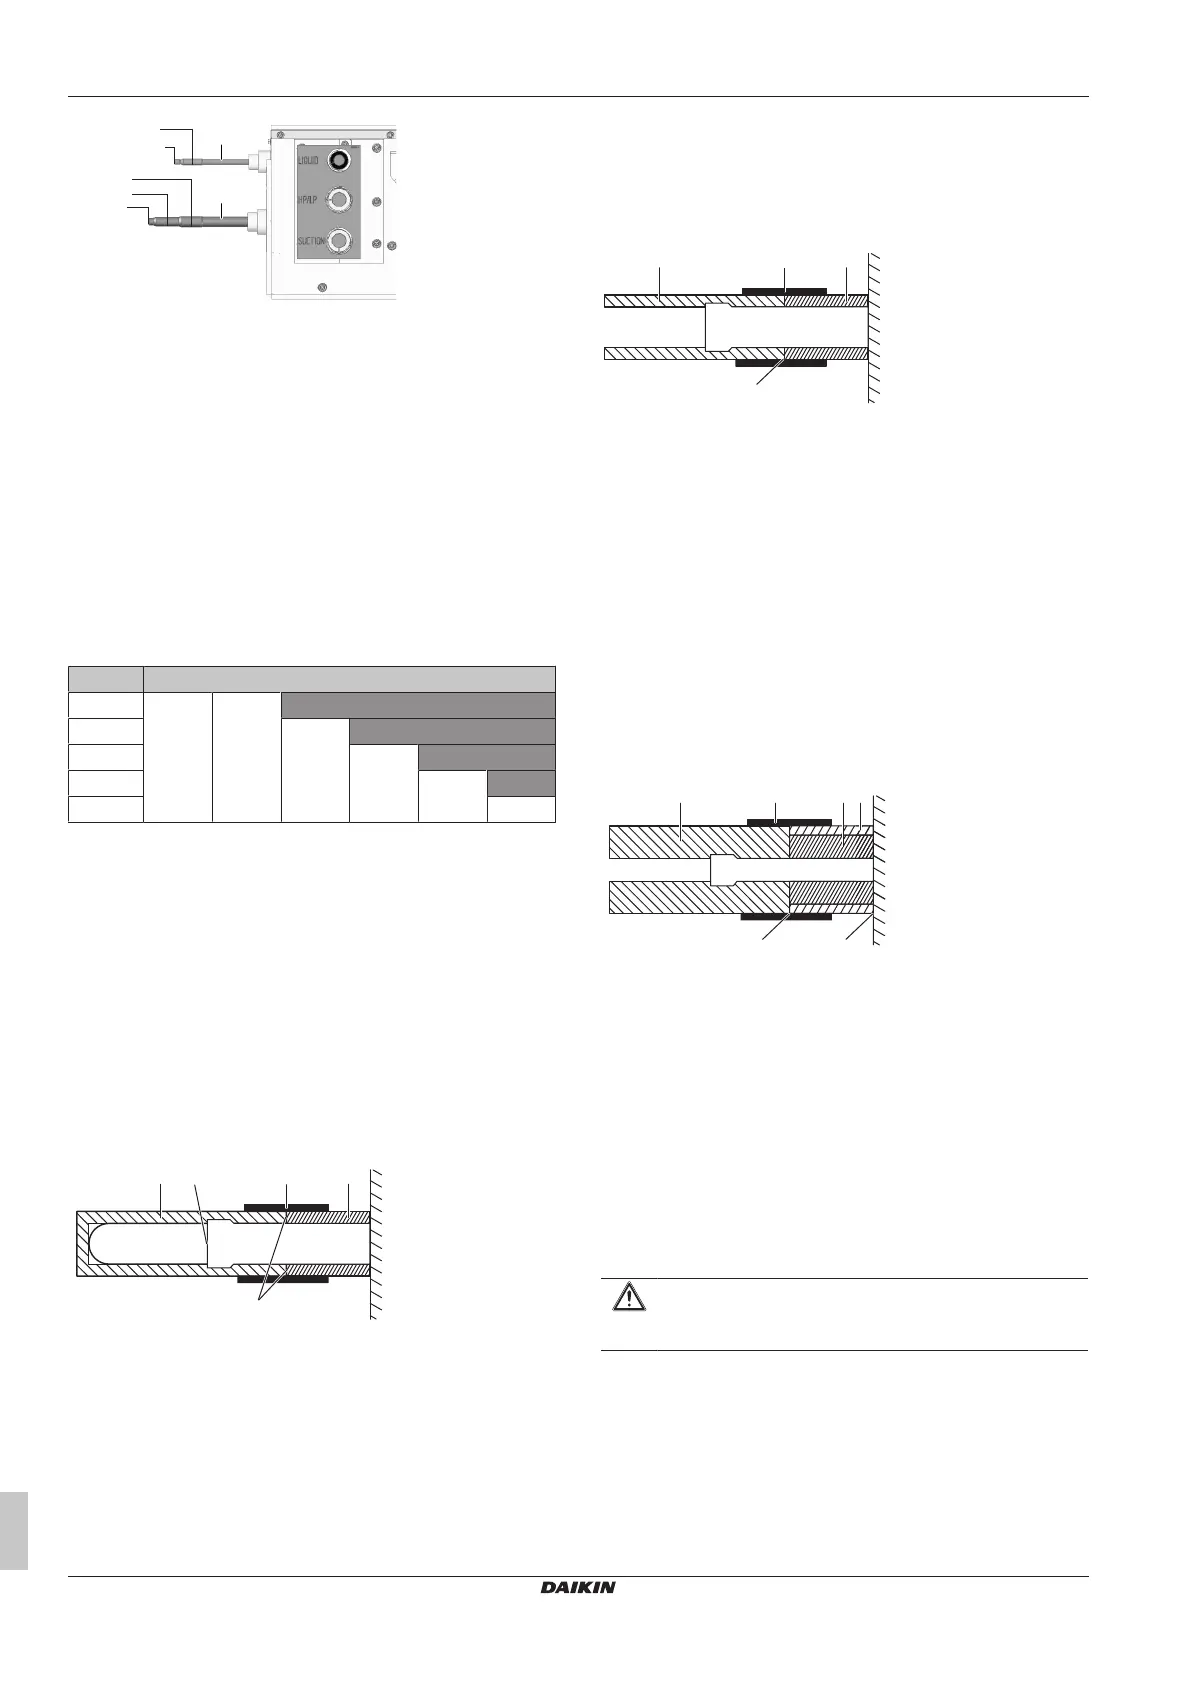
To insulate the header and branch pipes (standard insulation)
The header pipes and branch pipes MUST be insulated (field
supply). Make sure that the insulation is properly mounted over the
header and branch pipes of the unit as shown in the image below.
Always use tape (field supply) to prevent air gaps in the seam
between the insulation tubes.
b
e
ca
d
a Insulation tube (field supply)
b Tape (field supply)
c Insulation tube (BS unit)
d Adherence surface
e BS unit
1 Install an insulation tube (a) over the pipe and against the
insulation tube (c) on the BS unit.
2 Apply tape (b) to close the seam.
To insulate the header and branch pipes (extra insulation)
Depending on ambient conditions (see "14.2.3 Refrigerant piping
insulation"[431]), it can be required to add extra insulation material.
Make sure that the insulation is properly mounted over the header
and branch pipes of the unit as shown in the image below. In order
to level out the difference in thickness, an extra insulation tube must
be installed over the insulation tube coming out of the unit. Always
use tape (field supply) to prevent air gaps in the seam between the
insulation tubes.
e
dd
a b c f
a Insulation tube (extra thick)(field supply)
b Tape (field supply)
c Insulation tube (BS unit)
d Adherence surface
e BS unit
f Insulation tube for levelling out thickness (field supply)
1 Install an insulation tube (a) over the pipe and against the
insulation tube (c) on the BS unit.
2 Attach an extra layer of insulation tube (f) to level out the
thickness.
3 Apply tape (b) to close the seam.
15 Electrical installation
CAUTION
See "2 Specific installer safety instructions" [44] to make
sure this installation complies with all safety regulations.
Bekijk gratis de handleiding van Daikin BS8A14AJV1B9, stel vragen en lees de antwoorden op veelvoorkomende problemen, of gebruik onze assistent om sneller informatie in de handleiding te vinden of uitleg te krijgen over specifieke functies.
Productinformatie
| Merk | Daikin |
| Model | BS8A14AJV1B9 |
| Categorie | Airco |
| Taal | Nederlands |
| Grootte | 8827 MB |


