CYP PUV-1550STX handleiding
Handleiding
Je bekijkt pagina 12 van 40
12
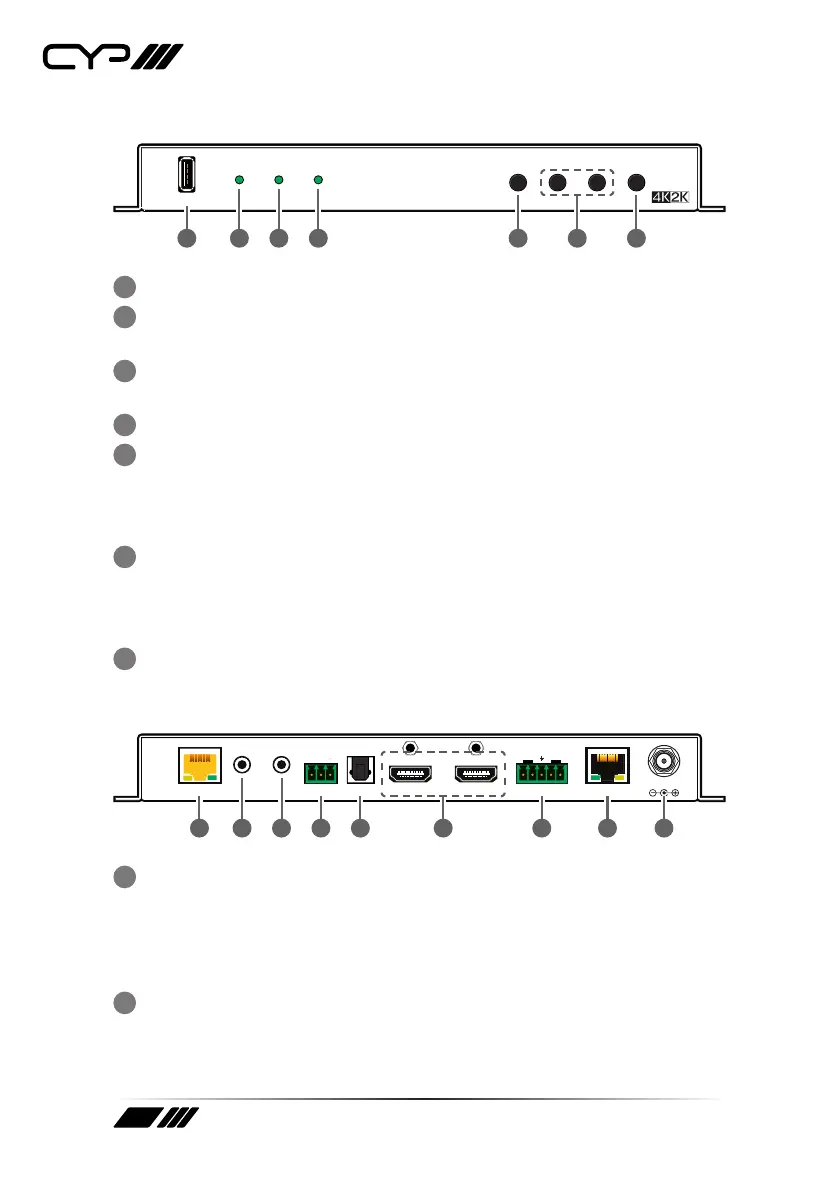
6.3 Receiver Front Panel
POWER 4K2K SYNC MENU ENTER
TEST PATTERN
-
+
SERVICE
PUV-1550S-RX
1 2 3 4 5 6 7
1
SERVICE: This slot is reserved for rmware update use only.
2
POWER: This LED will illuminate to indicate the unit is on and
receiving power.
3
4K2K: This LED will illuminate to indicate the input source contains a
4K UHD signal.
4
SYNC: This LED will illuminate when a live input source is detected.
5
MENU: Press to enter the OSD menu, or to back out from menu items.
Once within the OSD press this button a second time to exit. Press and
hold this button together with the “-” button for 3 seconds to reset the
unit back to factory defaults.
6
DOWN & UP/TEST PATTERN: When the OSD menu is in use, press
these buttons to move within the menu. Outside of the OSD,
press these buttons together to instantly set the output timing to
1280×720@60Hz and display test patterns on both outputs.
7
ENTER: Press to conrm a selection or to go deeper into a menu item.
6.4 Receiver Rear Panel
DC 5V
LANAUDIO OUT
L
R
+ −
+ −
BAHDMI OUTOPT IN
RS232
RX TX
CAT5e/6/7 IN
IR OUT
IR IN
1 2 3 4 5 6 7 8 9
1
CAT5e/6/7 IN: Connect to a compatible Transmitter unit with a single
Cat.5e/6/7 cable for transmission of all data signals. The yellow LED
will illuminate to indicate a successful data connection between the
Transmitter and Receiver. The green LED will illuminate to indicate
when PoH is active.
2
IR IN: Connect to the provided IR Extender to extend the IR control
range of remotely located devices. Ensure that the remote being used
is within direct line-of-sight of the IR Extender.
Bekijk gratis de handleiding van CYP PUV-1550STX, stel vragen en lees de antwoorden op veelvoorkomende problemen, of gebruik onze assistent om sneller informatie in de handleiding te vinden of uitleg te krijgen over specifieke functies.
Productinformatie
| Merk | CYP |
| Model | PUV-1550STX |
| Categorie | Niet gecategoriseerd |
| Taal | Nederlands |
| Grootte | 2707 MB |


