Concept Aquaglide VP4220 handleiding
Handleiding
Je bekijkt pagina 27 van 51
52 53
ENEN
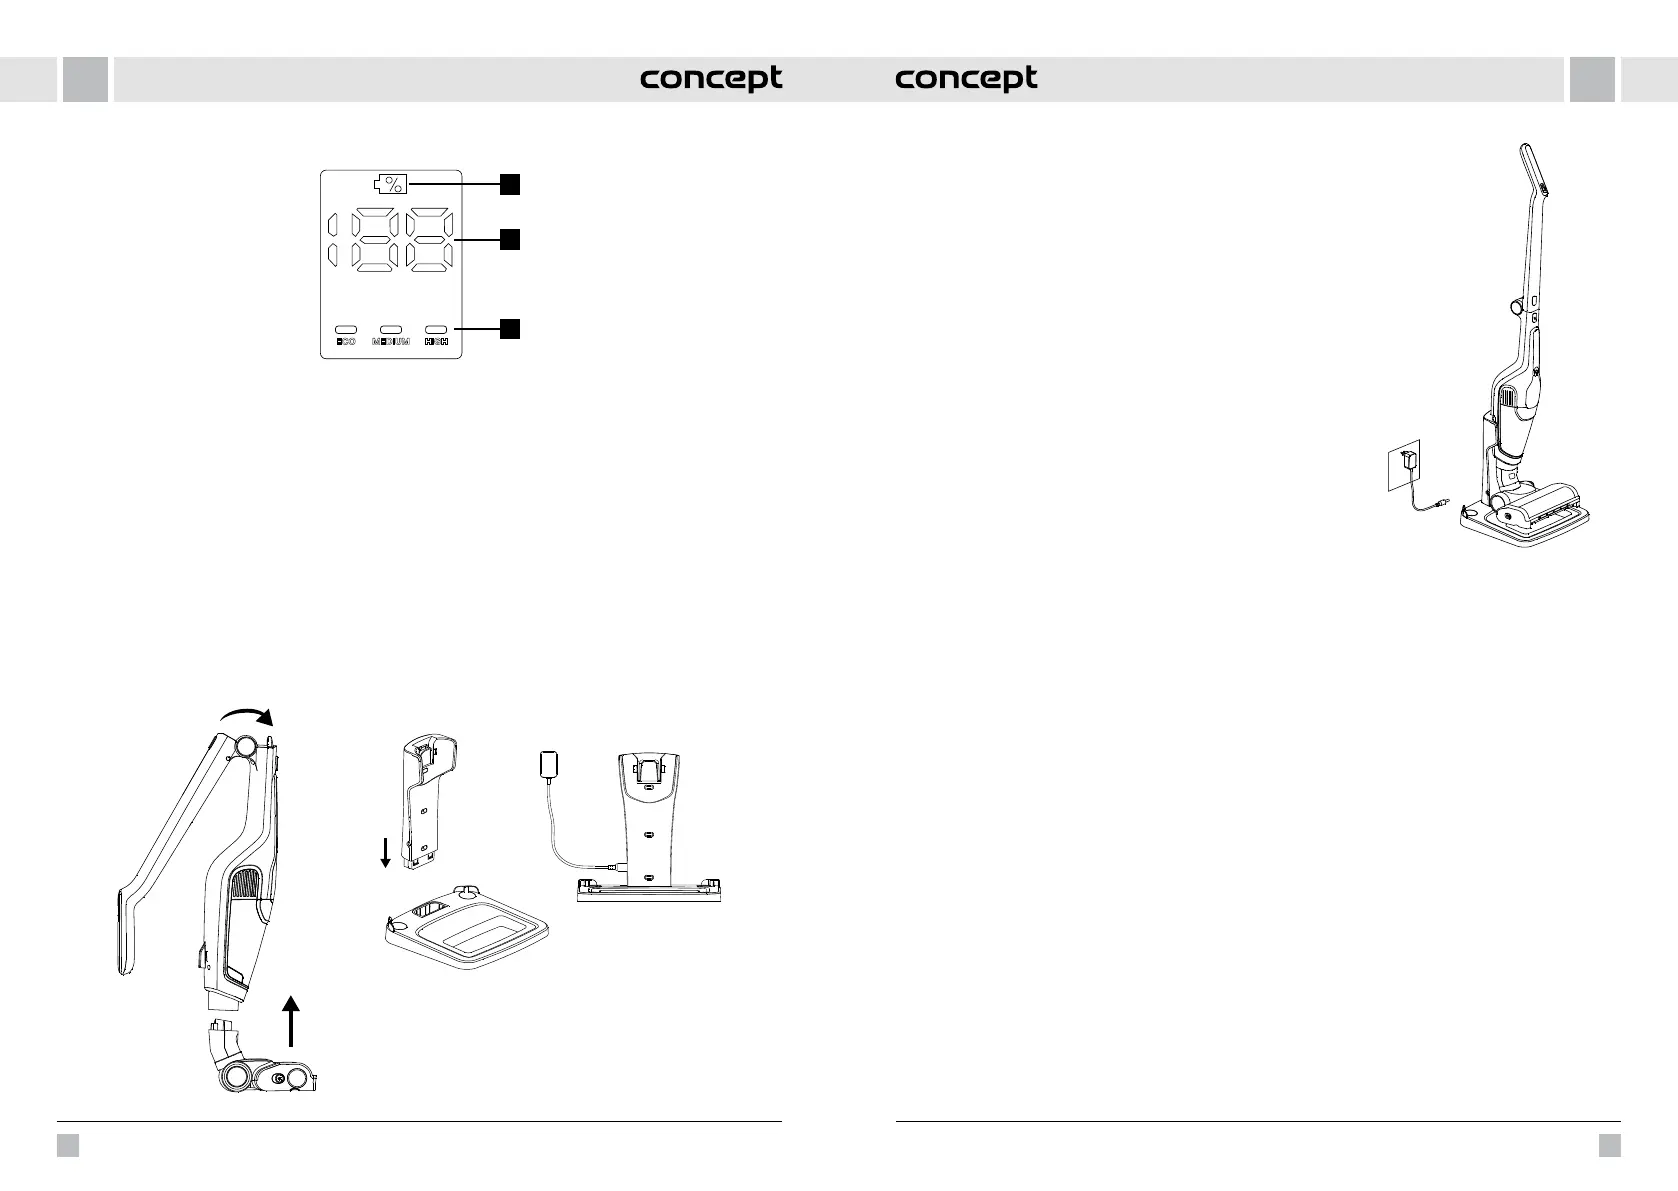
DISPLAY DESCRIPTION
1 Battery indicator
2 Battery status in %
3 Power (Low, Medium, High)
INSTRUCTIONS FOR USE
ASSEMBLING THE APPLIANCE
Before using the appliance for the first time, remove all packaging materials and stickers from the appliance.
Select the appropriate accessories according to the desired use (handheld vacuum cleaner / stick vacuum cleaner /
wiping).
1. Insert the turbo brush into the stick part of the vacuum cleaner, you will hear a click. To remove the turbo brush from
the pole section, press the release button and pull to disengage.
2. To fold the handle, press the button to fold the handle. If you raise the handle to the upright position, it will
automatically it will automatically snap into position.
3. Slide the top of the charging base into the base and place on a flat surface.
4. Use screws and dowels to secure the base to the wall. Before mounting, make sure that the electrical outlet will be
close enough to the charging base to be attached.
5. To charge the appliance, plug the charging adapter into the hole on the left side of the charging base and then plug
the charging adapter into a mains socket.
1
2
3
CHARGING THE APPLIANCE
1. Insert the hand-held vacuum cleaner into the rod vacuum cleaner.
Make sure the vacuum cleaner is switched off.
2. Place the rod vacuum cleaner into the charging base. Ensure that the
charging base is placed on a level and stable surface. Make sure there is no
dust between the hand-held vacuum cleaner and the rod vacuum cleaner.
If necessary, clean the contacts.
3. Plug the charging adapter into the hole on the left side of the
charging base, then plug the charging adapter into a mains socket.
During charging, the battery indicator flashes slowly on the display and the
battery level is shown in %. After the battery is fully charged, the display will
go out after approximately 1 minute. When charging, it is normal to heat up
the stick vacuum cleaner or charging base.
4. When charging is complete, disconnect the adapter from the mains.
Note: Even if the rod vacuum cleaner is on, if it is placed in the charging base, it
automatically shuts off. While the rod vacuum cleaner is charging, the vacuum
cleaner has a current protection element. Even if you press the power button,
the appliance will remain switched off.
Battery care
To prolong the life of the vacuum cleaner battery, follow these instructions:
Do not leave the vacuum cleaner fully charged or completely discharged for a long time.
After a long vacuuming session, the battery may be too hot to charge. Allow the battery to cool down before charging.
Do not let the vacuum cleaner to be completely discharged.
It is ideal to keep the capacity of the battery between 20 % - 80 %.
USE
OPERATION OF THE ROD VACUUM CLEANER
1. Press the on/off button and switch on the stick vacuum cleaner.
2. When switched on, the stick vacuum cleaner will automatically start in medium gear.
3. Use the power button to change the suction power. The individual power levels appear on the display.
4. During operation, the LED light on the rotary brush head lights up.
5. If L0 starts flashing on the display during operation, charge the appliance.
6. If the brush becomes blocked during vacuuming, switch off the vacuum cleaner and remove the dirt.
7. If the appliance is standing upright on the floor, always switch off the stick vacuum cleaner as the bristles could
damage the floor or carpet.
8. Press the on/off button again to switch the vacuum cleaner off.
9. After use, check for dirt on the brush, remove it if necessary and return the vacuum cleaner to its stand.
Accessories
The mopping module is designed for mopping all types of hard floors.
1. Stick the cleaning cloth on the bottom of the wiper module.
2. Open the cap of the filling hole, fill the wiping module with water and secure with the cap. Do not add any cleaning
agent to the tank!
3. Place the wiper module on the floor nozzle.
Note: The wiping module can be used with the vacuum cleaner on or off. Water flows out of the holes at the bottom
of the tank automatically when the nozzle is moved back and forth.
Bekijk gratis de handleiding van Concept Aquaglide VP4220, stel vragen en lees de antwoorden op veelvoorkomende problemen, of gebruik onze assistent om sneller informatie in de handleiding te vinden of uitleg te krijgen over specifieke functies.
Productinformatie
| Merk | Concept |
| Model | Aquaglide VP4220 |
| Categorie | Stofzuiger |
| Taal | Nederlands |
| Grootte | 6034 MB |


