Bosch GRT 18V-40 Professional handleiding
Handleiding
Je bekijkt pagina 38 van 323
38 | English
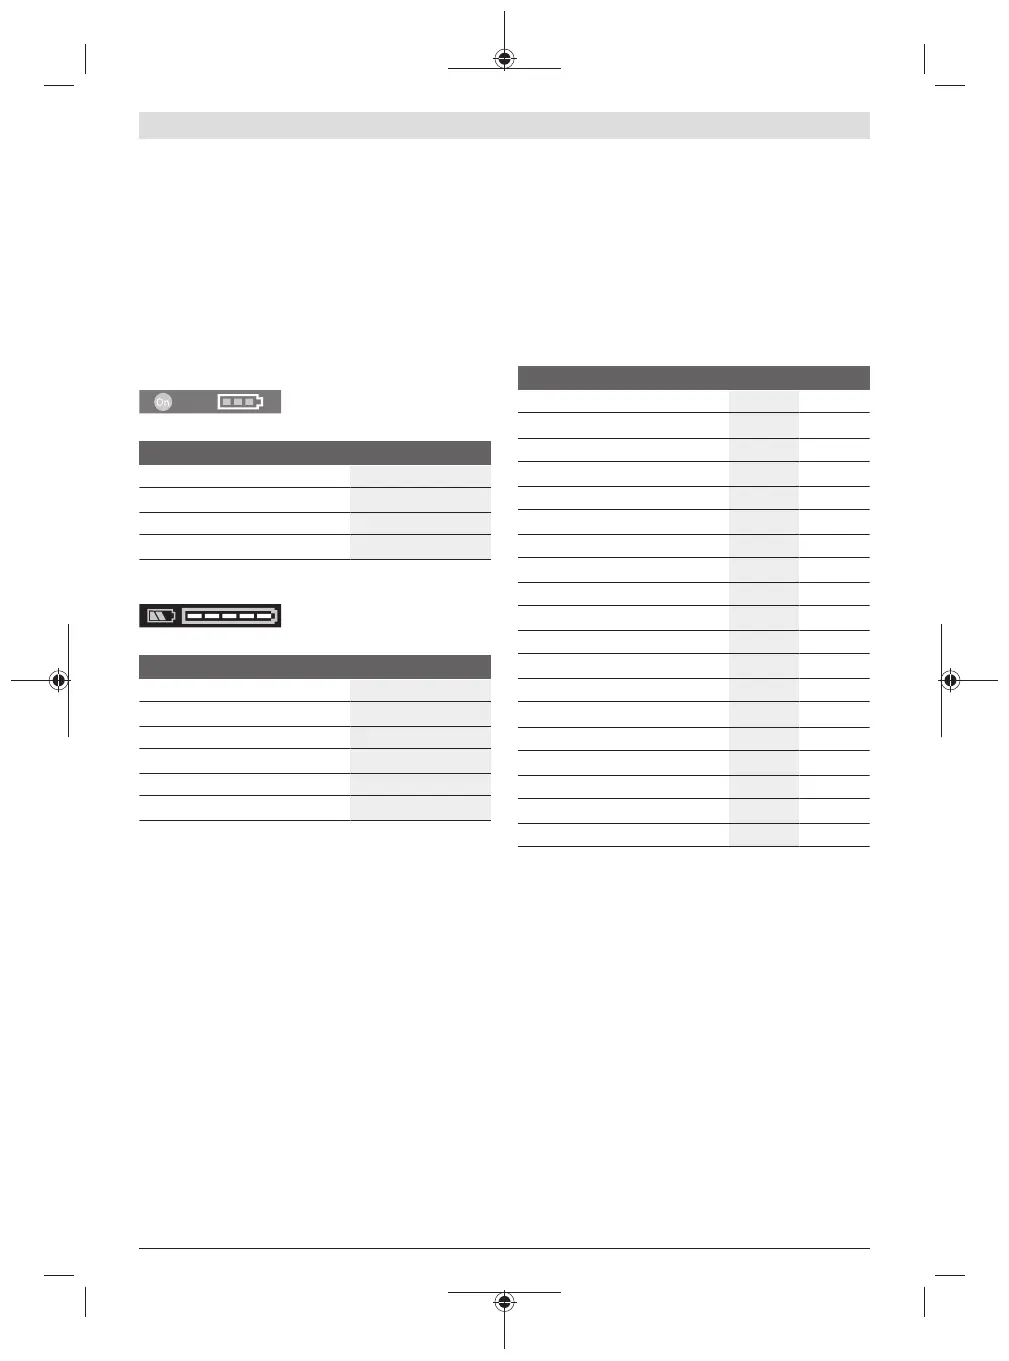
Battery charge indicator
The green LEDs on the battery charge indicator indicate the
state of charge of the battery. For safety reasons, it is only
possible to check the state of charge when the power tool is
not in operation.
Press the button for the battery charge indicator or to show
the state of charge. This is also possible when the battery is
removed.
If no LED lights up after pressing the button for the battery
charge indicator, then the battery is defective and must be
replaced.
Battery model GBA 18V...
LED Capacity
3× continuous green light 60–100%
2× continuous green light 30–60%
1× continuous green light 5–30%
1× flashing green light 0–5%
Battery model ProCORE18V...
LED Capacity
5 × continuous green light 80–100%
4 × continuous green light 60–80%
3 × continuous green light 40–60%
2 × continuous green light 20–40%
1 × continuous green light 5–20%
1 × flashing green light 0–5%
Recommendations for Optimal Handling of the
Battery
Protect the battery against moisture and water.
Only store the battery within a temperature range of −20 to
50°C. Do not leave the battery in your car in the summer, for
example.
Occasionally clean the ventilation slots on the battery using a
soft brush that is clean and dry.
A significantly reduced operating time after charging indic-
ates that the battery has deteriorated and must be replaced.
Follow the instructions on correct disposal.
Battery Maintenance
Use the following procedures to enable optimum usage of
the battery:
– Protect the battery against moisture and water.
– Store the machine and battery only within a temperature
range between –20°C and 50°C . As an example, do not
leave the battery in the car in summer.
– The battery must not be stored within the product but
stored separately.
– Do not leave the battery in the product in direct sunlight.
– The ideal storage condition for the battery is 5°C.
– Occasionally clean the venting slots of the battery using a
soft, clean and dry brush.
A significantly reduced working period after charging indic-
ates that the battery is used and must be replaced.
Mounting and Operation
Action Figure Page
Product Features
A
3
Delivery scope
B
4
Connecting the shaft
C
4
Mounting the protection guard
D
5
Mounting the plant protector
E
5
Mounting and adjusting the handle
F – H
6 – 8
Mounting the carrying strap
I
8
Battery charging and inserting
J
9
Switching trimming on/off
K
9
Switching trimming edges on/off
L
10
Mounting the cutting line
M
11
Line feeding
N
12
Anti-tangle
O
13
Removing the spool
P
14
Mounting the blade
Q
15 − 16
Working advice
R − V
17 – 19
Storage
W
19
Maintenance
X − Y
20
Accessories
Z
21
Pro-Tap
Lightly tap the spool on the ground for system to release the
line on each side.
If the line is broken near the insertion eyelet, continue tap-
ping several times to be able to cut with the full diameter of
40cm.
EasyWind (see figureN)
The EasyWind winding device allows the spool line to be in-
serted without having to take the spool apart.
If the spool line needs to be reloaded:
– Cut 3m from the line (accessory).
– Align the arrows on the spool in a way that they point to
the Pro-Tap button(14).
– Insert the spool line into the eyelet marked "Insert line"
and pull it through on the other side. The line should be
the same length on both sides.
F 016 L94 625 | (12.11.2024) Bosch Power Tools
Bekijk gratis de handleiding van Bosch GRT 18V-40 Professional, stel vragen en lees de antwoorden op veelvoorkomende problemen, of gebruik onze assistent om sneller informatie in de handleiding te vinden of uitleg te krijgen over specifieke functies.
Productinformatie
| Merk | Bosch |
| Model | GRT 18V-40 Professional |
| Categorie | Niet gecategoriseerd |
| Taal | Nederlands |
| Grootte | 43929 MB |


