Biltema 84-0058 handleiding
Handleiding
Je bekijkt pagina 9 van 24
Art. 84-0058
9
© 2024-10-17 Biltema Nordic Services AB
NO
• Støvsugeren skal IKKE brukes til å suge
opp fi nt støv fra for eksempel gips,
betong eller aske. Det fi ne støvet kan
skade motoren, og eventuelle skader
dekkes ikke av garantien.
• Støvsugeren må ikke brukes i rom med
høy luftfuktighet!
• Ikke støvsug uten fi lter i støvsugeren!
• Ikke støvsug hår, klær eller kroppsdeler!
• Hold støvsugeren unna varmekilder som
varmeovner, komfyrer med mer!
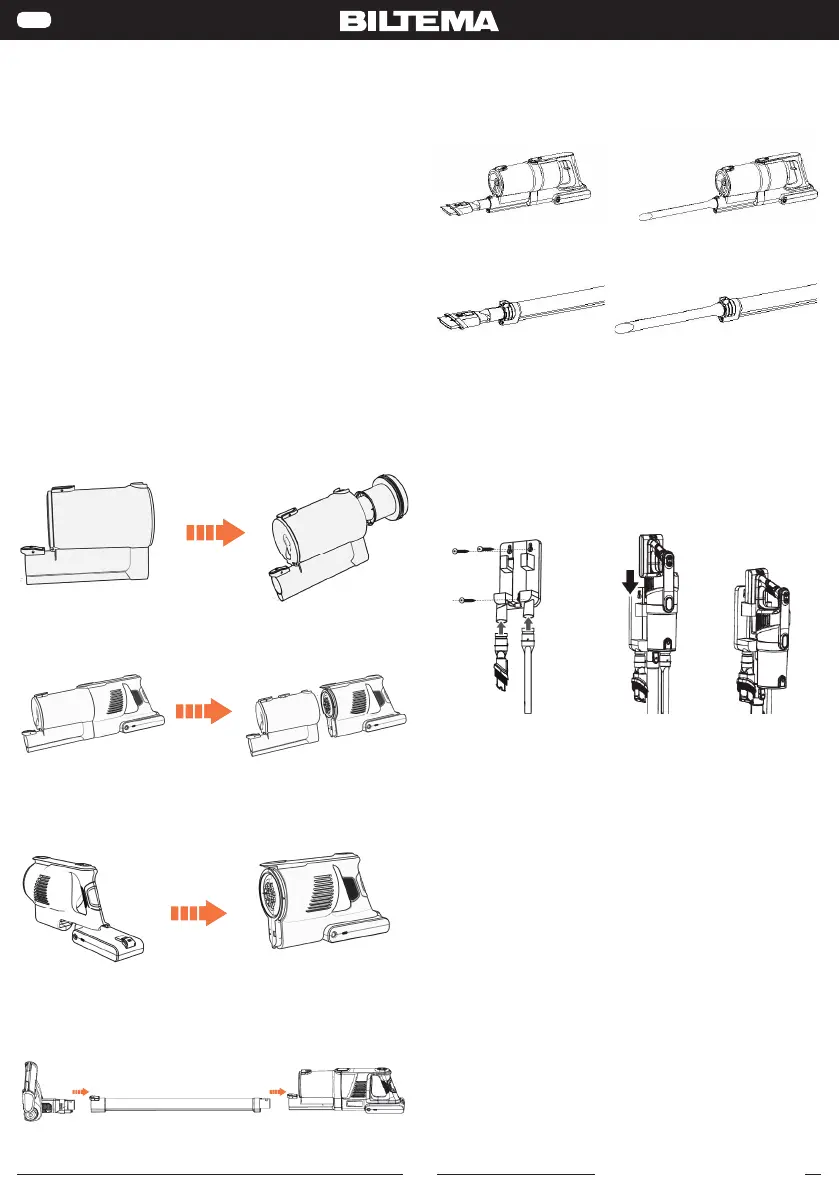
7. MONTERING
Sett syklonen og HEPA- lteret i støvbeholderen. Sørg
for at sporene i syklonen står på linje med taggene i
støvbeholderen.
▋Packing Details
Dust cup
motor
assembly
Battery
pack
Conductive
tube
Electric
floor brush
Accessories
Suction
head
1 1 1 1 2
Charger Hanger
Iinstructions
Certificate
of
conformity
——
1 1 1 1 ——
▋Installation of components
·Installation of dust cup assembly
Screw the inner cone of the cyclone cone into the outer cone in the direction of the
arrow, and then install the cyclone cone and HEPA into the dust cup (rotate the
Monter støvsugermotoren på støvbeholderen. Fell
inn motoren fra undersiden, og trykk sammen til du
hører et klikk.
·The connection between the dust cup assembly and the motor assembly
Align the lower edge bayonet slot of the dust cup assembly with the lower edge
bayonet of the motor assembly and sleeve it tightly, and then you can hear the
"click" lock sound of the dust cup release button. (As shown below)
· Connection of dust cup motor assembly and battery pack assembly
Aim the front end of the battery pack at the groove at the lower part behind the dust cup motor
assembly, and then keep the battery pack parallel to the lower part of the dust cup motor
assembly. Insert the pin at the upper end of the battery pack into the groove at the lower part
behind the dust cup motor assembly and push it flat forward. The lock sound of the release
button of the battery pack can be heard.(as shown below)
· Connection of electric ground brush, conductive tube and body components
Connect the electric brush: insert one end of the electric brush into one end of the
conductive tube, and then insert the other end of the conductive tube into the host
interface, and then hear the locking sound of the "cut".(as shown below)
Monter batteripakken på motoren. Sett batteriet på
linje med motoren, og trykk sammen til du hører et
klikk.
·The connection between the dust cup assembly and the motor assembly
Align the lower edge bayonet slot of the dust cup assembly with the lower edge
bayonet of the motor assembly and sleeve it tightly, and then you can hear the
"click" lock sound of the dust cup release button. (As shown below)
· Connection of dust cup motor assembly and battery pack assembly
Aim the front end of the battery pack at the groove at the lower part behind the dust cup motor
assembly, and then keep the battery pack parallel to the lower part of the dust cup motor
assembly. Insert the pin at the upper end of the battery pack into the groove at the lower part
behind the dust cup motor assembly and push it flat forward. The lock sound of the release
button of the battery pack can be heard.(as shown below)
· Connection of electric ground brush, conductive tube and body components
Connect the electric brush: insert one end of the electric brush into one end of the
conductive tube, and then insert the other end of the conductive tube into the host
interface, and then hear the locking sound of the "cut".(as shown below)
Monter støvsugerslangen med munnstykket og
støvsugerhuset ved å trykke dem sammen. Trykk til
du hører et klikk.
·The connection between the dust cup assembly and the motor assembly
Align the lower edge bayonet slot of the dust cup assembly with the lower edge
bayonet of the motor assembly and sleeve it tightly, and then you can hear the
"click" lock sound of the dust cup release button. (As shown below)
· Connection of dust cup motor assembly and battery pack assembly
Aim the front end of the battery pack at the groove at the lower part behind the dust cup motor
assembly, and then keep the battery pack parallel to the lower part of the dust cup motor
assembly. Insert the pin at the upper end of the battery pack into the groove at the lower part
behind the dust cup motor assembly and push it flat forward. The lock sound of the release
button of the battery pack can be heard.(as shown below)
· Connection of electric ground brush, conductive tube and body components
Connect the electric brush: insert one end of the electric brush into one end of the
conductive tube, and then insert the other end of the conductive tube into the host
interface, and then hear the locking sound of the "cut".(as shown below)
Montere tilbehør
Monter ønsket munnstykke på maskinen eller røret.
Munnstykke montert på maskinen:
▋Installation of components
·Accessory and host connection
Insert the accessory into the host interface and insert it tightly. (As shown below)
·Connection between accessories and conductive tube
Insert the accessory socket into one end of the conductive tube and insert it tightly.
After inserting it, insert the other end of the conductive tube into the host interface.
Just hear the "click" lock sound. (As shown below)
· Use of the rack
Remove and expand the screws to attach the rack to the wall, then insert the small
attachment, and finally put the whole machine on.
Munnstykke montert på røret:
▋Installation of components
·Accessory and host connection
Insert the accessory into the host interface and insert it tightly. (As shown below)
·Connection between accessories and conductive tube
Insert the accessory socket into one end of the conductive tube and insert it tightly.
After inserting it, insert the other end of the conductive tube into the host interface.
Just hear the "click" lock sound. (As shown below)
· Use of the rack
Remove and expand the screws to attach the rack to the wall, then insert the small
attachment, and finally put the whole machine on.
Montere veggfestet:
Mål og monter veggfestet med skruen og pluggen
som medfølger, avhengig av materialet i veggen.
Festet har også plass til å holde de to ekstra munn-
stykkene som medfølger.
Husk at du må ha en stikkontakt i nærheten, slik at
du kan koble til adapteren.
▋Installation of components
·Accessory and host connection
Insert the accessory into the host interface and insert it tightly. (As shown below)
·Connection between accessories and conductive tube
Insert the accessory socket into one end of the conductive tube and insert it tightly.
After inserting it, insert the other end of the conductive tube into the host interface.
Just hear the "click" lock sou nd. (As shown below)
· Use of the rack
Remove and expand th e screws to attach the rack to the wall, then insert the small
attachment, and finally put the whole machine on.
8. BRUK
Lading
Koble adapterens DC-kontakt til kontakten på bat-
teriet, og koble adapteren til en 230 V stikkontakt.
Når batteriet lades, blinker lyset rødt. Når batteriet er
fulladet, lyser det blått. Trekk ut adapteren fra både
stikkontakten og batteriet når det er fulladet.
Batteriet må bare lades med adapteren som medføl-
ger.
Batteriet kan lades både når det er montert i støvsu
geren og når det er tatt ut.
Støvsuging
Slå på støvsugeren med AV/PÅ-knappen.
Velg sugeeffekt etter hva du skal støvsuge. Lav ef-
fekt for øm ntlige materialer, som tepper med lang
Bekijk gratis de handleiding van Biltema 84-0058, stel vragen en lees de antwoorden op veelvoorkomende problemen, of gebruik onze assistent om sneller informatie in de handleiding te vinden of uitleg te krijgen over specifieke functies.
Productinformatie
| Merk | Biltema |
| Model | 84-0058 |
| Categorie | Stofzuiger |
| Taal | Nederlands |
| Grootte | 3444 MB |