Biltema 84-0058 handleiding
Handleiding
Je bekijkt pagina 14 van 24
Art. 84-0058
14
© 2024-10-17 Biltema Nordic Services AB
FI
ERITYISET TURVAOHJEET
• Älä imuroi nesteitä!
• Älä imuroi kuumaa tuhkaa tai teräviä
kappaleita!
• Imuria EI ole tarkoitettu imemään hienoa
pölyä, esimerkiksi kipsi-, betoni- tai
tuhkapölyä. Hieno pöly voi vahingoittaa
moottoria, eikä takuu kata näitä vaurioi-
ta.
• Älä käytä imuria tilassa, jonka ilmankos-
teus on korkea!
• Älä koskaan imuroi ilman imurin suoda-
tinta.
• Älä koskaan imuroi hiuksiasi, päällä ole-
via vaatteitasi tai jotakin osaa kehostasi!
• Älä sijoita imuria lämmönlähteiden,
kuten lämpöpatterin, uunin tms. lähelle!
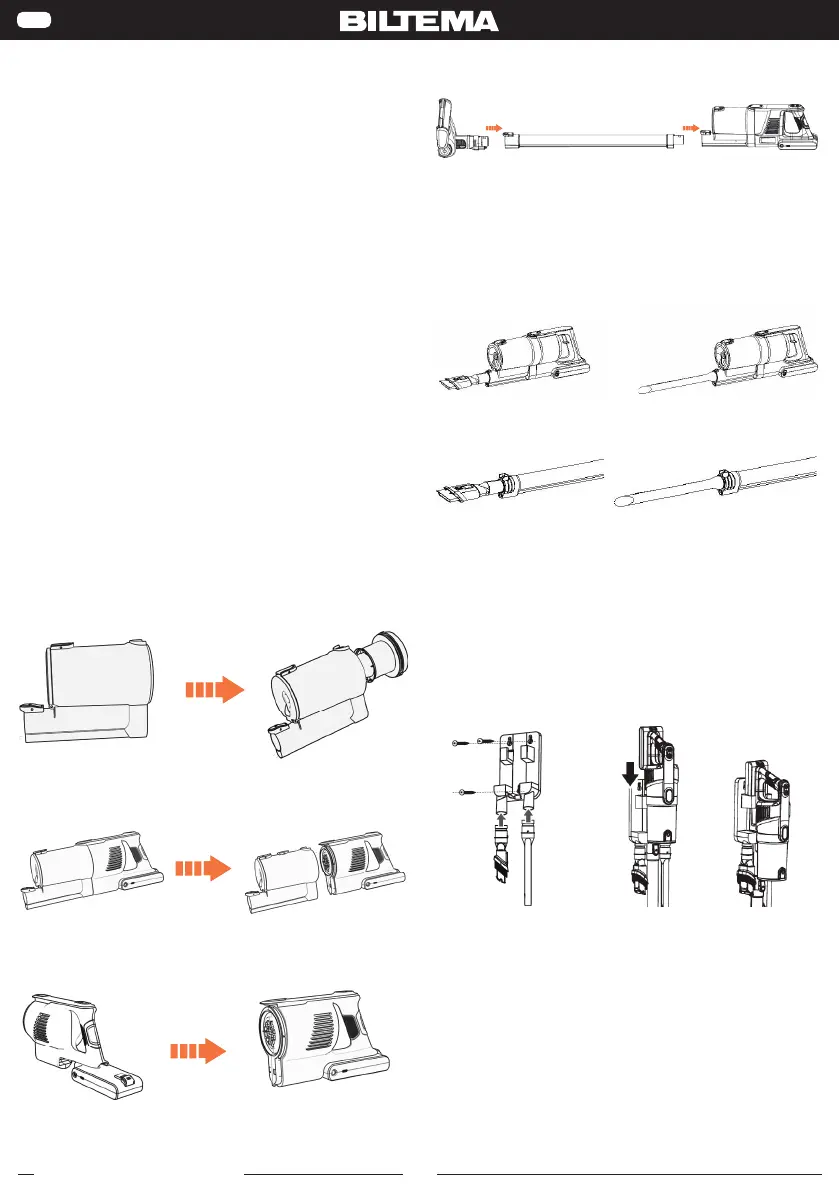
7. KOKOAMINEN
Aseta sykloni ja HEPA-suodatin pölysäiliöön. Kohdis-
ta syklonin urat säiliössä olevien merkkien kanssa.
▋Packing Details
Dust cup
motor
assembly
Battery
pack
Conductive
tube
Electric
floor brush
Accessories
Suction
head
1 1 1 1 2
Charger Hanger
Iinstructions
Certificate
of
conformity
——
1 1 1 1 ——
▋Installation of components
·Installation of dust cup assembly
Screw the inner cone of the cyclone cone into the outer cone in the direction of the
arrow, and then install the cyclone cone and HEPA into the dust cup (rotate the
Asenna imurin moottori pölysäiliön päälle. Kallista
moottori alakautta sisään ja paina, kunnes kuulet
napsahduksen.
·The connection between the dust cup assembly and the motor assembly
Align the lower edge bayonet slot of the dust cup assembly with the lower edge
bayonet of the motor assembly and sleeve it tightly, and then you can hear the
"click" lock sound of the dust cup release button. (As shown below)
· Connection of dust cup motor assembly and battery pack assembly
Aim the front end of the battery pack at the groove at the lower part behind the dust cup motor
assembly, and then keep the battery pack parallel to the lower part of the dust cup motor
assembly. Insert the pin at the upper end of the battery pack into the groove at the lower pa rt
behind the dust cup motor assembly and push it flat forward. The lock sound of the release
button of the battery pack can be heard.(as shown below)
· Connection of electric ground brush, conductive tube and body components
Connect the electric brush: insert one end of the electric brush into one end of the
conductive tube, and then insert the other end of the conductive tube into the host
interface, and then hear the locking sound of the "cut".(as shown below)
Asenna moottorin akku. Kohdista akku moottoriin ja
paina, kunnes kuulet napsahduksen.
·The connection between the dust cup assembly and the motor assembly
Align the lower edge bayonet slot of the dust cup assembly with the lower edge
bayonet of the motor assembly and sleeve it tightly, and then you can hear the
"click" lock sound of the dust cup release button. (As shown below)
· Connection of dust cup motor assembly and battery pack assembly
Aim the front end of the battery pack at the groove at the lower part behind the dust cup motor
assembly, and then keep the battery pack parallel to the lower part of the dust cup motor
assembly. Insert the pin at the upper end of the battery pack into the groove at the lower pa rt
behind the dust cup motor assembly and push it flat forward. The lock sound of the release
button of the battery pack can be heard.(as shown below)
· Connection of electric ground brush, conductive tube and body components
Connect the electric brush: insert one end of the electric brush into one end of the
conductive tube, and then insert the other end of the conductive tube into the host
interface, and then hear the locking sound of the "cut".(as shown below)
Yhdistä imuputki, suulake ja imurin runko painamalla
ne yhteen. Paina, kunnes kuulet napsahduksen.
·The connection between the dust cup assembly and the motor assembly
Align the lower edge bayonet slot of the dust cup assembly with the lower edge
bayonet of the motor assembly and sleeve it tightly, and then you can hear the
"click" lock sound of the dust cup release button. (As shown below)
· Connection of dust cup motor assembly and battery pack assembly
Aim the front end of the battery pack at the groove at the lower part behind the dust cup motor
assembly, and then keep the battery pack parallel to the lower part of the dust cup motor
assembly. Insert the pin at the upper end of the battery pack into the groove at the lower part
behind the dust cup motor assembly and push it flat forward. The lock sound of the release
button of the battery pack can be heard.(as shown below)
· Connection of electric ground brush, conductive tube and body components
Connect the electric brush: insert one end of the electric brush into one end of the
conductive tube, and then insert the other end of the conductive tube into the host
interface, and then hear the locking sound of the "cut".(as shown below)
Lisävarusteiden asentaminen:
Asenna haluamasi suulake imuputkeen suoraan
koneeseen.
Suoraan koneeseen asennettu suulake:
▋Installation of components
·Accessory and host connection
Insert the accessory into the host interface and insert it tightly. (As shown below)
·Connection between accessories and conductive tube
Insert the accessory socket into one end of the conductive tube and insert it tightly.
After inserting it, insert the other end of the conductive tube into the host interface.
Just hear the "click" lock sound. (As shown below)
· Use of the rack
Remove and expand the screws to attach the rack to the wall, then insert the small
attachment, and finally put the whole machine on.
Imuputkeen asennettu suulake:
▋Installation of components
·Accessory and host connection
Insert the accessory into the host interface and insert it tightly. (As shown below)
·Connection between accessories and conductive tube
Insert the accessory socket into one end of the conductive tube and insert it tightly.
After inserting it, insert the other end of the conductive tube into the host interface.
Just hear the "click" lock sound. (As shown below)
· Use of the rack
Remove and expand the screws to attach the rack to the wall, then insert the small
attachment, and finally put the whole machine on.
Seinäkiinnikkeen asentaminen:
Mittaa asennuskohta ja asenna kiinnike mukana
toimitetulla ruuveilla ja tulpilla seinän materiaalin
vaatimalla tavalla.
Kiinnikkeessä on tilaa myös kahdelle mukana tuleval-
le lisäsuulakkeelle.
Muista, että kiinnikkeen lähellä on oltava seinäpisto-
rasia verkkolaitetta varten.
▋Installation of components
·Accessory and host connecti on
Insert the accessory into the host interface and insert it tightly. (As shown below)
·Connection between accessories and conductive tube
Insert the accessory socket into one end of the conductive tube and insert it tightly.
After inserting it, insert the other end of the conductive tube into the host interface.
Just hear the "click" lock sound. (As shown below)
· Use of the rac k
Remove and expand the screws to attach the rack to the wall, then insert the small
attachment, and finally put the whole machine on.
8. KÄYTTÄMINEN
Lataaminen
Yhdistä verkkolaitteen DC-liitin akun liitäntään ja
pistoke 230 V:n pistorasiaan.
Kun akku latautuu, valo vilkkuu punaisena. Kun akku
on ladattu täyteen, valo palaa sinisenä. Irrota verk-
kolaite sekä seinäpistorasiasta että akusta, kun akku
on ladattu täyteen.
Bekijk gratis de handleiding van Biltema 84-0058, stel vragen en lees de antwoorden op veelvoorkomende problemen, of gebruik onze assistent om sneller informatie in de handleiding te vinden of uitleg te krijgen over specifieke functies.
Productinformatie
| Merk | Biltema |
| Model | 84-0058 |
| Categorie | Stofzuiger |
| Taal | Nederlands |
| Grootte | 3444 MB |