Baby Lock Splendor BLSP8 handleiding
Handleiding
Je bekijkt pagina 76 van 82
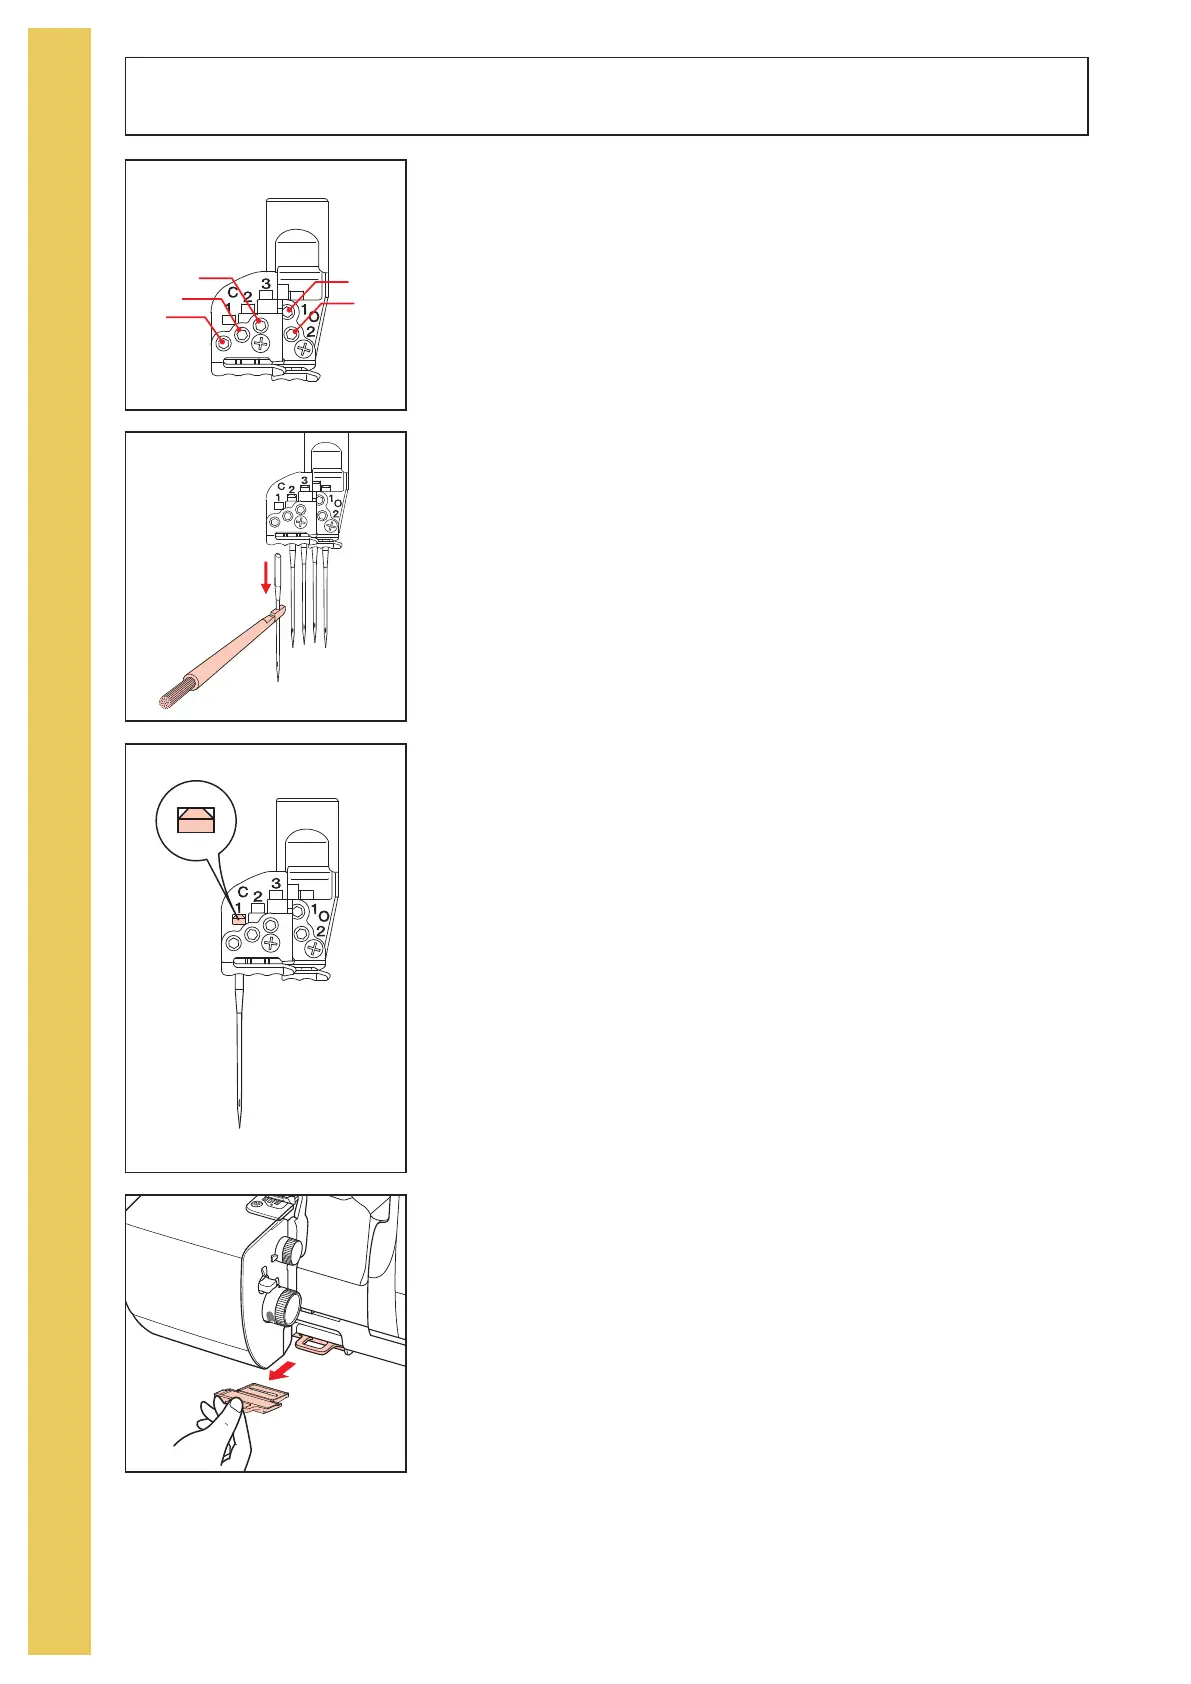
Replacing Needles
Needle Identification (fig. A)
The chain/cover stitch needle(s) are on the front left portion of the
needle clamp and are identified by C-1,C-2 and C-3.
C-1-Left chain/cover stitch needle can be used for chain stitch, left
narrow cover stitch, wide cover stitch or triple cover stitch.
C-2-Center chain/cover stitch needle can be used for a chain stitch,
left narrow cover stitch, right narrow cover stitch or triple cover
stitch.
C-3-Right chain/cover stitch needle can be used for a chain stitch,
right narrow cover stitch, wide cover stitch, or triple cover stitch.
The overlock needles are on the back right portion of the needle
clamp and are identified by O-1 and O-2.
O-1-Left overlock needle can be used for wide overlock stitches.
O-2-Right overlock needle can be used for narrow overlock stitch
-
es and rolled or narrow hemming.
NOTE: Both overlock needles are used for a 4-thread overlock
stitch.
To replace a needle
1. Raise the needle(s) to the highest position by turning the hand
-
wheel toward you.
2. Using the Allen screwdriver, loosen the needle screw for the
needle to be changed. Screws are located by sequence as indi-
cated above (fig. A).
NOTE: To prevent the needle from falling into the needle plate,
hold it with the needle insert tool as you loosen the screw (fig. B).
3. Use the needle insert tool or tweezers to insert the new needle
with the flat side to the back. Insert needle as far as it will go,
check the needle viewing window (fig. C).
4. Tighten the needle clamp screw.
NOTE: If you do drop a needle down into the machine just pull out
the needle-drop drawer at the bottom or the trim bin. The needle
will be on the magnetic strip (fig. D). To insert the needle -drop
draw or trim bin align the drawer or trim bin with the left and right
sides on the bottom of the machine and slide the drawer or trim bin
into position.
CAUTION:
- Moving Parts: To reduce risk of injury, switch machine off before
servicing.
- CLOSE ALL MACHINE COVERS BEFORE OPERATING MA
-
CHINE.
Note: No need to tighten the needle screws when a needle has
been removed from a position on the needle clamp.
7.0
7.5
3
4
2
5.0
4.5
BL
2
O
2
1
1
3
4
C1
O1
O2
C2
C3
7.0
7.5
3
4
2
5.0
4.5
BL
2
O
2
1
1
3
4
C1
O1
O2
C2
C3
7.0
7.5
3
4
2
5.0
4.5
BL
2
O
2
1
1
3
4
C1
O1
O2
C2
C3
7.0
7.5
3
4
2
5.0
4.5
BL
2
O
2
1
1
3
4
C1
O1
O2
C2
C3
AA
BB
CC
DD
73
M
A
I
N
T
E
N
A
N
C
E
Bekijk gratis de handleiding van Baby Lock Splendor BLSP8, stel vragen en lees de antwoorden op veelvoorkomende problemen, of gebruik onze assistent om sneller informatie in de handleiding te vinden of uitleg te krijgen over specifieke functies.
Productinformatie
| Merk | Baby Lock |
| Model | Splendor BLSP8 |
| Categorie | Niet gecategoriseerd |
| Taal | Nederlands |
| Grootte | 18882 MB |