Audibax Control 384 handleiding
Handleiding
Je bekijkt pagina 6 van 16
3.4.8 Delete A Chase
Action:
1) Press and hold the PROGRAM button to enter programming mode
2) Press the CHASE button (1~6) to be deleted
3) Press and hold AUTO DEL button and the respective CHASE button to delete the chase. All
LEDs will blink.
3.4.9 Delete All Chase Programs
CAUTION! This procedure will result in irrevocable loss of chase step memory. The individual
scenes and program banks will be preserved.
Action:
1) Turn OFF controller
2) Press and hold the BANK DOWN button and the AUTO DEL button while turning ON the
controller.
3) AII LEDs will blink.
3.5 Scene Programming (Steps)
3.5.1 Insert a Scene
Action:
1) Press and hold the PROGRAM button to enter programming mode
2) Press the desired CHASE button
3) Press the TAPSYNC DISPLAY to switch the LED display to steps view
4) Use the BANKUP/DOWN buttons to navigate steps and locate the insert point of the new
scene
The display will read the step number
5) Press MIDI/ADD button to prepare the insert
6) Use the BANKUP/DOWN button to locate the SCENE
7) Press the SCENE button that corresponds to the scene to be inserted
8) Press MIDI/ADD button to insert the scene. All LEDs will blink.
Notes:
/.e. To insert a scene between Steps 05 and 06 navigate using BANK buttons until the display
reads STEP05.
3.5.2 Copy a Scene
Action:
1) Press and hold the PROGRAM button to enter programming mode
2) Select the BANK that contains the scene to be copied using the BANK UP/DOWN buttons
3) Press the SCENE button that corresponds to the scene to be copied
4) Press MIDI/ADD button to copy the scene
5) Select the destination BANK that contains the scene memory to record onto using the
BANKUP/DOWN buttons
6) Press the desired SCENE button to complete copy. All LEDs will blink
3.5.3 Delete a Scene
Action:
1) Press and hold the PROGRAM button to enter programming mode.
2) Select the BANK that contains the scene to be deleted by using the BANK UP/ DOWN
buttons.
3) Press and hold the AUTO DEL button.
4) Press the SCENE button that corresponds to the scene you want to delete. All LEDs will
blink.
3. OPERATING INSTRUCTIONS
3.1 Setup
3.1.1 Setting Up The System
1) Plug the AC to DC power supply to the system back panel and to the mains outlet.
2) Plug in your DMX cable(s) to your intelligent lighting as described in the fixtures respective
manual. For a quick Primer on DMX see the "DMX Primer" section in the Appendix of this
manual.
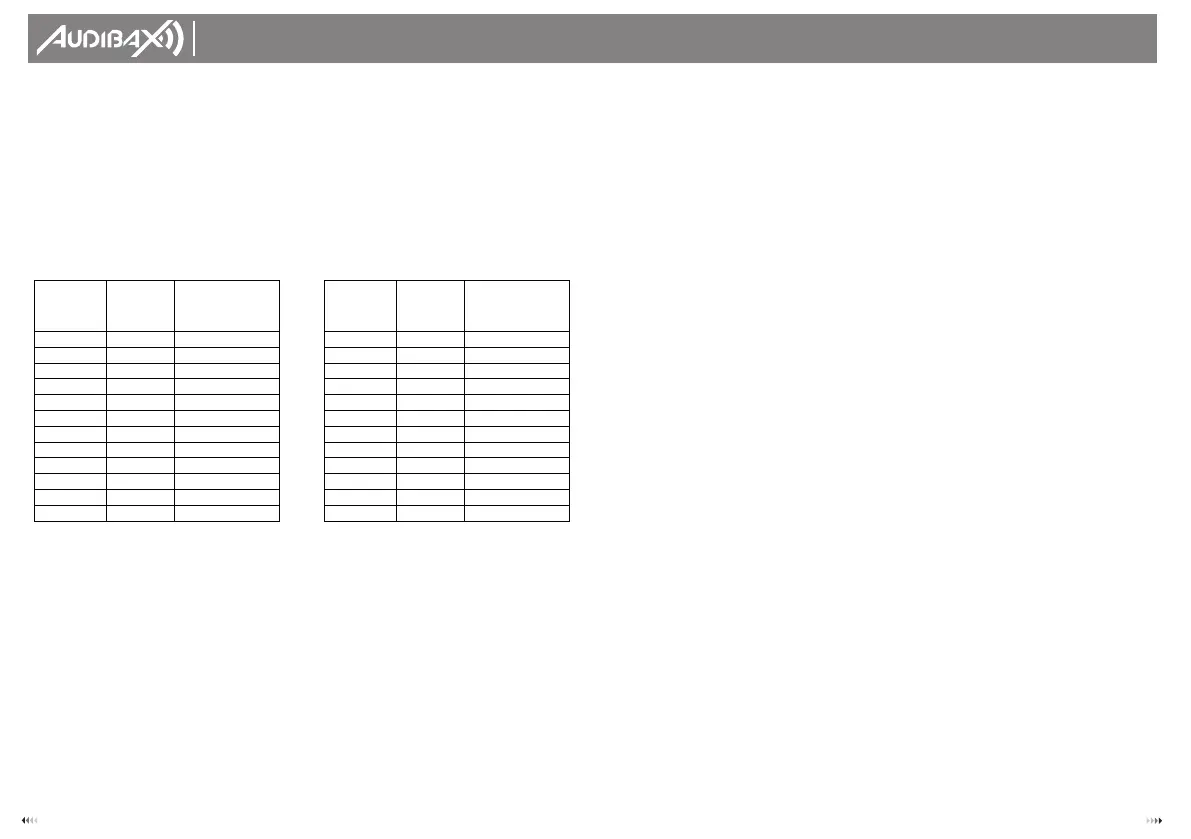
3.1.2 Fixture Addressing
The Controller is programmed to control 32 channels of DMX per fixture, therefore the fixtures
you wish to control with the corresponding “SCANNER" buttons on the unit, must be spaced
16 channels apart.
Please refer to your individual fixture’s manual for DMX addressing instructions. The table
above refers to a standard 9 dipswitch binary configurable device.
3.1.3 Pan and Tilt Channels
Because not all intelligent lighting fixtures are alike or share the same control attributes. The
Controller allows the user to assign the wheel the correct pan and tilt channel for every
individual fixture.
Action:
1) Press and hold PROGRAM & TAPSYNC different DMX cannel.
Faders are given a channel buttons together (1) time to access the number and are labeled
on the surface of the channel as signment mode.
2) Press a SCANNER button or PAGE SELECT button that represents the fixture whose faders
you would like to reassign
3) Move one fader of 16 channels to select the pan cannel.
4) Press the TAPSYNC DISPLAY button to select pan / tilt.
5) Move one fader of 16 channel to select the tilt cannel
6) Press and hold PROGRAM & APSYNC DISPLY buttons to exit and save setting. All LEDs will
blink
USER´S
MANUAL
Control 384
5 10
FIXTURE OR
SCANNER#
DEFAULT
DMX
STARTING
ADDRESS
BINARYDIPSWITCH
SETTINGS TO THE
“ONPOSITION”
FIXTURE OR
SCANNER#
DEFAULT
DMX
STARTING
ADDRESS
BINARYDIPSWITCH
SETTINGS TO THE
“ONPOSITION”
1
1
1
13
193
1,7,8
2
17
1,5
14
209
1,5,7,8
3
33
1,6
15
225
1,6,7,8
4
49
1,5,6
16
241
1,5,6,7,8
5
65
1,7
17
257
1,9
6
81
1,5,7
18
273
1,5,9
7
97
1,6,7
19
289
1,6,9
8
113
1,5,6,7
20
305
1,5,6,9
9
129
1,8
21
321
1,7,9
10
145
1,5,8
22
337
1,5,7,9
11
161
1,6,8
23
353
1,6,7,9
12
177
1,5,6,8
24
369
1,5,6,7,9
Bekijk gratis de handleiding van Audibax Control 384, stel vragen en lees de antwoorden op veelvoorkomende problemen, of gebruik onze assistent om sneller informatie in de handleiding te vinden of uitleg te krijgen over specifieke functies.
Productinformatie
| Merk | Audibax |
| Model | Control 384 |
| Categorie | Niet gecategoriseerd |
| Taal | Nederlands |
| Grootte | 2873 MB |


