Arktic 274224 handleiding
Handleiding
Je bekijkt pagina 15 van 160
15
GB
Cleaning & maintenance
• ATTENTION! Always disconnect the appliance from the pow-
er supply and cool down before storage, cleaning & mainte-
nance.
• Do not use water jet or steam cleaner for cleaning and do not
push the appliance under the water as the parts will get wet
and electric shock might be resulted.
• If the appliance is not kept in a good state of cleanliness, this
can adversely affect the life of the appliance and result in a
dangerous situation.
• Food residues should be regularly cleaned and removed from
the appliance. If the appliance is not cleaned properly, it will
reduce its lifespan and may result in a dangerous condition
during use.
Cleaning
• Clean the cooled exterior surface with a cloth or sponge
slightly dampened with a mild soap solution.
• For reasons of hygiene, the appliance should be cleaned be-
fore and after use.
• Avoid water contacting the electrical components.
• Clean the inside of container with a non-abrasive detergent
and rinse with clean water.
• Never immerse the appliance in water or other liquids.
• No parts are dishwasher safe.
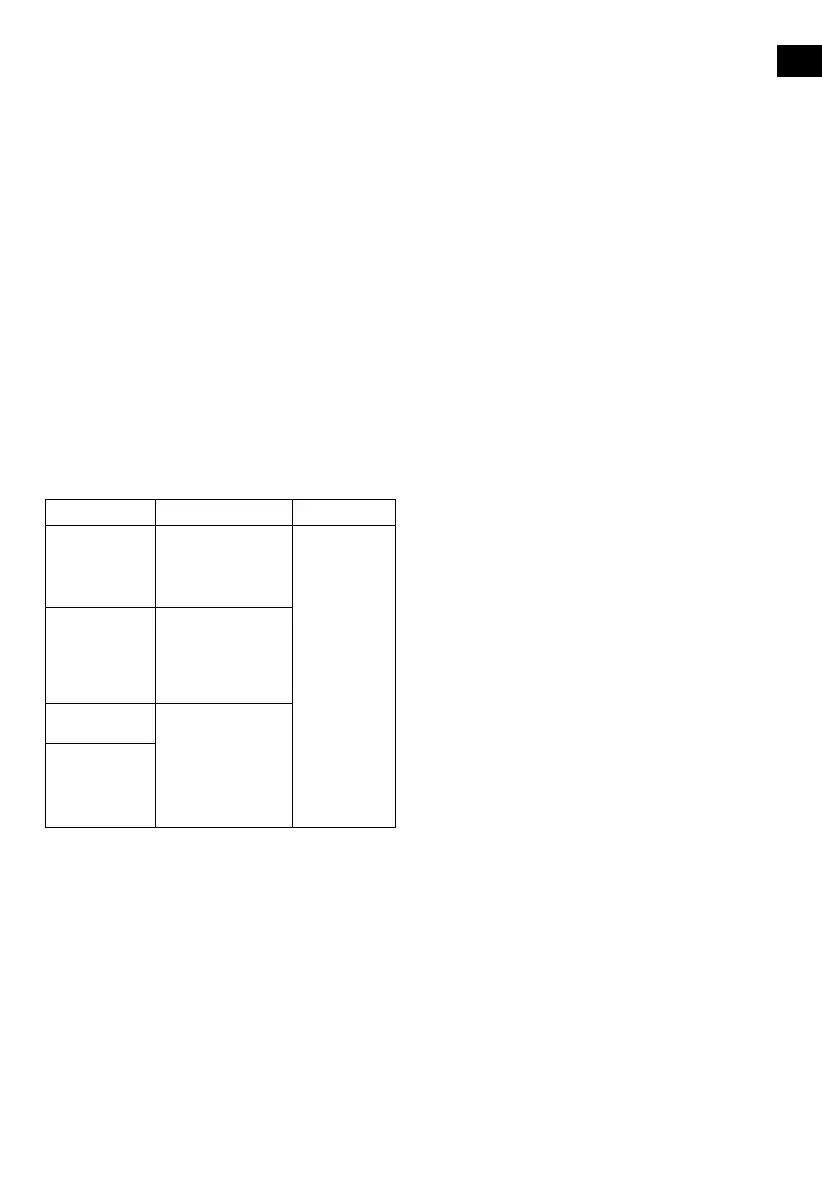
Parts How to clean Remark
All accessories
such as racks,
rack holders, etc.
• Soak in warm, soapy
water for about 10 to
20 minutes.
• Rinse under running
water thoroughly.
Dry all parts well
at last.
External glass
surfaces
• Wipe clean with a
soft cloth and a little
neutral detergent.
Make sure no water or
moisture enters inside
the of the appliance.
Interior glass
surfaces
• Remove any food
deposits.
• Wipe clean with a soft
cloth and a little mild
detergent. Make sure
no water or moisture
enters inside the of the
appliance.
Glass door
a) Emptying the bowls
• Before a bowl may be cleaned, it must be emptied all the food
ingredient inside the bowl first.
b) Disassembly the dispensing tap:
• Ensure all the beverage are emptied inside the bowl.
• Disassembly the tap before removing the bowl.
• Remove the pin (F) to release all the other parts. (Fig.13 on
page 6)
•
Use clean and warm water to wash the parts. (Fig.14 on page 6)
c) Remove the bowl and the lid:
• To remove the bowl lid (1) of the bowl (2) first, follow these
instructions & see Fig.15 on page 6.
1) Lift the rear part of the lid;
2) Extract the bowl lid (1) from the retainer placed at the
front side.
• Then, raise the front part of the bowl to release it.
• Next, remove the bowl from its position by pushing slightly at
the rear side. The bowl is detached now. (Fig.16 on page 6)
• Finally, take out the auger and remove the seal hat cover (A)
and bowl seal ring (B). Replace if worn or for every 12 months.
(Fig.17 on page 7)
d) Remove the bowl and the lid:
ATTENTION! All of the previously disassembled and removed
components must be thoroughly washed and sanitized. We
strongly recommend daily cleaning and sanitizing this machine
in order to maintain high degree of food quality.
• To carry out this procedure correctly, proceed as follows:
- Fill a container with detergent and hot water with a temper-
ature of 50 ~ 60°C;
- Wash the disassembled components thoroughly with the de-
tergent solution.
- Rinse with hot water.
- Dip the disassembly components into the solution and soaked
for about 30 minutes.
- Then, wash the components again with clean water.
- Place different components on a dry, clean surface and dry
all parts well.
- Assembly the machine as described in below part e).
- Before starting operating the machine again, carry out the
rinsing cycle with clean water. (See below part f).)
WARNING! Do not immerse the bowl lids with lighting bulb in
any type of liquid. Before cleaning, please make sure the light-
ing bulb are removed from the machine as described as below
(Fig.29 on page 8).
To clean the lighted bowl lid as below:
1. Using a clean, damp cloth to wipe clean the bottom part of
the bowl lid & the outer surface.
2. Using a sponge dipped in the washing solution, sanitize the
bottom part (24) of the bowl lid, take care not to touch the
hinge part (X) for about 10 minutes (Fig.18 on page 7).
3. Rinse twice or more, with a clean sponge soaked in warm
fresh water.
4. Dry it with a dry clean cloth.
5. Put back the bowl lid only after the bowl has been cleaned
and sanitised.
e) Reassembly the washed components
ATTENTION! All of the washed components must be carefully
re-assembled. Some components must be adequately lubricat-
ed by the supplied lubricants in order to ensure that they work
efficiently.
• Always check for the integrity of the seal (A), should it be
worn, replace it with a new one (supplied).
• Replace the auger seal hat cover (A) for at least every 12
months.
• Insert the auger seal hat cover (A) as below. (Fig.19 on page
7).
• Lubricate the inside area of the auger seal hat cover (A) as
shown in Fig.20 on page 7 with the lubricant (Supplied).
• Then, insert the bowl seal ring (B) and lubricate with the sup-
plied lubricant around it as below. (Fig.21 on page 7)
• Next, insert the auger with the white washer (D) and black
washer (E) for the shaft. Rotate the auger to engage it. (Fig.22
on page 7)
Bekijk gratis de handleiding van Arktic 274224, stel vragen en lees de antwoorden op veelvoorkomende problemen, of gebruik onze assistent om sneller informatie in de handleiding te vinden of uitleg te krijgen over specifieke functies.
Productinformatie
| Merk | Arktic |
| Model | 274224 |
| Categorie | Niet gecategoriseerd |
| Taal | Nederlands |
| Grootte | 24497 MB |


