Adj Vizi Scan LED Pro handleiding
Handleiding
Je bekijkt pagina 20 van 26
American DJ® - www.americandj.com - Vizi Scan LED PRO Instruction Manual Page 39 American DJ® - www.americandj.com - Vizi Scan LED PRO Instruction Manual Page 40
Vizi Scan LED PRO Operation
3. Tap the UP button to choose between “RUN” or “AUDI”. “RUN” will
make the units run through a built-in program. “AUDI” will make
the units sound active.
4. Press UP, to select “ALON” or “NAST”. Which means stand alone,
or master mode. Select “ALON” to run the unit as a stand alone,
press ENTER.
5. Press MODE/ESC to return to the main menu
6. You may invert the pan and tilt functions by in the system menu
by following the directions on page 23.
Master-Slave Operation (Sound Active or Auto Program):
This function will allow you to link up to 16 units together and oper-
ate without a controller. The units can run a built-in program or run in
sound actiive mode. In Master-Slave operation one unit will act as the
controlling unit and the others will react to the controlling units pro-
grams. Any unit can act as a Master or as a Slave.
1. Using standard XLR microphone cables, daisy chain your units
together via the XLR connector on the rear of the units. Remem-
ber the Male XLR connector is the input and the Female XLR
connector is the output. The rst unit in the chain (master) will use
the female XLR connector only - The last unit in the chain will use
the male XLR connector only. For longer cable runs we suggest a
terminator at the last fixture.
2. Access the main menu.
3. Tap the UP button until “PLAY” is displayed, and Press ENTER.
4. Tap the UP button to choose between “RUN” or “AUDI”. “RUN” will
make the units run through a built-in program. “AUDI” will make
the units sound active.
5. Press UP, to select “ALON” or “NSTR”. Which means stand alone,
or master mode.
6. Select “NAST” to designate the unit as the master and press
ENTER to conrm. The Slave units do not need to be set, just
connect to the Master and they will beging to follow.
7. Press MODE/ESC if you want to return to the main menu.
8. You may change the show or invert the pan and tilt functions
in the system menu by following the directions on page 23.
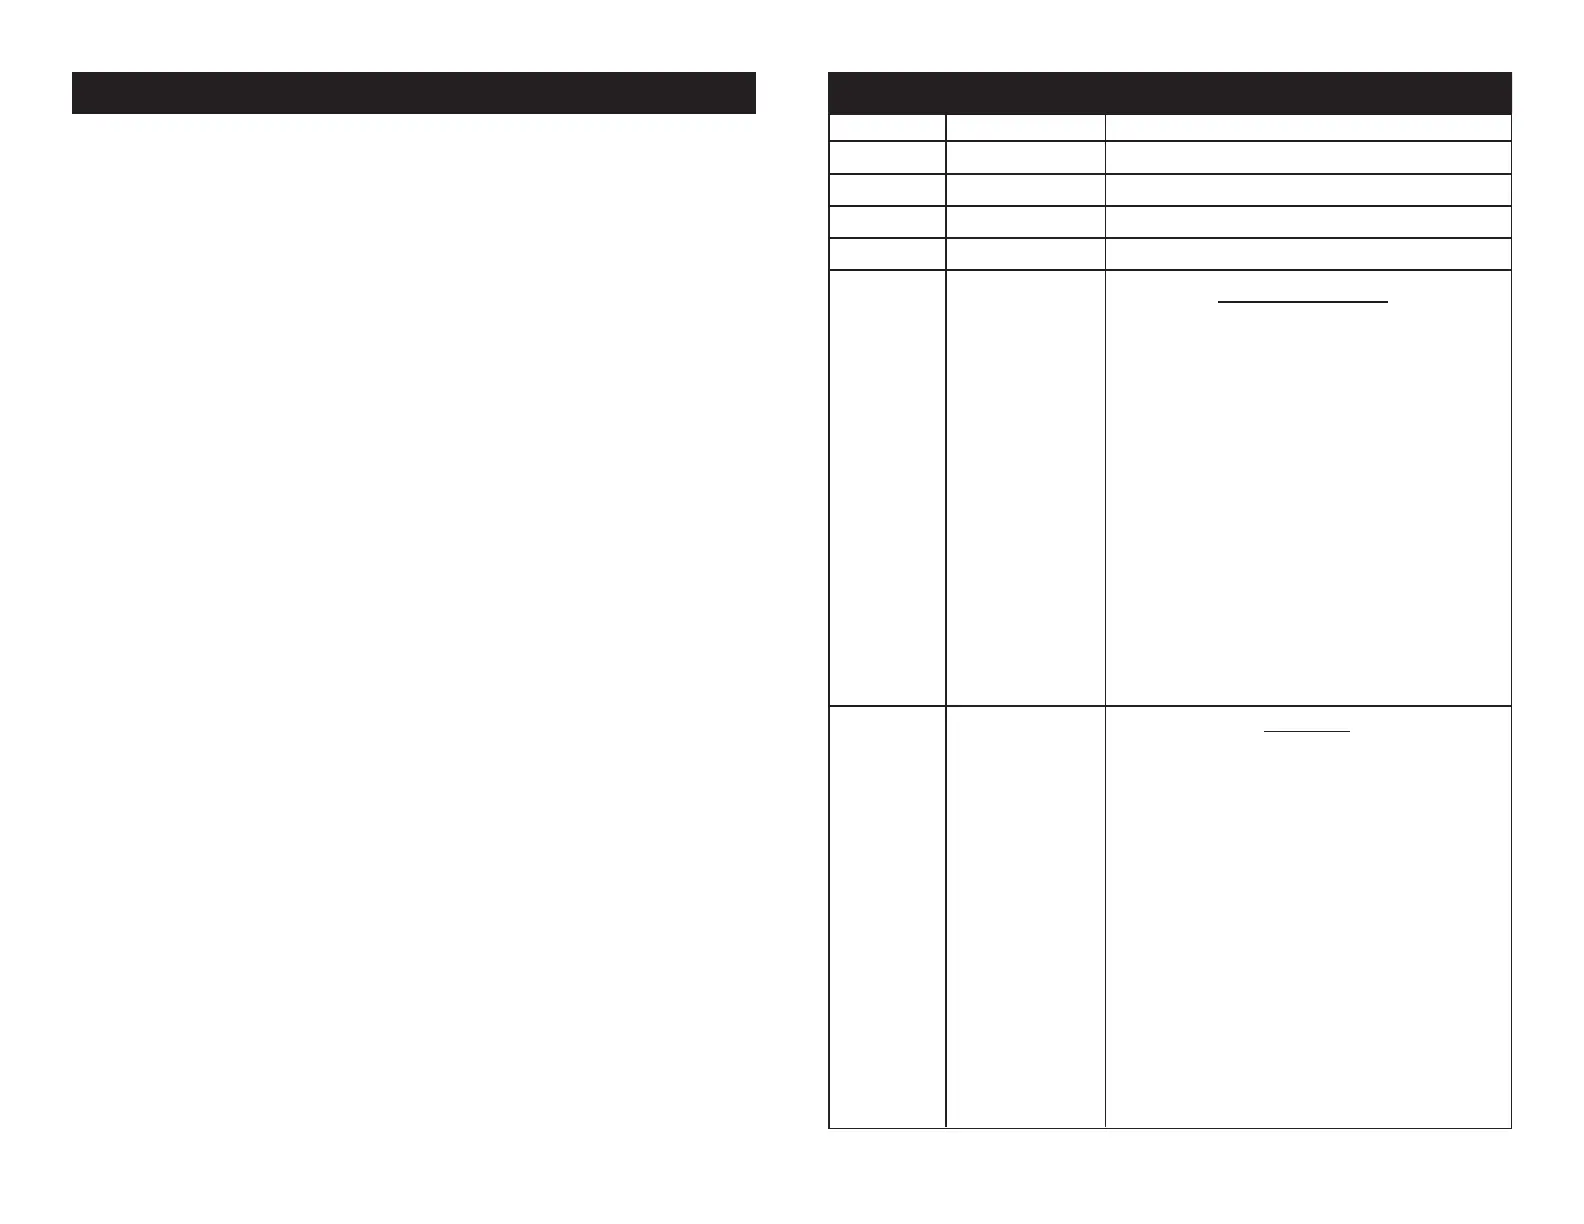
Vizi Scan LED PRO 14 Channel Mode
Channel Value Function
1 0 - 255 PAN MOVEMENT 8bit
2 0 - 255 PAN FINE 16bit
3 0 - 255 TILT MOVEMENT 8bit
4 0 - 255 TILT FINE 16bit
5 COLOR WHEEL
0 - 14 OPEN
15 - 29 COLOR 1
30 - 44 COLOR 2
45 - 59 COLOR 3
60 - 74 COLOR 4
75 - 89 COLOR 5
90 - 104 COLOR 6
105 - 119 COLOR 7
120 - 127 COLOR 8
128 - 189 FORWARD RAINBOW EFFECT
FAST - SLOW
190 - 193 NO ROTATION
194 - 255 BACKWARDS RAINBOW EFFECT
SLOW - FAST
6 GOBOS
0 - 9 OPEN
10 - 19 ROTATING GOBO 1
20 - 29 ROTATING GOBO 2
30 - 39 ROTATING GOBO 3
40 - 49 ROTATING GOBO 4
50 - 59 ROTATING GOBO 5
60 - 69 ROTATING GOBO 6
70 - 79 ROTATING GOBO 7
80 - 95 ROTATING GOBO 1 SHAKE
96 - 111 ROTATING GOBO 2 SHAKE
112 - 127 ROTATING GOBO 3 SHAKE
128 - 143 ROTATING GOBO 4 SHAKE
144 - 159 ROTATING GOBO 5 SHAKE
Bekijk gratis de handleiding van Adj Vizi Scan LED Pro, stel vragen en lees de antwoorden op veelvoorkomende problemen, of gebruik onze assistent om sneller informatie in de handleiding te vinden of uitleg te krijgen over specifieke functies.
Productinformatie
| Merk | Adj |
| Model | Vizi Scan LED Pro |
| Categorie | Niet gecategoriseerd |
| Taal | Nederlands |
| Grootte | 3588 MB |


