Zodiac Hydroxinator iQ PRO handleiding
Handleiding
Je bekijkt pagina 22 van 32
Page 23
Page 22
MagnaPool™ | Installation Manual
<
AUX 2 / LIGHT
-OFF
-ON
-DEFINE COLOR
<
COLOR LIGHT
-ALPINE WHITE
-SKY BLUE
-COBALT BLUE
-CARIBBEAN BLUE
-SPRING GREEN
-EMERALD GREEN
-EMERALD ROSE
-MAGENTA
-VIOLET
-SLOW SPLASH
-FAST SPLASH
-AMERICA
-FAT TUESDAY
-DISCO TECH
Note: Colour sequence is relevant for Zodiac colour
lights only. If other manufacturers lights are
installed the colour selection will vary
8.3 Heating
The chlorinator is compatible with all types of
pool heating: heat pump, heat exchanger, electric
heater. The built-in water temperature sensor
manages set point temperatures to start heating
only when needed.
The heating system must be wired to the
chlorinator exclusively using the Aux 2 connector.
8.3.1 Heating System with On/Off Remote
Control Connector
For heating systems fitted with a specific contact
for remote On/Off command:
1. Connect a 2 x 0.75 mm
2
electric wire (not
supplied) of the appropriate length to the
green Aux 2 connector on the chlorinator.
2. Connect the chlorinator contact to the wire.
3. Follow the connection and activation
procedure for the On/Off function in the
heating system manual.
4. Set the heating system setpoint temperature
to the maximum setting. The chlorinator will
manage the water heating via its own water
temperature sensor.
8.3.2 Heating System without On/Off Remote
Control Connector
For all heating systems not equipped with a remote
On/Off contact, serially connect to the flow switch
(present on all heating systems).
1. Connect a 2 x 0.75 mm
2
electric wire (not
supplied) of the appropriate length to the
green Aux 2 connector on the chlorinator.
2. Disconnect one of the two ow switch wires
from the terminal block of the heating system.
(Refer to the heater manual, if necessary.)
3. Connect one wire from Aux 2 to the terminal
block in place of the disconnected wire.
4. Connect the disconnected heating system wire
to the wire on the Aux 2 terminal block of the
chlorinator using a connecting terminal.
5. Set the heating system setpoint temperature
to the maximum setting. The chlorinator will
manage the water heating via its own water
temperature sensor.
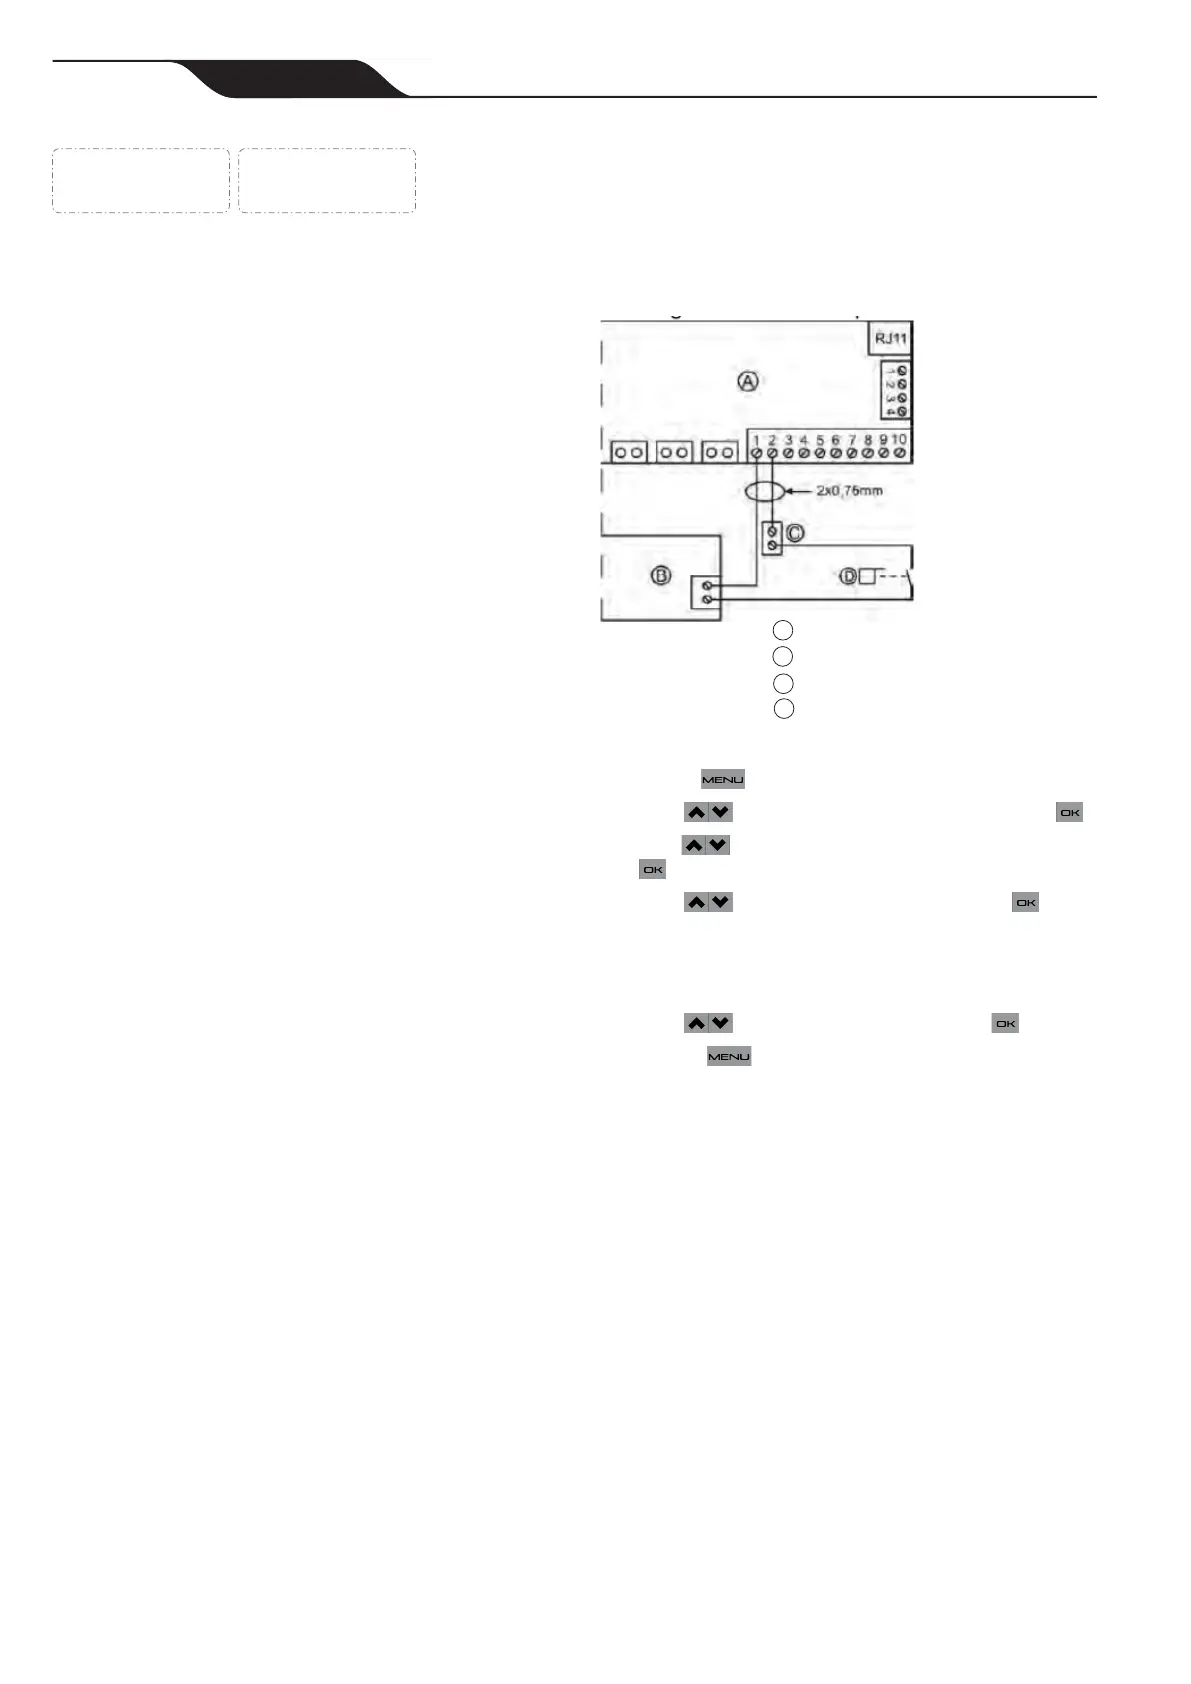
A
chlorinator
B
heating system
C
connecting terminal block
D
ow switch
8.3.3 Assign Heating System
1. Press .
2. Use to select “Auxiliaries” then press .
3. Use to select “Assign Heating” then press
.
4. Use to select “Aux 2” then press .
NOTE: Once a heating system has been assigned, it is
not possible to set another Aux 2 timer, such as
for lighting.
5. Use to select “Yes” then press .
6. Press to exit.
The heating system is activated when the filtration
pump is running and the water temperature is
below the setpoint.
After assigning a heating system, a new sub-menu
appears in the Main Menu as ‘HEATING’.
Under the HEATING menu, available settings are:
• DISABLE - heating system set to off
• ENABLE - heating system set to on
• SETPOINT - set water temperature setpoint in 1°C
increments (min 15°C/ max 35 °C)
• HEATING PRIORITY - activate heating priority. If
you have a variable speed pump connected, select
speed setting for heating priority mode
Bekijk gratis de handleiding van Zodiac Hydroxinator iQ PRO, stel vragen en lees de antwoorden op veelvoorkomende problemen, of gebruik onze assistent om sneller informatie in de handleiding te vinden of uitleg te krijgen over specifieke functies.
Productinformatie
| Merk | Zodiac |
| Model | Hydroxinator iQ PRO |
| Categorie | Niet gecategoriseerd |
| Taal | Nederlands |
| Grootte | 6511 MB |


