Handleiding
Je bekijkt pagina 7 van 72
7
Steam Cleaning (on some models)
IMPORTANT: Do not use oven cleaners or any other additives
with Steam Clean.
The Steam Clean feature is designed for light oven cavity bottom
cleaning. Use the Steam Clean feature as soon as possible after
spills occur. The longer a spill sits and dries in the oven, the more
difficult it may be to remove.
Allow the range to cool to room temperature before using the
Steam Clean feature. If your oven cavity is above 170°F (77°C),
“HOT” will appear in the display and the Steam Clean feature will
not activate until it cools down.
� Remove all racks and accessories from the oven cavity.
� For best results, pour 12 oz (355 mL) of distilled or filtered
water onto the oven bottom.
� The Steam Clean feature will take a total of 40 minutes. “End”
will appear in the display at the end of the cycle.
IMPORTANT: Since the water in the oven bottom is hot, do not
open the oven door during the Steam Clean cycle.
Press the Cancel keypad at any time to end the cycle. The display
will return to the time of day.
Helpful Hints
� Once the Steam Clean cycle is complete, remove all remaining
water and debris in the bottom of the oven with a sponge or
cloth.
� Wipe any remaining moisture from the oven door interior, oven
cavity interior sides, and cooktop.
� Use a soft brush or nylon scrubber to wipe the oven interior.
This may help with more stubborn stains.
� If any soil remains, run a second Steam Clean cycle to help
loosen debris for easier removal.
� Use the Steam Clean on small spills such as cheese or sauce
from pizza or snacks, or drips from casseroles.
� Food spills containing sugar, proteins or starches may require
vigorous scrubbing to remove most of the debris.
� It is recommended to use distilled or filtered water, as tap
water may leave mineral deposits on the oven bottom. Use a
cloth soaked with vinegar or lemon juice to remove any
mineral deposits that may be left after the Steam Clean cycle.
Oven Light
The oven light is a 40 W halogen bulb. Before replacing, make
sure the oven and cooktop are cool and the control knobs are in
the Off position.
To Replace:
1. Disconnect power.
2. Turn the glass bulb cover in the back of the oven
counterclockwise to remove.
3. Remove bulb from socket.
4. Replace bulb, using tissue or wearing cotton gloves to handle
bulb. To avoid damage to or decreasing the life of the new
bulb, do not touch bulb with bare fingers.
5. Replace bulb cover by turning clockwise.
6. Reconnect power.
IMPORTANT: Do not use lamps rated higher than 40 W.
INSTALLATION INSTRUCTIONS
REQUIREMENTS
Tools and Parts
Gather the required tools and parts before starting installation.
Read and follow the instructions provided with any tools listed
here.
Tools Needed
� Tape measure
� Flat-blade screwdriver
� Phillips screwdriver
� 1/8" flat-blade screwdriver
� Level
� Hand or electric drill
� Hammer
� Wrench or pliers
� Pipe wrench
� 15/16" combination wrench
� 1/4" drive ratchet
� 3/8" nut driver
� 1/8" drill bit (for wood floors)
� Marker or pencil
� Pipe-joint compound
resistant to Propane gas
� Noncorrosive leak-detection
solution
� 3/16" carbide-tipped
masonry drill bit
(for concrete/ceramic floors)
(For Slide-in/Front Control
Ranges)
For Propane/Natural Gas
Conversions
� 3/8" combination wrench
� 1/2" combination wrench
� 5/8" combination wrench
� 9/32" nut driver
� Quadrex
®
✝
or Phillips
screwdriver
� Masking tape
� 3/8" nut driver
(For Slide-in/Front Control
Ranges)
Parts Supplied
Check that all parts are included.
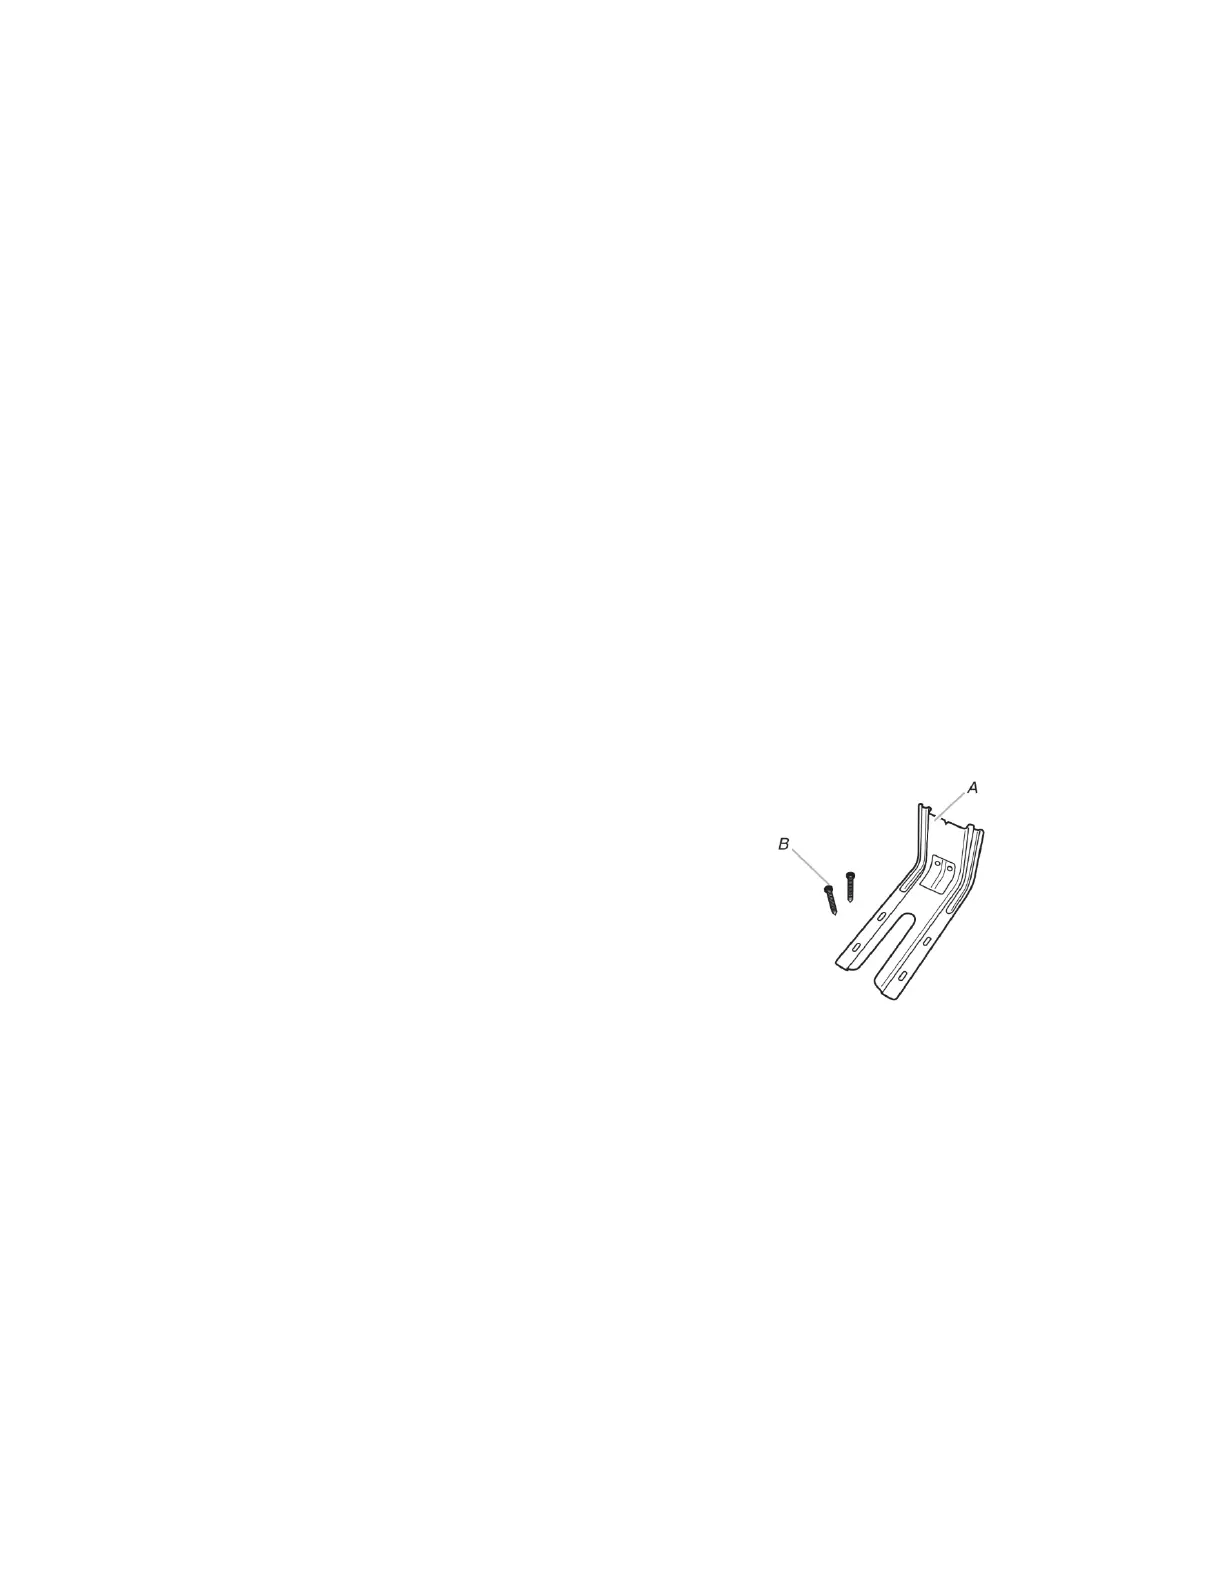
A. Anti-tip bracket
B. #12 x 1
5
/
8
" (4.1 cm) screws (2)
Anti-tip bracket must be securely mounted to floor or wall.
Thickness of flooring may require longer screws to anchor bracket
to floor.
Parts needed
Check local codes and consult gas supplier. Check existing gas
supply and electrical supply. See “Electrical Requirements” and
“Gas Supply Requirements” sections.
✝Quadrex
®
is a registered trademark of NLW Holdings, Inc.
Bekijk gratis de handleiding van Whirlpool WFGS4530SZ, stel vragen en lees de antwoorden op veelvoorkomende problemen, of gebruik onze assistent om sneller informatie in de handleiding te vinden of uitleg te krijgen over specifieke functies.
Productinformatie
| Merk | Whirlpool |
| Model | WFGS4530SZ |
| Categorie | Fornuis |
| Taal | Nederlands |
| Grootte | 14390 MB |


