Handleiding
Je bekijkt pagina 33 van 132
EN-33
Viking | RVL Steam Oven | MVSOC6301
How to use the Meat Probe
Note
• The Meat Probe is not enabled for all
cooking functions and for Recipes. If the
Meat Probe is plugged in during one of these
functions, a message will appear on the screen
asking you to please unplug the Meat Probe.
• If the Meat Probe is accidentally removed during
operation, a warning message appears on the
screen.
• The temperature of the probe can be set between
104°F and 212°F (40°C - 100°C).
Warnings
• IMPORTANT: Use only the Meat Probe supplied
with the appliance.
• IMPORTANT: Do not plug the Meat Probe into
the hole on the right side of the oven cavity. This
is a steam vent hole, not a socket hole for the
Meat Probe.
IMPORTANT: Make sure to return the Meat Probe
Plug to the Meat Probe socket when the Meat Probe
is not in use. Not doing so will cause water ingress
into electrical components.
• To avoid burns, use a kitchen glove to insert and
remove the Meat Probe when the oven is hot.
• Always remove the probe using the grip. If it is
removed by pulling on the cable, it could damage
the Meat Probe.
• Make sure the food is completely unfrozen when
the Meat Probe is inserted. Inserting the Meat Probe
into hard frozen meat will damage the Meat Probe.
How to Use
NOTE: The Meat Probe must be plugged in before a cooking mode is selected for it to function.
1. Remove the metal plug and insert the plug of the Meat Probe all the way (you will hear a click, confirming
proper insertion).
• The Meat Probe socket is located in the upper left corner of the oven chamber. It is protected by a
metal plug.
• The Meat Probe is automatically recognized when it is inserted and an icon appears on the screen.
2. Insert the tip of the Meat Probe into the central and thickest part of the meat.
• Avoid touching fatty parts or bones, as these cook at dierent temperatures than meat.
• Make sure that no part of the probe (the wire or grip) is in contact with oven parts or dishes to help prevent
damage to the probe.
• When a cooking mode is started with the Meat Probe inserted, the screen for setting the Meat Probe's
temperature will appear automatically.
3. Set the Meat Probe temperature with the arrows and confirm with the Check Mark button.
4. Set Cooking Mode temperature with the arrows and confirm with the Check Mark button.
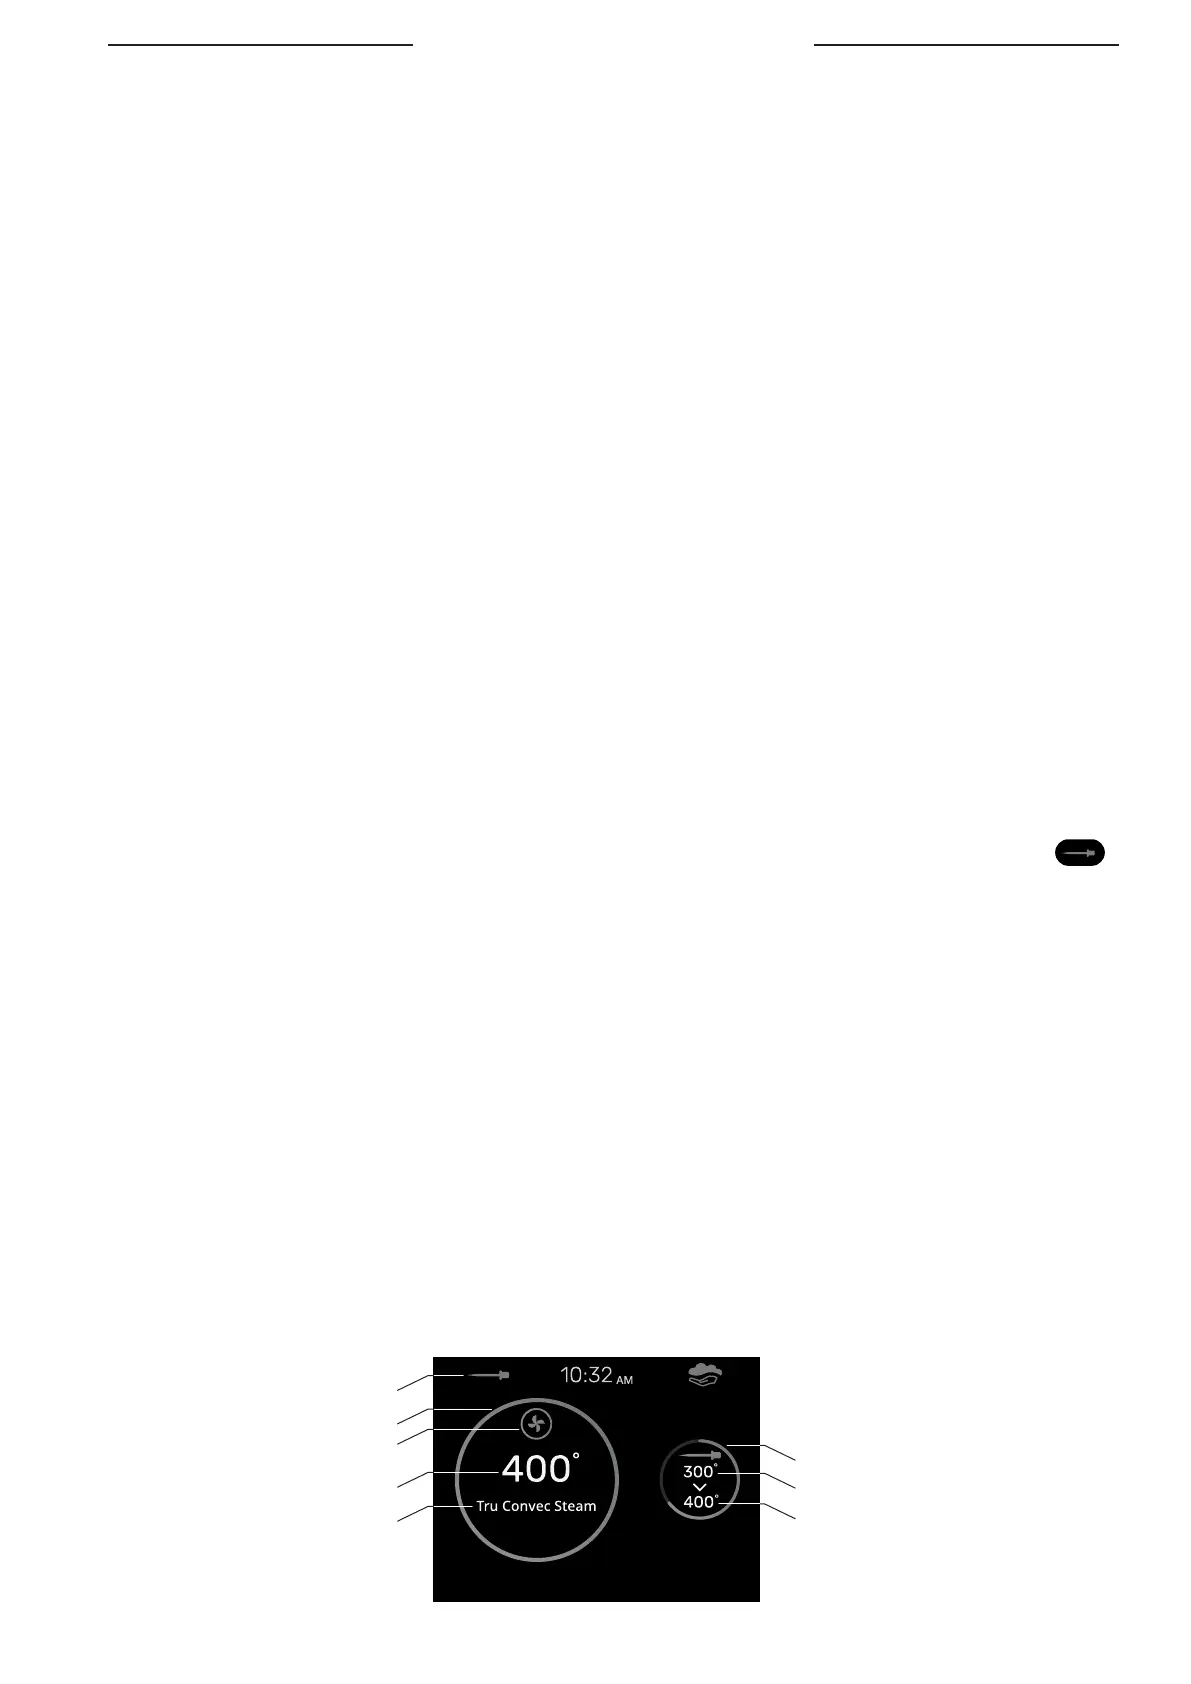
5. After pressing the Check Mark button, cooking starts and all cooking details appear on the screen. See
figure below.
• NOTE: To change the probe temperature after cooking has started, press the Back button and adjust the
Meat Probe set temperature then adjust the Cooking Mode set temperature, then press the Check Mark
button to begin the temperature reduction process or preheating.
6. Once the Meat Probe temperature is reached, the oven will switch o and a beep signals that cooking
has finished.
Currently Cooking Screen with Meat Probe information
Currently Cooking Solid Circle
Meat Probe Plugged In Icon
Current Cooking Mode Icon
Cooking Set Temperature
Current Meat Probe Temperature
Progress Indicator Circle
Current Cooking Mode
Set Meat Probe Temperature
Bekijk gratis de handleiding van Viking MVSOC6301BG, stel vragen en lees de antwoorden op veelvoorkomende problemen, of gebruik onze assistent om sneller informatie in de handleiding te vinden of uitleg te krijgen over specifieke functies.
Productinformatie
| Merk | Viking |
| Model | MVSOC6301BG |
| Categorie | Oven |
| Taal | Nederlands |
| Grootte | 20838 MB |