Vestil PLB-5 handleiding
Handleiding
Je bekijkt pagina 3 van 4
Rev. 3/28/2017 PLB, MANUAL
Copyright 2017 Vestil Manufacturing Corp. Page 3 of 4
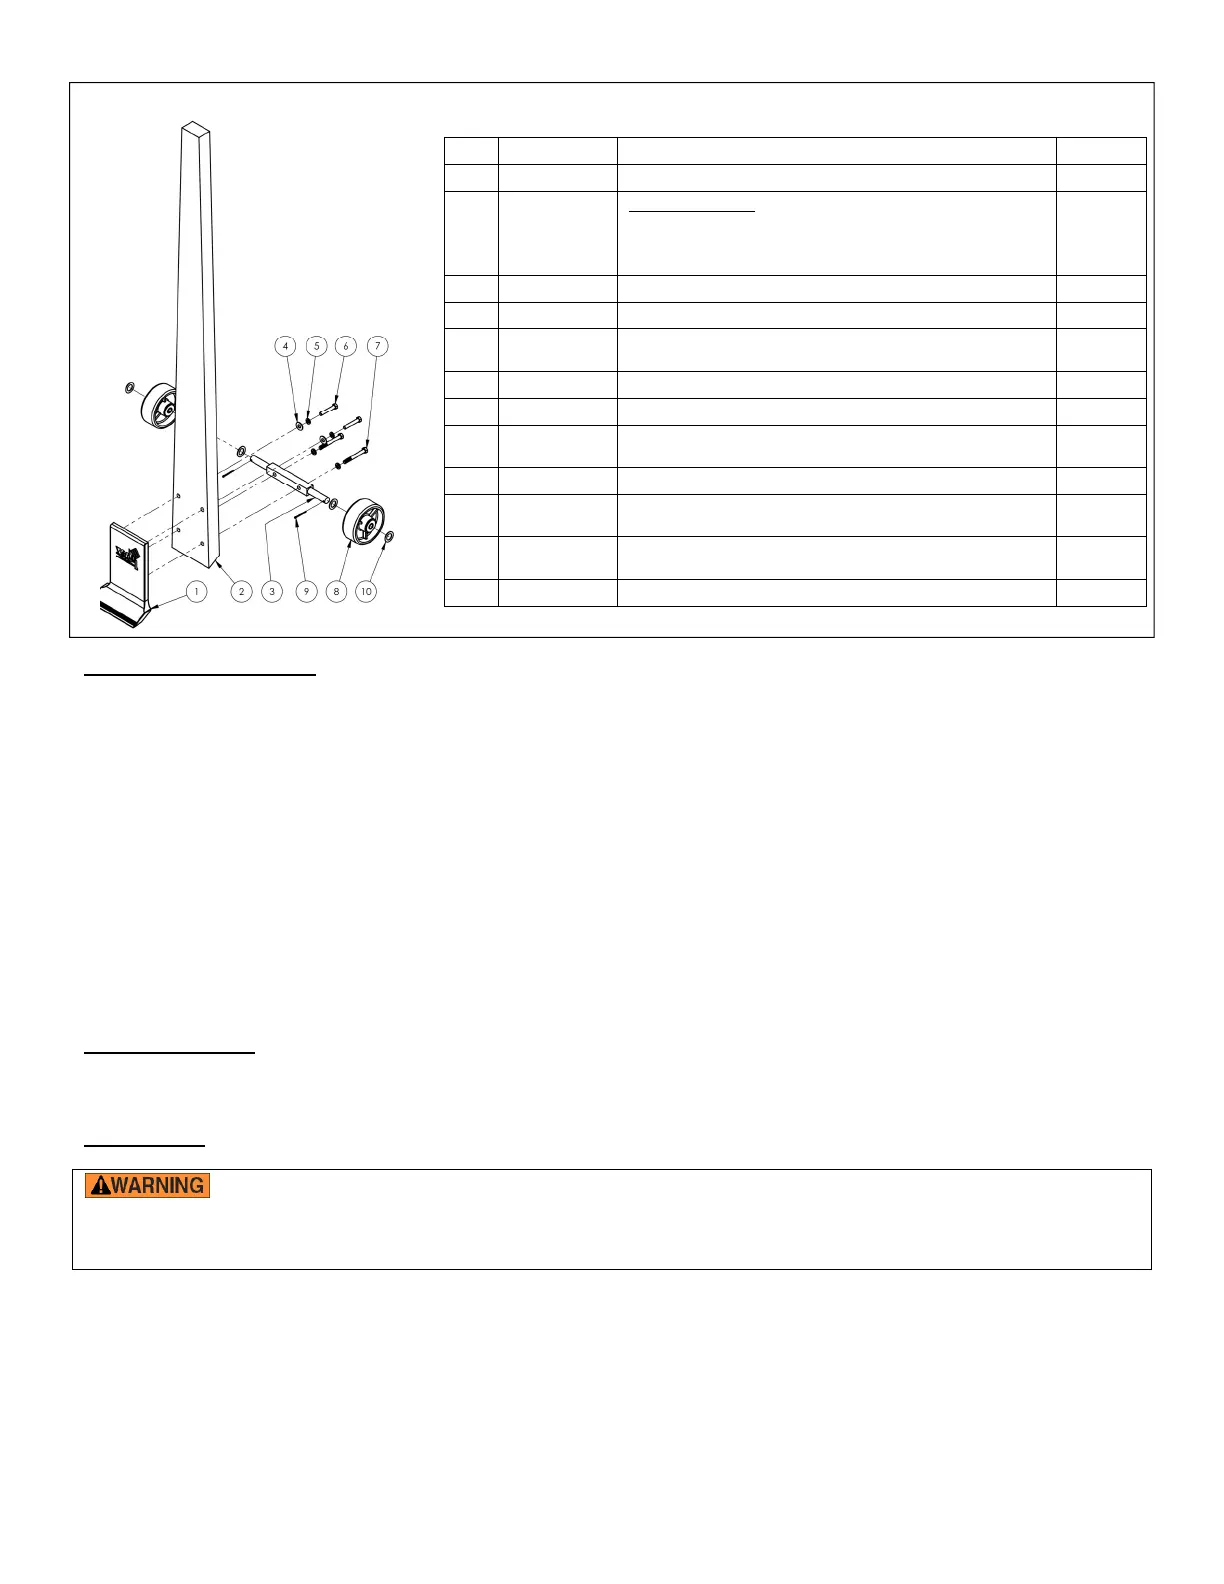
Exploded parts diagram and bill of materials
Assembly instructions
: To assemble the pry bar, complete the following steps.
1) Put together the wheel assembly:
a. Put a machine bushing (10) onto each end of the axle (3);
b. Slide a wheel (8) onto each end of the axle; then
c. Secure the wheels to the axle by inserting cotter pins (9) through the pin holes in the ends of the axle.
2) Fasten the upper part of the pry plate to the handle:
a. Put a lock washer (5) and then a flat washer (4) on each of the shorter bolts (6);
b. Place the pry plate (1) against the handle (2) and align the bolt holes in the handle with the threaded holes in the
back side of the pry plate.
c. Insert the bolts through the upper bolt holes in the handle and wind them into the upper holes in the pry plate. Do not
tighten the connections at this time.
3) Fasten the wheel assembly (from step 1) to the handle and pry plate:
a. Put a lock washer and then a flat washer on each of the longer bolts (7);
b. Make sure that the lower bolt holes in the handle align with the lower threaded holes in the pry plate.
c. Insert the bolts through the axle, through the lower bolt holes in the handle, and wind them into the pry plate.
4) Tighten all connections.
Use instructions: To lift an object with the pry bar,
1) Slide the pry plate under the object. Apply steady pressure to the axle to push the plate under the object; then
2) Carefully pull down the end of the handle. Make sure that the pry plate does not slip out from under the object.
Inspections: Perform the inspections explained below and maintain the pry bar as described to ensure that the unit is and
remains in normal, safe operating condition.
If a problem is discovered during an inspection, restore the unit to normal operating condition
BEFORE using it again. DO NOT use the unit if repairs are incomplete! While servicing the pry bar, DO NOT modify it in any
way. A “modification” is a change that alters the product from original condition, like bending the structural members or
removing parts. Modifications might make the device unsafe to use and automatically void the limited warranty.
Before each use, including first use, inspect:
1. Handle and pry plate: look for regions of significant wear, cracks, deformation and rot.
2. Wheels and mounting hardware: roll the pry bar to confirm that the wheels and bushings are in normal condition.
Examine the axle, machine bushings and cotter pins. The axle should be straight and undamaged. Bushings should
be undamaged and allow the wheels to turn smoothly without contacting the cotter pin. The cotter pin should be
undamaged and securely attached to the axle pin.
3. Product labels: all labels should be readable and located as shown in the “Label placement diagram” on p. 4. If a
label is unreadable or missing, contact Vestil to order a replacement.
Item
Part no. Description Quantity
1 33-014-006 Frame, pry plate 1
2
33-014-003
33-014-004
33-014-005
Wooden handle:
PLB-5
PLB-6
PLB-7
1
1
1
3 33-112-004 Pin, axle 1
4 33008 Flat washer, low carbon, USS, zinc-plated,
3
/
8
in. 2
5 33622
Split lock washer, carbon steel, medium zinc
finish,
3
/
8
in.
4
6 11112
3
/
8
“ -16 x 2
1
/
4
“ HHCS bolt 2
7 11116 HHCS #2, zinc-plated,
3
/
8
” -16 x 3
1
/
4
“ bolt 2
8 16-132-020
5in. x 2in. poly on steel wheel, roller bearing, for
3
/
4
in. axle
2
9 65058 Cotter pin, low carbon steel, zinc-finish,
7
/
64
” x 1
1
/
2
” 2
10 33424
Machine bushing, low carbon, plain finish,
3
/
4
” x
18ga.
4
* 33-154-001
Complete replacement wheel kit (items numbered 8,
9, & 10)
* 33-154-002 Complete replacement hardware kit
Bekijk gratis de handleiding van Vestil PLB-5, stel vragen en lees de antwoorden op veelvoorkomende problemen, of gebruik onze assistent om sneller informatie in de handleiding te vinden of uitleg te krijgen over specifieke functies.
Productinformatie
| Merk | Vestil |
| Model | PLB-5 |
| Categorie | Niet gecategoriseerd |
| Taal | Nederlands |
| Grootte | 744 MB |


