Vemer Oikos Wi-Fi.NOW handleiding
Handleiding
Je bekijkt pagina 2 van 2
WHAT TO DO IF THE ROUTER IS REPLACED
12
In case of replacement of the Router/Access Point of the home network or if it is necessary to change the network settings entered in the device
(SSID network name or password) configure the device described in BOX 10.
Important: Do not remove/delete the device from the application of the user with whom the device is associated before proceeding with the configuration procedure.
HOW TO DELETE DEVICE ASSOCIATION FROM AN ACCOUNT (DE-LINK)
13
If it is necessary to assign control of the device to another user (typical situation for example when the device is installed in a rented home and the tenants change),
proceed as follows through using one of the two alternative ways:
a. on the old user's phone:
1. Launch the App and access the building in which the device is contained by pressing the “ENTER” key.
2. Now locate the device to be disassociated and press the “
” key to its right.
3. Select the "Delete" item in the drop-down menu and confirm.
The De-Link procedure is finished. At this point wait for the orange LED on the Oikos Wi-Fi to start flashing slowly (it may take a few minutes).
b. if you do not have the old user's credentials, proceed as follows:
1. Launch the App and press the “ ” key in the top left of the Home page.
2. Follow the instructions in the wizard and press “Next”.
3. On the Oikos Wi-Fi press the T key. The green LED will start flashing fast for a few seconds and will then flash slowly for approximately 5 minutes (set-up mode).
4. On the phone check in the settings that you have activated the Bluetooth connection.
5. On the App:
a. follow the instructions in the wizard and press “Next”
b. find and select in the list the device “OW_...” to connect to the Oikos Wi-Fi (the green LED will become a steady light to indicate the connection between the app
and the device)
c. select the “De-Link” key and confirm.
The De-Link procedure has ended. At this point:
the App displays the De-Link message allowing you to return to the Home page
on the Oikos Wi-Fi the orange LED will light up for a few seconds to signal the restart phase and will then start flashing slowly.
At the end of one of the 2 procedures it is possible to configure the device described in BOX 10.
LED SIGNALS
14
The colours of the LED on the device, based on the types of ignition described in the table, explain the operating status of the device:
Colour
Type of switch on Operating status
GREEN
Steady on Bluetooth connection with smartphone (during the conguration phase of the remote control or local operation)
Fast ashing Bluetooth mode preparation for connection with smartphone
Slow ashing Bluetooth mode on for remote control conguration
YELLOW
Steady on Switching on of the device or restarting
Fast ashing Reporting no Internet connection
Slow ashing Device not congured
RED
Steady on Relay status ON
15
HOW TO PROCEED WITHOUT A CONNECTION
In the event that the device cannot reach the Vemer Cloud due to connectivity problems, LOCAL OPERATION allows connection to the device through the Bluetooth of your
smartphone, allowing programming and configuration of the Chronothermostat without changing the settings in the Cloud.
Failure to connect to the Internet is signalled by the quick flashing of the Orange LED on the device.
The device automatically resumes normal operation as soon as the Cloud connection is restored
interrupting the programming and configuration of LOCAL OPERATION.
To activate Local Operation:
1.On the App:
a. access the building in which the device has been configured and once it has been identified, access it by pressing the relative “ENTER” key
b. access the Settings via the menu key in the top right and then select Advanced Settings
c. select Local Operation
2. On the Oikos Wi-Fi press the T key, the green LED will begin to flash quickly for a few seconds and will then flash slowly for approximately 5 minutes.
3. On the phone check in the settings that you have activated the Bluetooth connection.
4. On the App:
a. follow the instructions in the wizard and press Next
b. find and select in the list the device “OW_...” to connect to the Oikos Wi-Fi (the green LED will become a steady light to indicate the connection between the app and the device)
c. the application will verify and report the problem of no connection:
• LAN: device not connected to the home router. If this condition persists, check that the home router is powered on and working properly and that
the home Wi-Fi network data (SSID network name or password) entered when configuring the device is correct (see BOX10).
• NET: device connected to the home router but not connected to the Internet.
• CLOUD: no connection to the Vemer Cloud. The problem resolves itself once the connection between Cloud Vemer and the device is restored.
If this condition persists for more than 24 hours, do not perform any operation and contact Vemer support.
d. set the desired temperature value using the + and - keys and press the “Save” key.
During the period of using Local Operation on the App, on the Device Detail page, the icon appears
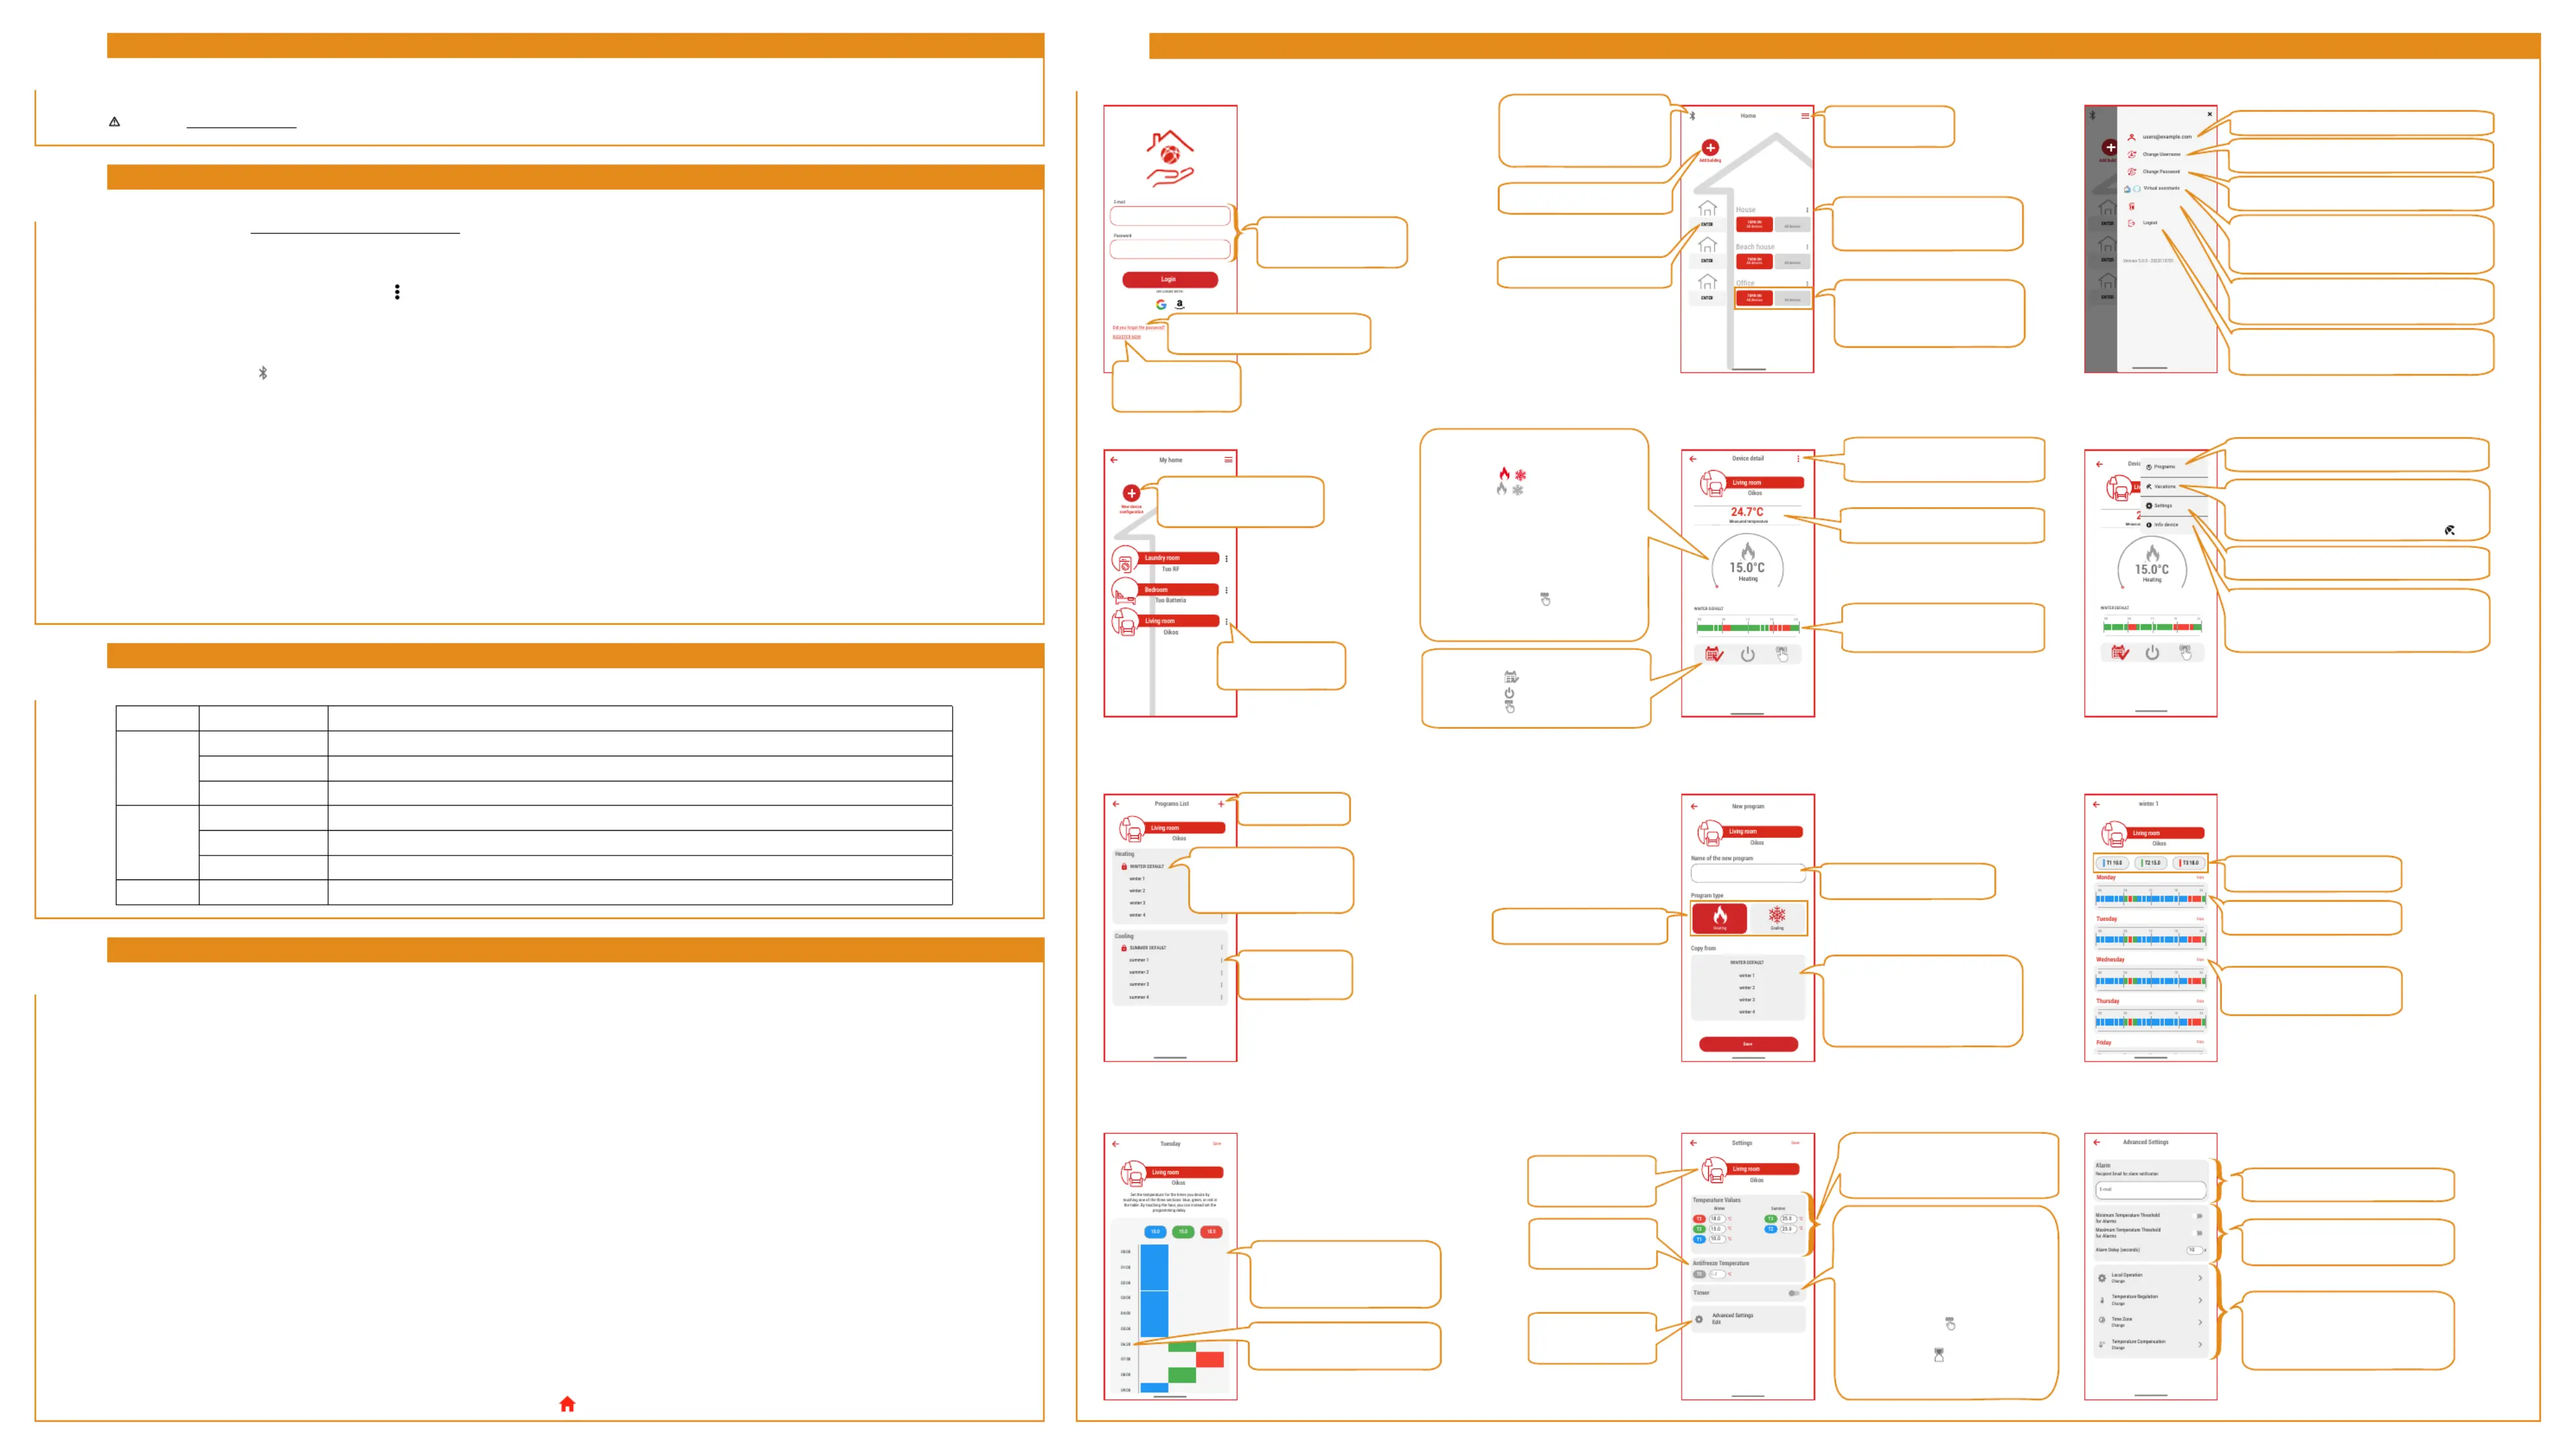
APP DESCRIPTION
16
E-mail
Password
Login
Did you forgot the password?
REGISTER NOW
OR LOGIN WITH:
LOGIN
BUILDING
Programs List
Living room
Oikos
Heating
WINTER DEFAULT
winter 1
winter 2
winter 3
winter 4
Cooling
SUMMER DEFAULT
summer 1
summer 2
summer 3
summer 4
PROGRAMS LIST
Enter e-mail and passwords
chosen during registration
(see BOX 9)
Used to create a new
Vemer account
(see BOX 9)
Recover login credentials if forgotten
ENTER
ENTER
Add build
ENTER
Version 5.0.0 - 2023110701
Logout
Delete Account
Virtual assistants
Change Password
Change Username
users@example.com
APPLICATION MENU
Lavanderia
Oikos
Bedroom
Laundry room
Tuo RF
Tuo Batteria
Living room
My home
New device
configuration
Used to rename, move or
delete the device
Used to start the configuration
procedure of a new device
(see BOX 10)
Measured temperature
24.7°C
Device detail
Living room
Oikos
WINTER DEFAULT
00
06
12
18
24
Heating
15.0°C
DEVICE DETAIL
They allow access to the advanced
configuration of the device
Indicates the measured temperature
(24.7°C)
Indicates the name and chart of the
program running: tap this area to access
the program list
Meausured temperature
24.7°C
Device detail
Living room
Oikos
WINTER DEFAULT
00
06
12
18
24
Heating
15.0°C
Programs
Vacations
Settings
Info device
CONFIGURATION MENU
Allows access to the archive of programs
saved in the Cloud
Used to access the Holiday menu where it is possible to
set the days on which the adjustment is switched off by
selecting them on the calendar. During the holiday period,
the icon appears on the Device Detail page
Allows access to the device settings menu
Used to create a new
program
The padlock on the left in the
DEFAULT WINTER name indicates
that that program cannot be
changed or deleted
EDIT SCHEDULE (PART 1)
Advanced Settings
Local Operation
Change
10
s
Minimum Temperature Threshold
for Alarms
Maximum Temperature Threshold
for Alarms
Alarm Delay (seconds)
Alarm
Recipient Email for alarm notification
E-mail
Time Zone
Change
Temperature Regulation
Change
Temperature Compensation
Change
A
ADVANCED SETTINGS
Home
Add building
House
ENTER
ENTER
ENTER
TURN ON
All devices
Beach house
Office
TURN OFF
All devices
TURN ON
All devices
TURN ON
All devices
TURN OFF
All devices
TURN OFF
All devices
HOME
Used to start the Reset or De-Link
procedure of a device
via Bluetooth connection
(see BOX 11 and BOX 13)
Allows access to the
application menu
Used to rename or delete
(in case there are no devices
configured inside) the building
They allow all the devices configured
inside the building to be switched on
or off with a single command
Used to rename or
delete the program
New program
Living room
Oikos
Name of the new program
Program type
Copy from
WINTER DEFAULT
winter 1
winter 2
winter 3
winter 4
Save
Heating
Cooling
PROGRAM CREATION
Used to name
the new program
They allow selection
of the program operating mode
Used to select an existing program from
which to copy the settings. Once the
new program has been created, it will
be possible to modify its characteristics
(see program modification)
winter 1
Living room
Oikos
Monday
T1 10.0
T2 15.0
T3 18.0
Copy
Copy
Copy
Copy
Copy
Tuesday
Wednesday
Thursday
Friday
00
06
12
18
24
00
06
12
18
24
00
06
12
18
24
00
06
12
18
24
00
06
12
18
24
Tuesday
Living room
Oikos
Save
Set the temperature for the times you desire by
touching one of the three sections: blue, green, or red in
the table. By touching the hour, you can instead set the
programming delay.
10.0
15.0
18.0
00:00
01:00
02:00
03:00
04:00
05:00
06:30
07:00
08:00
09:00
EDIT PROGRAM (PART 2)
Used to set a switching delay
by tapping on the desired time
They are used to assign one of the
temperatures T1, T2 and T3 (identified
by the colours blue, green and red)
to each time of day
Used to activate and set the temperature
thresholds and the delay for the alarm to go off
and the e-mail to be sent
Used to enter the user e-mail that
will receive the alarm
Used to create a new building
Allows access to the building
Settings
Living room
Oikos
Save
Antifreeze Temperature
T0
6.0
°C
Temperature Values
T1
T2
T3
Winter
Summer
T2
T3
10.0
°C
18.0
°C
15.0
°C
25.0
°C
23.0
°C
Advanced Settings
Edit
Timer
SETTINGS
Used to deactivate
or set the temperature
value T0
Used to rename
and change
the product icon
Allows access to the
advanced functions
of the device
Used to activate and deactivate
a timing. The timings are used to maintain
Manual operation for the set period,
after which the device switches
to automatic operation.
This field is only visible when the device
is being used in
Manual mode.
During the timing period,
the icon
appears on
the Device Detail page
They are used to set the values
of the temperatures T1, T2 and T3 for
the Winter (Heating) and Summer
(Air Conditioning) operating modes
Used to change the value of the
temperatures T1, T2 and T3
Used to edit the program profile
of the selected day
The copy function is used to copy
the same program on several days
of the week
Used to change the operating mode:
Automatic
Off
Manual
The central area of the page indicates:
1)the status of the system
( ) red= on
( ) grey= off
by using the icon it is possible to change the
operating mode of the device
(heating/conditioning)
2) the set temperature (15.0°C),
3) lthe operating mode (Heating)
4) in Manual mode (
) by using the
red cursor it is possible to increase
or decrease the set temperature
Vemer account used to access the application
Used to change the username of the account with
which you logged into the application
Used to change the password of the account with
which you logged into the application
Used to associate with your Google or Amazon
account to interact with the device
by giving voice commands
Used to delete the Vemer account created with the
registration from the Cloud server (as required by GDPR)
Used to log out of the application to be able to access it
with another user (see BOX 9)
Used to view device information:
1) Identifier
2) MAC address
3) Wi-Fi signal strength
They allow access to the screens:
1) Local Operation (see BOX 15)
2) Temperature regulation
3) Time zone
4) Temperature compensation
Bekijk gratis de handleiding van Vemer Oikos Wi-Fi.NOW, stel vragen en lees de antwoorden op veelvoorkomende problemen, of gebruik onze assistent om sneller informatie in de handleiding te vinden of uitleg te krijgen over specifieke functies.
Productinformatie
| Merk | Vemer |
| Model | Oikos Wi-Fi.NOW |
| Categorie | Thermostaat |
| Taal | Nederlands |
| Grootte | 1084 MB |
