Uniprodo UNI_SAUNA_S6.0KW handleiding
Handleiding
Je bekijkt pagina 6 van 23
1110
03.06.2022
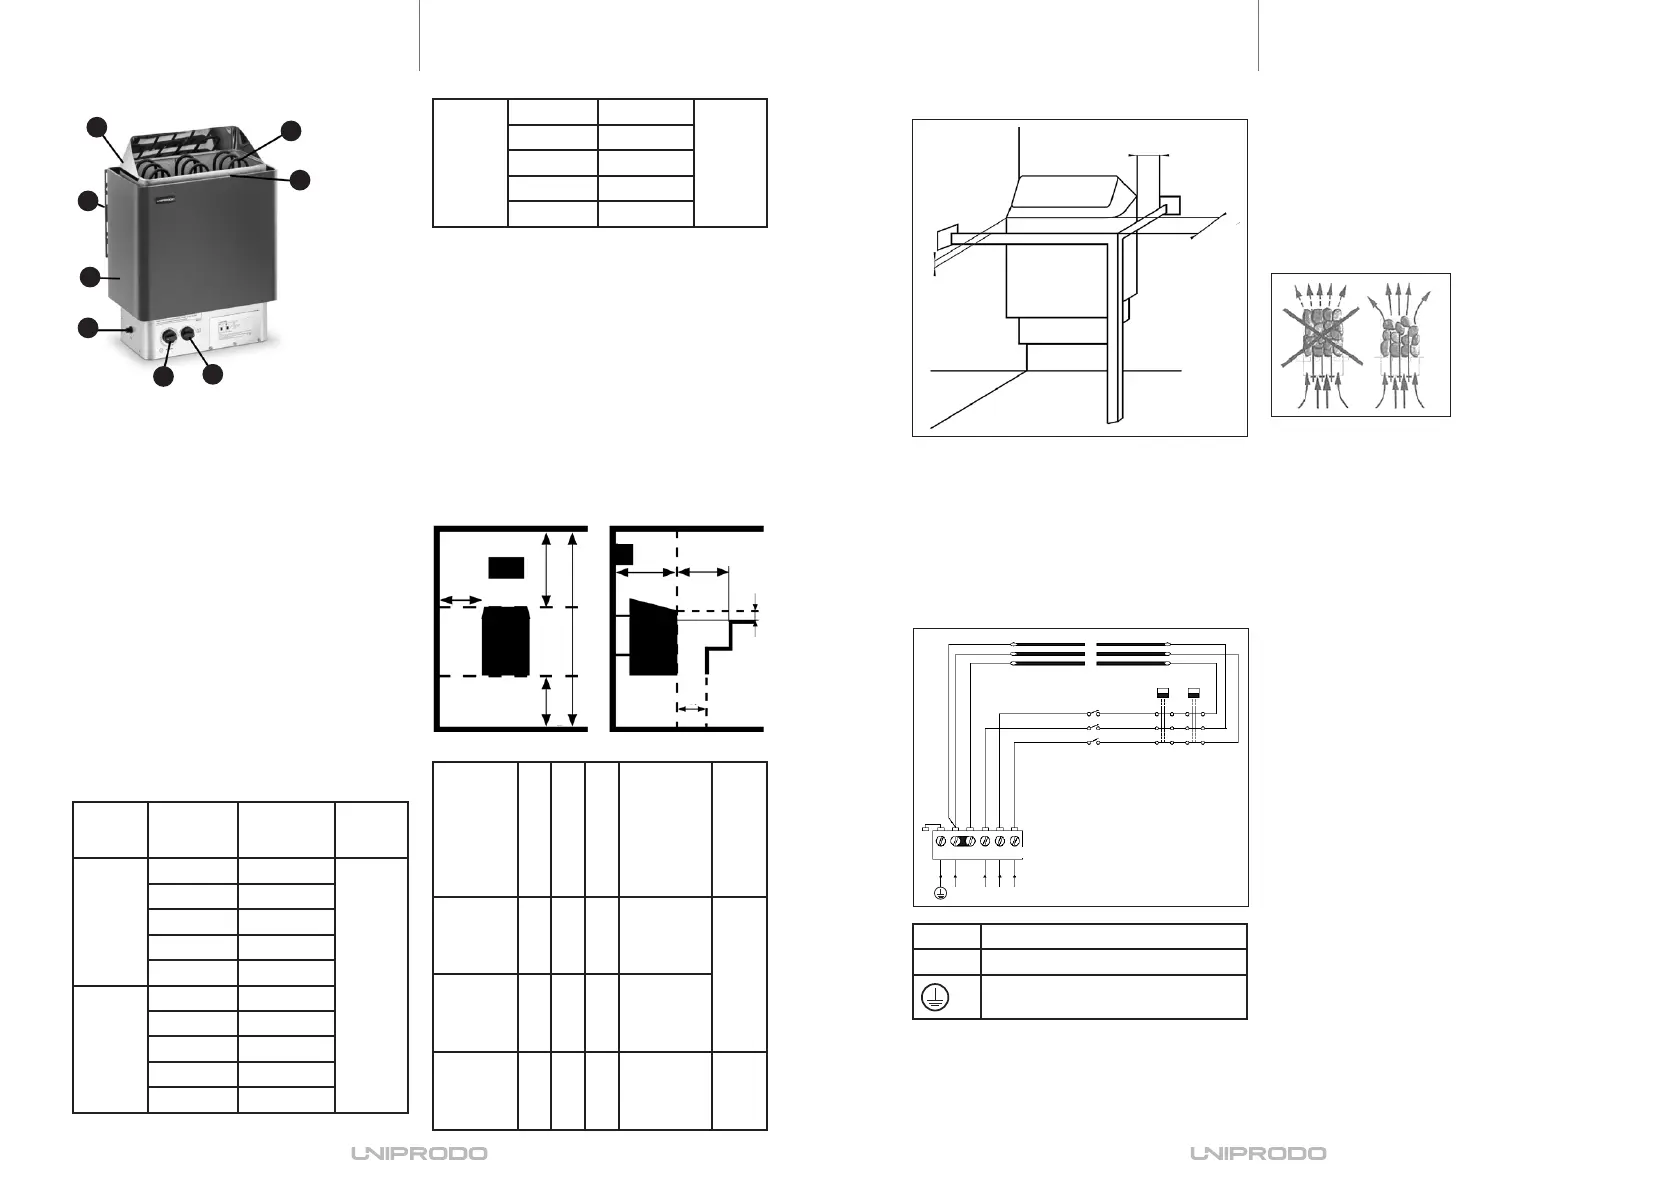
1. Heater deector
2. Mounting frame
3. Outer shield
4. “RESET” button
5. Time adjustment knob
6. Temperature adjustment knob
7. Vent
8. Heating elements
9. Power cord (not shown in the picture)
3.2. PREPARING FOR USE
Before installing, consult your local re department in
order to meet the re protection requirements. The
device should be located in a room with walls with
proper thermal insulation. The sauna oor should be
made of a material resistant to high temperatures and
humidity. Ventilation in the sauna must have a sucient
extraction capacity to replace all sauna air six times per
hour. The power cord connected to the appliance must
be properly grounded and correspond to the technical
details on the product label.
Connection to the electrical installation
Note: the heater must be connected by a qualied
electrician.
• The cable used to connect the heater to power
supply must be sheathed in REVE rubber (or
equivalent)
• The junction box must be waterproof and at least
50 cm above the ground.
• The junction box must be airtight and waterproof
with a condensation opening and 7 mm thick
walls.
3.1. DEVICE DESCRIPTION
Installation of guard rails
Min 50mm
Min 50mm
Min 20mm
Heater
model
A min [cm]
B min [cm]
C min [cm]
Minimum
distance to
the heater
[cm] (If the
heater guard
rail is 500 mm
above the
oor)
Wires
[mm
2
]
(400V
3ph)
UNI_SAUNA
_B4.5W
UNI_SAUNA
_S4.5KW
8 28 10 8
5x1,5
UNI_SAUNA
_B6.0KW
UNI_SAUNA
_S6.0KW
10 28 15 15
UNI_SAUNA
_S8.0KW
UNI_SAUNA
_S9.0KW
13 30 20 20 5x2,5
A
C
2cm
min. 120cm
min. 190cm
min. 18cm
X
X
B
5cm
X – Sensor unit
Placing heating stones in the sauna heater
The rocks should be 4-8 cm in diameter.
1. Before arranging the heating stones, make sure
that the device is turned o and the device
temperature does not pose the risk of burns.
2. Place stones inside the heater so that the weight
of the next stone rests on the stone already laid.
3. Make sure that the rocks do not rest against the
heating elements.
4. Lay the rocks loosely on top of each other to allow
free air ow.
N L1 L2 L3
1 2 3 4 5 6
1
2
3
L1 L2 L3 live wire ports
N
neutral wire ports
ground wire ports
3.3. DEVICE USE
1. Start the device
a) Using the time knob, start the device.
b) Set the desired operating time by turning the time
knob accordingly.
2. Set the temperature.
a) Using the temperature knob, set the desired
temperature.
3. Wait for the device to reach the desired
temperature.
4. After using the device:
a) If the timer is counting down, set it to „zero“.
b) If the timer has nished counting down and is
in the zero position, wait for the device to reach
room temperature.
Overheating protection and "RESET" button operation
If the temperature of the device reaches the safety
limit, the power will be cut o and the device will turn
o to prevent overheating. To restart the device, cool
the device and press the "RESET" button. It is also
recommended to check whether overheating has not
damaged the device.
3.4. CLEANING AND MAINTENANCE
a) Wait for the device to reach room temperature
before carrying out any maintenance work.
b) Use only non-corrosive cleaners to clean the
surface.
c) After cleaning the device, all parts should be dried
completely before using it again.
d) Use a soft, damp cloth for cleaning.
e) To descale, use only specic cleaners intended for
this purpose.
8
7
6
5
4
3
2
1
SELECTION OF SAUNA STOVE POWER
The table shows the recommended power of the heater
depending on the ambient temperature and the volume
of the sauna.
Ambient
tempera-
ture [°C]
Sauna vol-
ume [m3]
Recommend
Heater Out-
put [kW]
Temper-
ature
range [°C]
>22
3-6 ≥4.5
30-110
5-9 ≥6.0
8-12 ≥8.0
9-13 ≥9.0
9-13 ≥11.5
12-22
3-6 ≥6.0
5-9 ≥8.0
8-12 ≥9.0
8-12 ≥11.5
9-13 ≥12
NOTE: If an inappropriate device power is selected, the
temperature range achieved may vary.
The above suggested heater powers are oered based
on an indoor sauna with berglass insulation with
aluminum foil inside the walls and ceiling.
5-11
3-6 ≥8.0
30-110
5-9 ≥9.0
5-9 ≥11.5
8-12 ≥12
9-13 ≥15
ASSEMBLING THE APPLIANCE
Important: do not install the oven in cavities.
• Make sure that the device power source meets
the manufacturer‘s instructions.
• Before starting the installation, make sure that
the electric current to be supplied to the heater
meets the manufacturer‘s specications.
• Make sure that the user has enough rocks for the
sauna heater.
• Make sure that the heater will be installed in the
place that meets the requirements included in the
picture below.
EN EN
Bekijk gratis de handleiding van Uniprodo UNI_SAUNA_S6.0KW, stel vragen en lees de antwoorden op veelvoorkomende problemen, of gebruik onze assistent om sneller informatie in de handleiding te vinden of uitleg te krijgen over specifieke functies.
Productinformatie
| Merk | Uniprodo |
| Model | UNI_SAUNA_S6.0KW |
| Categorie | Niet gecategoriseerd |
| Taal | Nederlands |
| Grootte | 3868 MB |


