Uniprodo UNI_PBM_58 handleiding
Handleiding
Je bekijkt pagina 5 van 19
98
15.11.2023
3 4
1
2
4
5
6
3
2
5
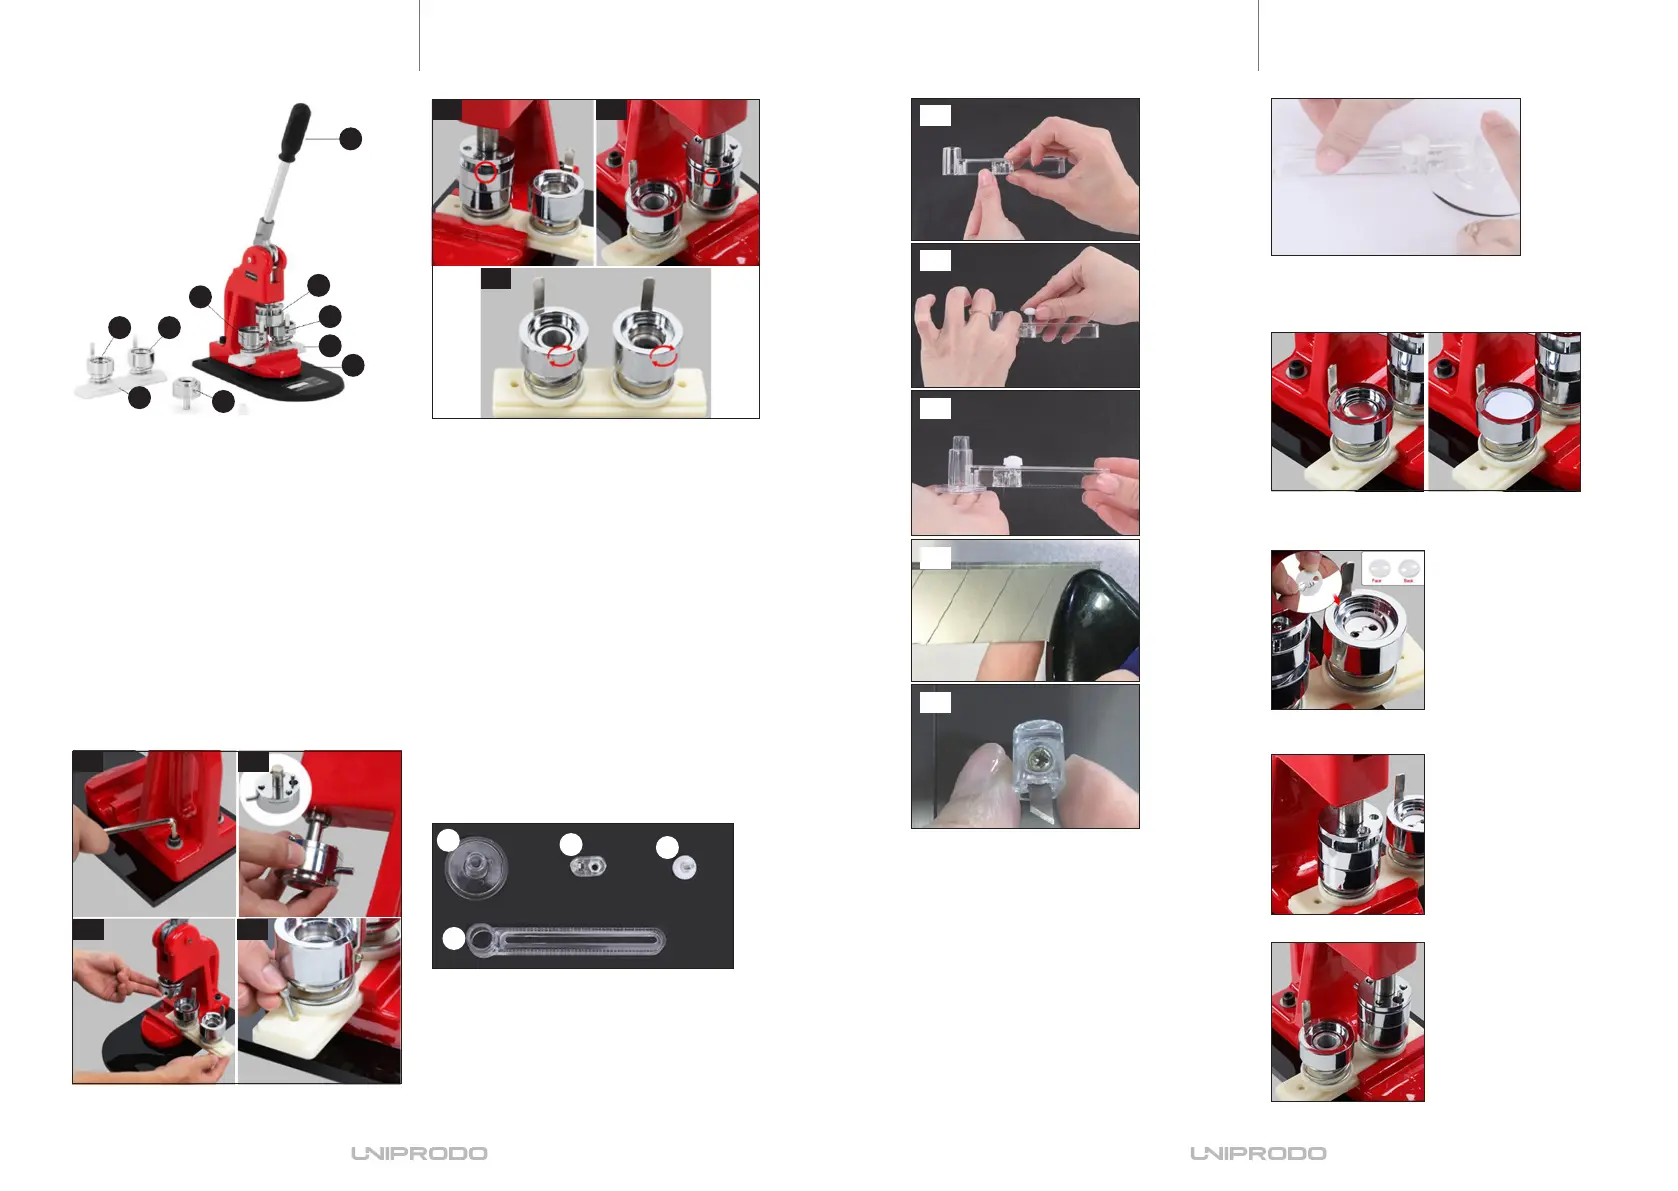
EN
1. Place the blade in the handle as shown on the
picture.
2. Put the knob securing the knife blade in the right
place (as shown on the picture) and adjust it.
3. Put the position locator in the designated place.
4. The knife blade is replaceable. To replace it, break
o apiece of the blade from the technical knife
(with abroken blade).
5. Remove the screw and replace the blade.
3.3. DEVICE USE
3.3.1. PREPARING THE PATTERN
WITH ACUTTING DEVICE
1. Place the position locator on the printed (or
drawn) pattern/design. With one hand, grab the
position locator and press it against the paper,
and with the other hand, rotate the handle until
the pattern disc is cut out.
3.3.2. PREPARING BUTTONS
1. Place the metal cap in the „A” mold. Then place
the previously prepared pattern on it (cut out in
the correct size). Put atransparent foil at the end.
2. Place the metal clasp in the „B” mold.
CAUTION! Remember that the clasp (safety pin) is
pointing downwards.
3. Move the „A” mold under the lever and press
down. All items will be in the upper mold.
4. Move the „B” mold under the lever and press down.
4
5
EN
1. Prepare the base of the device. Screw the body to
the base of the machine using asmall hexagonal
(Allen) key.
2. The upper mold should be inserted into the hole
under the lever. Make sure that the pin is inserted
into aspecial hole.
3. Slide the mold base (together with the molds) into
the special guides (as shown on the picture).
4. Move the base so that the upper mold is between
the lower molds. Place the positioning pins in the
holes on both sides of the sliding base.
5. Checking the operation. Move the „A” mold under
the lever (under the upper mold) and press down.
CAUTION! There will be agap in the upper mold,
but there will be no gap between the upper mold
and the „A” mold.
6. Checking the operation. Move the „B” mold under
the lever (under the upper mold) and press down.
CAUTION! There will be no gap in either the upper
mold or between the upper mold and the „B”
mold.
7. Mold setting adjustment. If the lower molds are
not aligned, adjust them manually (gently turn the
mold the right way round).
3.2.3. CUTTING TOOL ASSEMBLY
1. Position locator
2. Knife
3. Knob (adjustable)
4. Handle (adjustable)
1. Lever handle
2. Upper mold
3. „A” mold
4. „B” mold
5. Sliding mold base
6. Base of the machine
ACCESSORIES:
1. Cutting device
2. Metal cover
3. Transparent foil
4. Metal clasp
3.2. PREPARING FOR USE
3.2.1. APPLIANCE LOCATION
The device should always be used when positioned on
an even, stable, clean, fireproof and dry surface, and be
out of the reach of children and persons with limited
mental and sensory functions.
3.2.2. ASSEMBLING THE DEVICE
1
2
3
4
1
2
3
3.1. DEVICE DESCRIPTION
5 6
7
1 2
3 4
Bekijk gratis de handleiding van Uniprodo UNI_PBM_58, stel vragen en lees de antwoorden op veelvoorkomende problemen, of gebruik onze assistent om sneller informatie in de handleiding te vinden of uitleg te krijgen over specifieke functies.
Productinformatie
| Merk | Uniprodo |
| Model | UNI_PBM_58 |
| Categorie | Niet gecategoriseerd |
| Taal | Nederlands |
| Grootte | 11298 MB |


