Handleiding
Je bekijkt pagina 21 van 52
English - 20 -
(**) Limited Models Only
the same error, it is possible that your USB disk does
not meet the speed requirements. Try connecting
another USB disk.
The recording function has been designed for private
use and entertainment in your environment.
Please note that any commercial use of the recording
function could lead to copyright infringement of
authors' rights. Toshiba asks you to respect the
intellectual property rights of third parties.
Media Browser
You can play back music and movie les and display
photo files stored on a USB storage device by
connecting it to your TV. Connect a USB storage device
to one of the USB inputs located on the side of the TV.
After connecting a USB storage device to your TV, the
Sources bar will be displayed with USBx highlighted.
Press OK, Media Browser menu will be displayed on
the screen. Select the le of your choice and press OK
to display or play it back. You can access the content
of the connected USB device any time later from the
Sources menu. You can also press the Source button
on the remote and then select your USB storage device
from the list of sources.
You can set your media browser preferences by using
the Settings menu. Settings menu can be accessed
via the information bar which is displayed on the
bottom of the screen while playing back a video or
an audio le or displaying a picture le. Press the
Info button if the information bar has disappeared,
highlight the gear wheel symbol positioned on the
right side of the information bar and press OK. Picture
Settings, Sound Settings, Media Browser Settings
and Options menus may be available depending on
the media le type and the model of your TV and its
features. The content of these menus may also dier
according to the type of the currently open media le.
Only Sound Settings menu will be available while
playing back audio les.
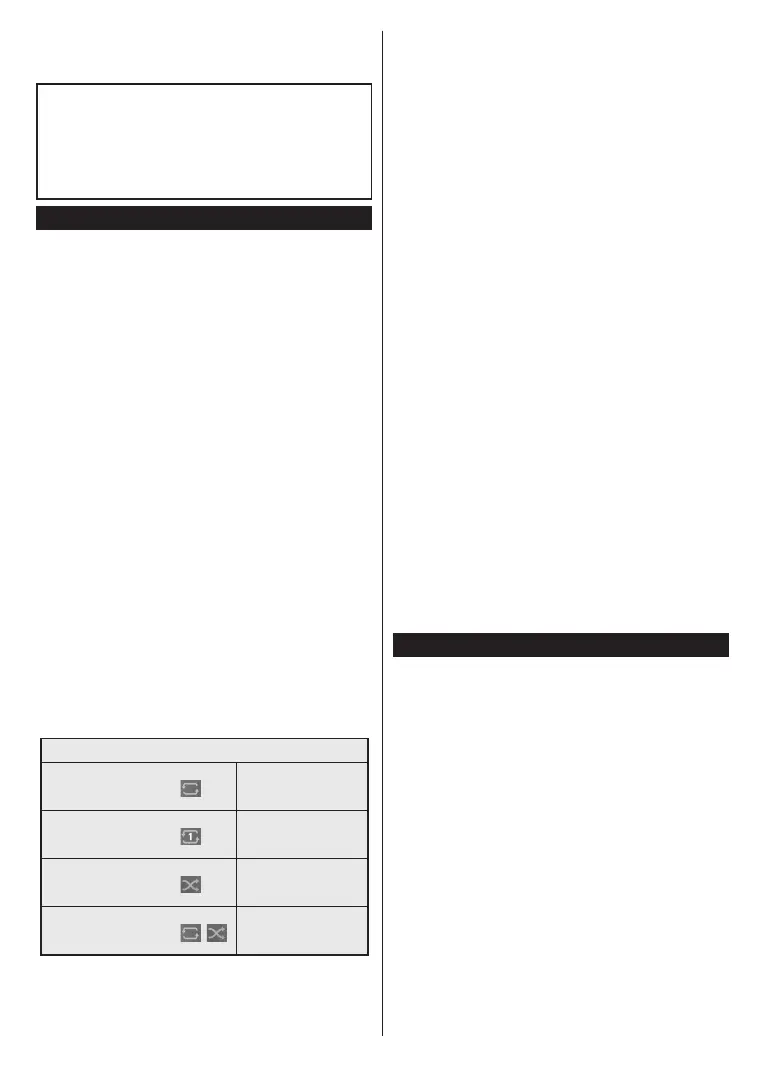
Loop/Shue Mode Operation
Start playback and activate
All les in the list will be
continuously played in
original order
Start playback and activate
The same le will be
played continuously
(repeat)
Start playback and activate
All les in the list will be
played once in random
order
Start playback and activate
,
All les in the list will be
continuously played in
the same random order
To use the functions on the information bar highlight the
symbol of the function and press OK. To change the
status of a function highlight the symbol of the function
and press OK as much as needed. If the symbol is
marked with a red cross, that means it is deactivated.
Custom Boot Up Logo
You can personalize your TV and see your favourite
image or photo on the screen each time your TV boots
up. To do this, copy your favourite image les into a
USB disk and open them in the Media Browser. Select
USB input from the Sources menu and press OK.
When you have chosen the desired image, highlight
it and press OK to view it in full screen. Press the
Info button, highlight the gear wheel symbol on the
information bar and press OK. Select Options and
press OK to enter. Set Boot Logo option will be
available. Highlight it and press OK again to choose the
image as custom boot logo. A conrmation message
will be displayed. Select Yes and press OK again. If
the image is suitable(*) you will see it on the screen
during the TV’s next boot up.
Note: You can use the Restore Default Boot Logo option in
the Settings>System>More menu to restore the default boot
logo. If you perform First Time Installation the boot logo will
also be restored to its default.
(*) Images should be in jpeg le formats. Only les with sizes
no greater then 4MB are supported. FollowMe TV
With your mobile device you can stream the current
broadcast from your smart TV using the FollowMe
TV feature. Install the appropriate Smart Center
application to your mobile device. Start the application.
For further information on using this feature refer to
the instructions of the application you use.
Note: Depending on model, your TV may not support this
function. The application may not be compatible with all mobile
devices. UHD (4K, Ultra HD) channels are not supported and
both of the devices must be connected to the same network.
CEC
This function allows to control the CEC-enabled
devices, that are connected through HDMI ports by
using the remote control of the TV.
The CEC option in the Settings>Devices menu should
be set as Enabled at rst. Press the Source button and
select the HDMI input of the connected CEC device
from the Sources List menu. When new CEC source
device is connected, it will be listed in source menu
with its own name instead of the connected HDMI ports
name(such as DVD Player, Recorder 1 etc.).
The TV remote is automatically able to perform the
main functions after the connected HDMI source has
been selected. To terminate this operation and control
the TV via the remote again, press and hold the “0-
Zero” button on the remote control for 3 seconds.
You can disable the CEC functionality by setting the
related option under the Settings>Devices menu
accordingly.
The TV supports ARC (Audio Return Channel). This
feature is an audio link meant to replace other cables
Bekijk gratis de handleiding van Toshiba 43LL3C63DAY, stel vragen en lees de antwoorden op veelvoorkomende problemen, of gebruik onze assistent om sneller informatie in de handleiding te vinden of uitleg te krijgen over specifieke functies.
Productinformatie
| Merk | Toshiba |
| Model | 43LL3C63DAY |
| Categorie | Televisie |
| Taal | Nederlands |
| Grootte | 7451 MB |


