Thames & Kosmos Robotics Smart Machines: Super Sphere handleiding
Handleiding
Je bekijkt pagina 4 van 64
› › › TIPS AND TRICKS
2
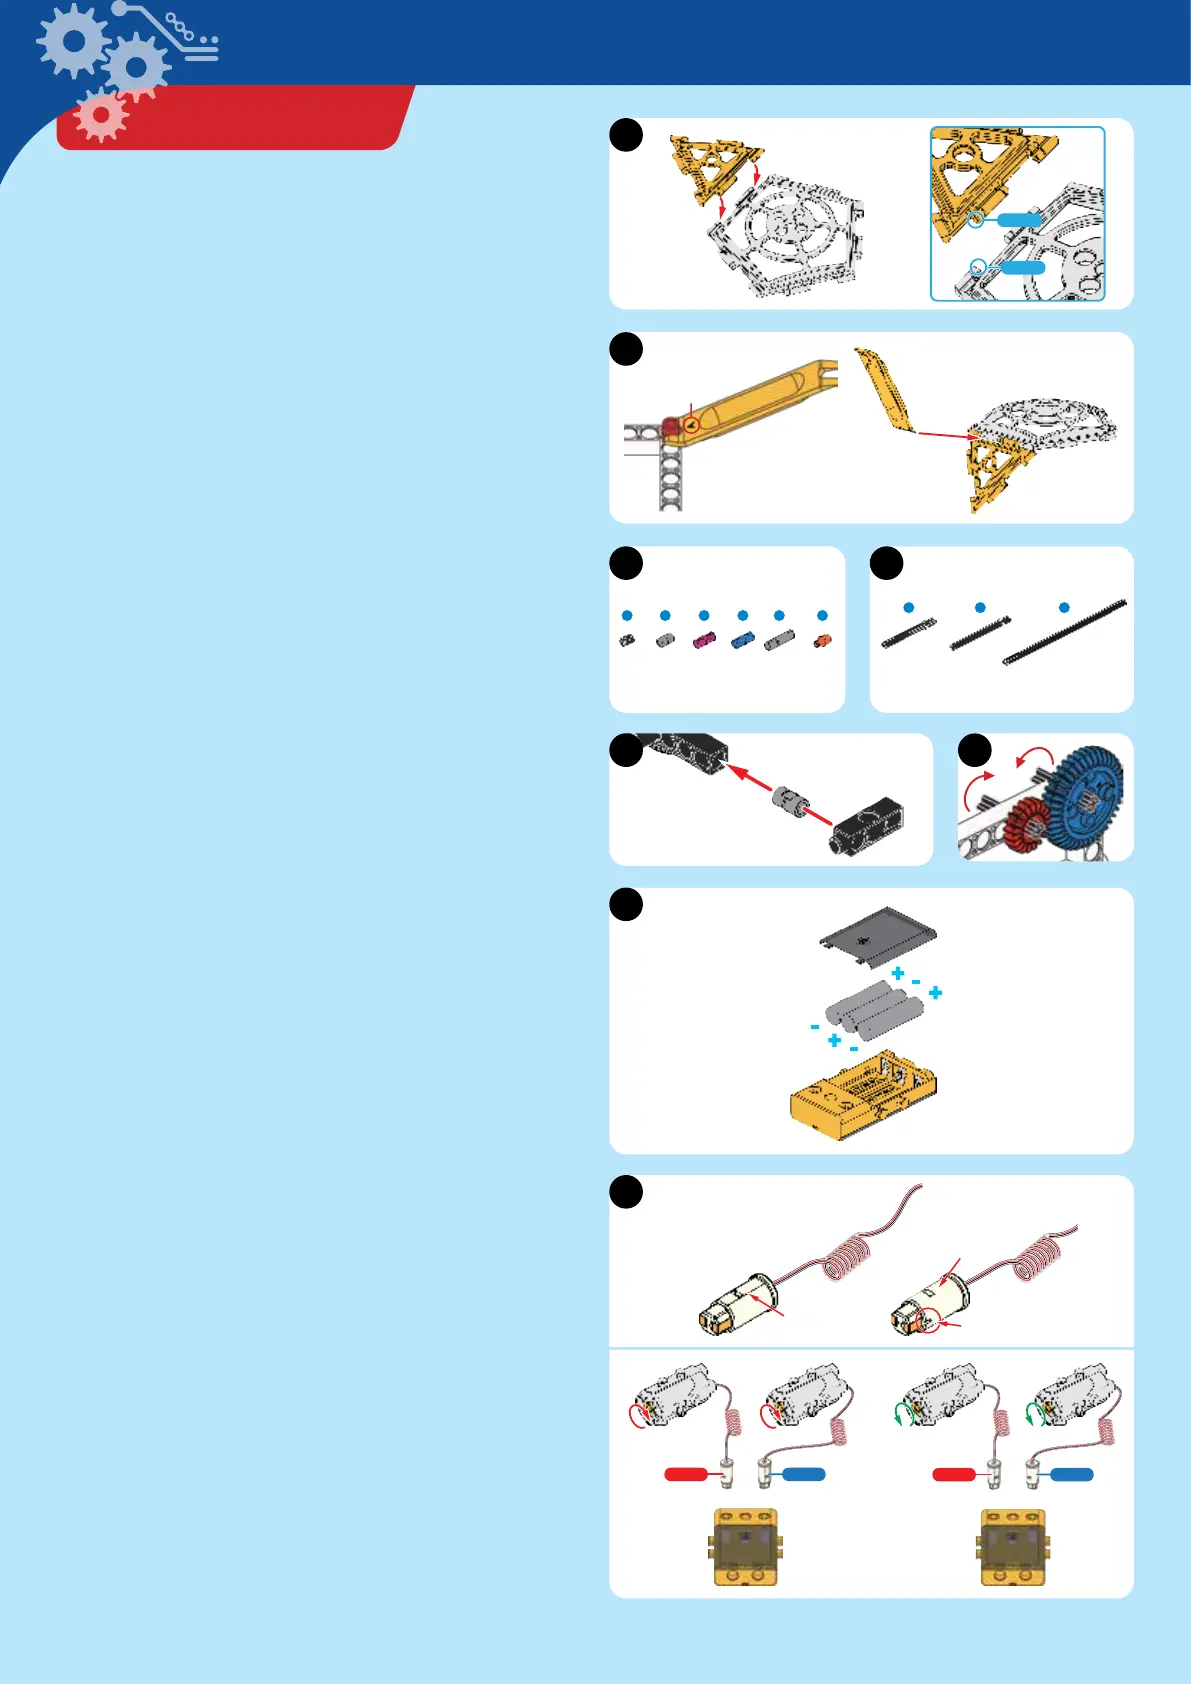
Read these tips for assembling and using the
models before starting.
A. Connecting the shell pieces
The spherical shell of the Super Sphere is made of 32
interlocking triangular and pentagonal pieces. They connect
at their edges, forming flexible joints. Each joint has a bump
and a groove. Slide the bump into the groove to snap the
pieces together. The shell pieces are very strong when
assembled correctly. However, if you push on it in the wrong
way, it might come apart. When puing it together, hold both
sides and use your fingers to connect the joints one at a time.
B. The anchor pin lever
This kit includes a lile yellow tool called the anchor pin
lever. End A of the anchor pin lever makes it easy to remove
anchor pins from the frames. You can use the wide end to
separate other parts, like the shell pieces.
C. Anchor pins and other connectors
Take a careful look at the different assembly components.
Anchor pins, joint pins, and shaft plugs may all look prey
similar at first glance. When you assemble the models, it’s
important to use the right connectors. The black anchor pins
are shorter than the gray ones.
D. Axles
The building system contains axles (also called shafts) of
various lengths. When assembling the model, always be sure
that you’re using the right one.
E. Connecting rods
Use the anchor pins to connect frames and rods. Pay close
aention to the instructions showing exactly which holes
should be used in a particular step. The red and blue lines in
the assembly diagrams show which holes to use.
F. Gear wheels
The models will often have multiple gear wheels installed in
a row. In order for the models to work well, these gears will
have to mesh well. Otherwise, the force from one gear wheel
won’t be properly transferred to the next.
G. Inserting and replacing the baeries
Before building any models, insert the baeries into the
baery compartment in the Bluetooth baery box. Slide the
transparent cover open. Insert (or replace) the baeries
according to the indicated plus-minus polarity markings.
Close the compartment by sliding the cover back on.
H. Inserting the motor wires into the Bluetooth baery box
The plugs on the motor wires are reversible. By flipping them
180 degrees, you will change the direction the motor turns. In
order for the models to move in sync with the remote controls
in the app, you must insert the plugs correctly. Follow the
specific plug orientations in the assembly steps for each
model. Note the small indented line on one side of the plug to
help you insert the motors correctly.
A
A
B
E
G
H
C D
3 x AA
Each joint has bump and groove.
It is easier to slide the bump via groove
while assemble.
bump
groove
The baery box is placed differently in each model. For some models, it is
not easy to install baeries after finishing the model assembly.
We suggest installing the baeries before assembling the model.
The baery box is placed differently in each model. For some models, it is
not easy to install baeries after finishing the model assembly.
We suggest installing the baeries before assembling the model.
Indented line
Flat surface
Curved surface
1 2 3 5 6 87
10
9
11
4
12 13 14 15 16 17 18
20 21
22 23 24
25 26 27 28
19
29 30
31
32 33 34
35
41
36 37
38
39 40 42
1 2 3 5 6 87
10
9
11
4
12 13 14 15 16 17 18
20 21
22 23 24
25 26 27 28
19
29 30 31
32 33 34
35
41
36 37
38
39 40 42
motor Amotor B
Tip-5-B
motor Amotor B
Tip-5-D
F
B
Bekijk gratis de handleiding van Thames & Kosmos Robotics Smart Machines: Super Sphere, stel vragen en lees de antwoorden op veelvoorkomende problemen, of gebruik onze assistent om sneller informatie in de handleiding te vinden of uitleg te krijgen over specifieke functies.
Productinformatie
| Merk | Thames & Kosmos |
| Model | Robotics Smart Machines: Super Sphere |
| Categorie | Niet gecategoriseerd |
| Taal | Nederlands |
| Grootte | 55497 MB |