Thames & Kosmos Chem C1000 handleiding
Handleiding
Je bekijkt pagina 13 van 19
1 cm
0 cm
2 cm
3 cm
4 cm
5 cm
6 cm
7 cm
8 cm
25mL
20mL
15mL
10mL
5mL
For some experiments, you will need somewhat larger containers: the two graduated
beakers (part #6) with lids (part #7). When performing experiments, a graduated
beaker ts securely in the large recess in the experiment station, for example in
Experiments 38 and 88. The small compartment to the side is for accommodating
the square 9-volt battery. Using the beakers, you can measure 10, 25, 50, 75 and
100 milliliters. One milliliter (abbreviated as mL) is one-thousandth of a liter and
corresponds to the cubic centimeter used for solids (abbreviated as cm
3
, cube having
equal edges of 1 cm). To open a lled and sealed graduated beaker, place it on the
table, hold it rmly, take a hold of the tab and pull the lid upward.
The chemical vials (parts #13 – 19) have two chambers: a large one for larger
quantities and a small one for chemicals of which only a little is needed. The
amounts added are as needed and are in line with the safety standards applicable
to experiment kits. The uniform size of the vials is a result of the size of the labels,
which contain information prescribed by law. The illustration shows how to open the
safety closures using the lid opener (part #21). When opening a vial, sometimes a
small amount of the chemical that is stuck to the lid will fall on your hand or on the
work surface. This can be prevented by forcefully tapping the vial on the working
surface several times before opening it. You can place opened chemical vials into the
large recesses in the experiment station, since they easily tip over, which would make
a mess and waste material. Once you have removed the amount you need, close the
vial immediately. See p. 14 for an explanation of how to open and close the safety
closure with dropper insert (part #20) of the bottle for the litmus solution (part #20).
If you have trouble opening or closing the safety closures, ask an adult for help.
11
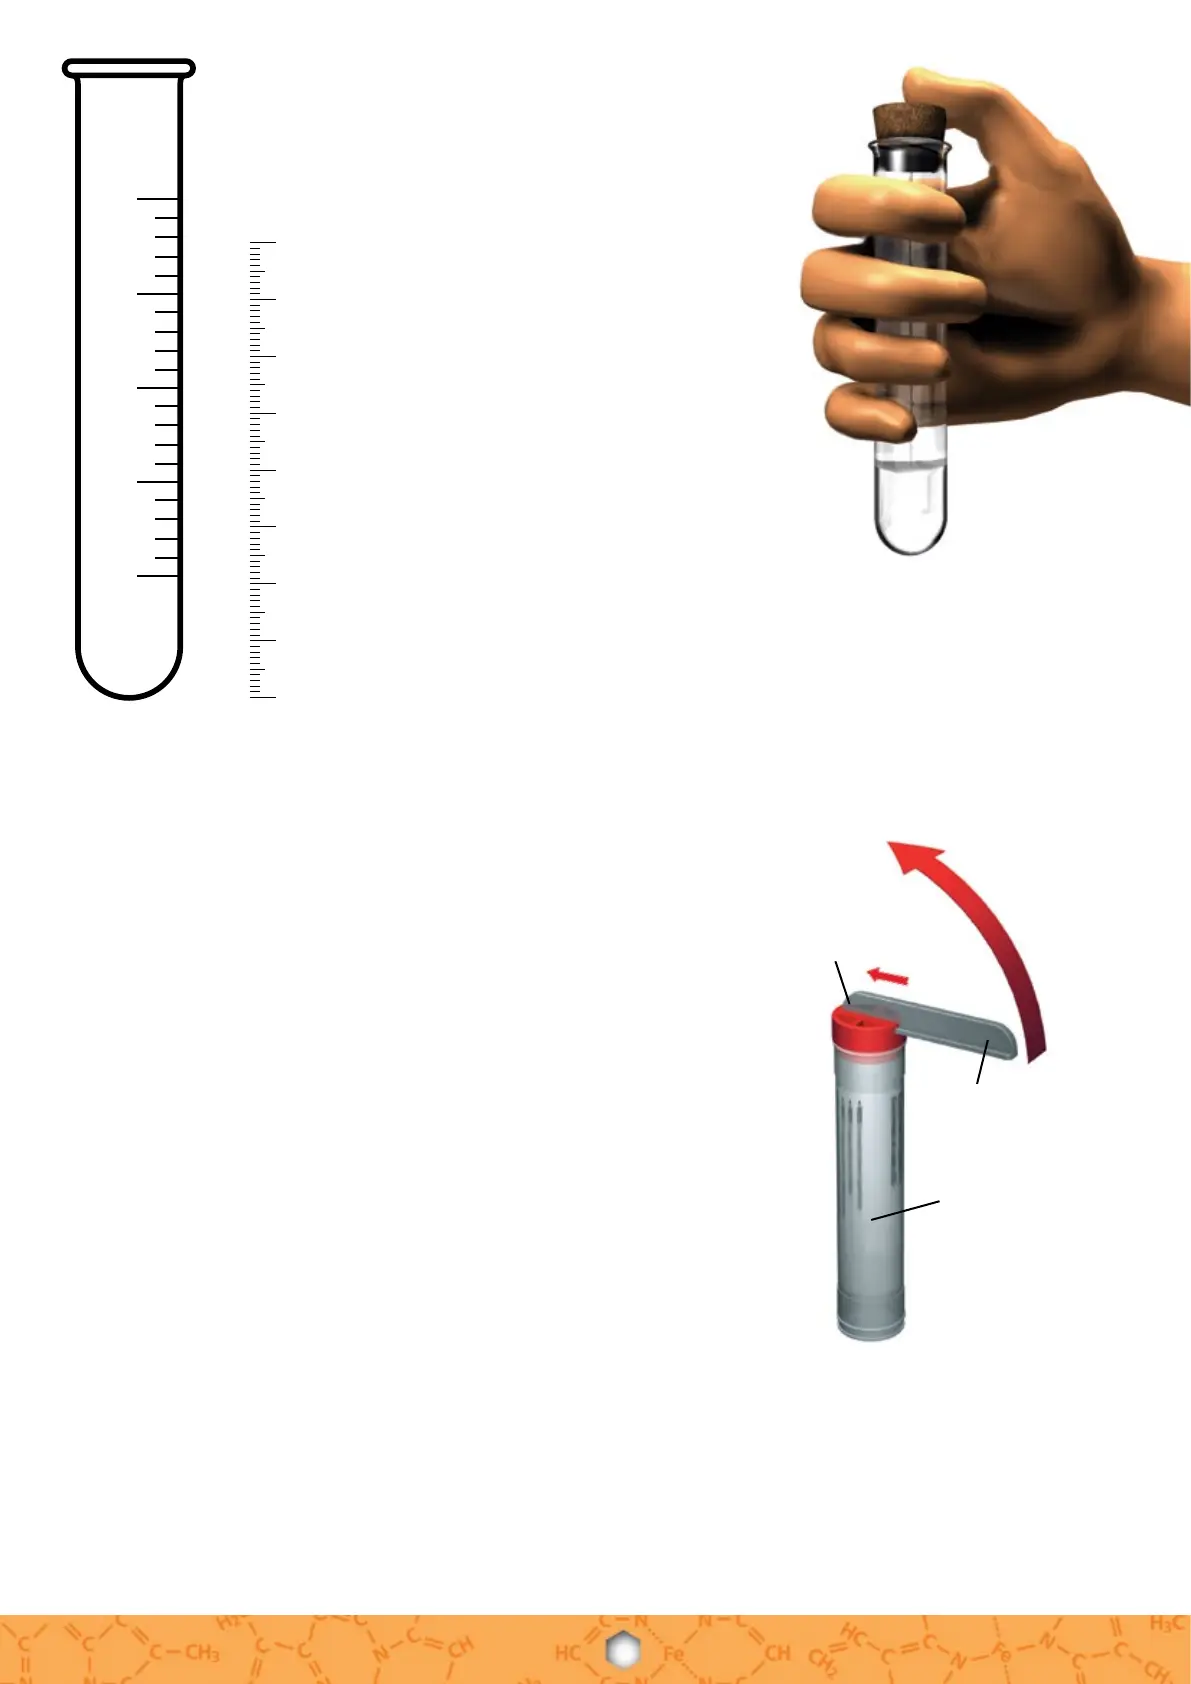
The most important device when performing
chemical experiments is the test tube (part
#8). It is used to hold liquid or solid substances,
particularly to make solutions of solid
substances. In some test tube experiments, we
indicate the quantity of solid according to the
approximate height of the column of solid
in the test tube, for example: “eervescent
powder up to a height of 3 cm”.
To clean the test tubes, use the
test tube brush (part #9). But don’t press
too hard or you might break the thin glass.
Cleaning is best done under running water.
Place the cleaned tubes to drip dry in a clean
container (e.g., a screw-top jar, see “Additional
materials”) with the opening facing downward.
Place lled test tubes into the small
holes in the experiment station. The slanted
shafts are for holding the test tubes that are
set up with a stopper with hole (part #10) and
angled tube (part #23) for certain experiments
(more on this in the next section).
You will use the stopper without
hole (part #11) to seal test tubes in which you
dissolve substances in water with a shaking
action. When shaking a test tube, always press
on the stopper as shown in the illustration.
Test tube
gauge for
marking ll
levels (in cm)
and volumes
(contents in
mL)
When shaking a test tube, always press on
the stopper with your thumb!
This is how to open the chemical vials using
the lid opener.
Chemical vial
Lid opener
Slide the
opener into
the lid
Bekijk gratis de handleiding van Thames & Kosmos Chem C1000, stel vragen en lees de antwoorden op veelvoorkomende problemen, of gebruik onze assistent om sneller informatie in de handleiding te vinden of uitleg te krijgen over specifieke functies.
Productinformatie
| Merk | Thames & Kosmos |
| Model | Chem C1000 |
| Categorie | Niet gecategoriseerd |
| Taal | Nederlands |
| Grootte | 11336 MB |