Thames & Kosmos Candy Vending Machine - Super Stunts and Tricks handleiding
Handleiding
Je bekijkt pagina 3 van 20

– You must carefully cut the plastc parts out of ther frames
wth dagonal cuttng plers (dagonal cutters) or scssors
– Remove the parts from the frames only when they are needed.
– Remove excess material (burrs) from the parts before assembling them.
Normal scissors do not cut as precisely as diagonal cutters, so if you only have
those, you may need to file some of the rough edges down with a nail file or
sandpaper.
– Assemble everything in the order shown. Don’t jump ahead!
I
O
r
N
t
I
p
S
1
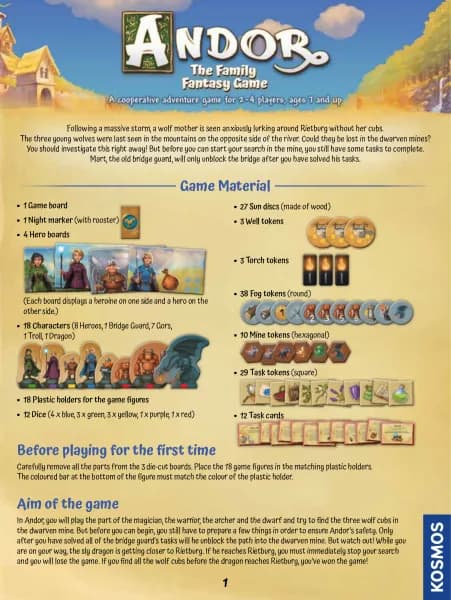
Candy Vending Machine
TABLE OF CONTENTS
Kit Contents ..................................... Inside front cover
Table of Contents, Safety Information, and Tips ........ 1
Introduction ................................................................ 2
ASSEMBLY STARTS ON PAGE 3
Candy Vending Machine Assembly ..................... 3
Candy Vending Machine Experiments ............... 13
Math with Money ...............................................16
Cool Vending Machines .............. Inside back cover
T
Additional information
can be found
on page
16 and the Inside
back cover.
550104-02-250423
Not suitable for
children under 3 years.
Choking hazard —
small parts may be
swallowed or inhaled.
Keep the packaging
and instructions as
they contain important
information.
Refer to the packaging
for the nutritional
information and the
ingredients list for the
candies.
!
!
WARNING
Children as young as eight years
of age can enjoy experimenting
with the built Candy Vending
Machine, but most children
under ten will need some help
building it. Regardless of their
age, please support your child
with advice and a helping hand,
especially during tricky
assembly steps. Before
beginning, read the instructions
together and discuss the safety
instructions.
To prevent damage to the
work surface on which your child
is building, provide them with a
mat or other surface protection.
When cutting the plastic parts
out of the frames with the
diagonal cutter or scissors,
special care must be taken, not
just because of the sharp edges
on the tools, but also because
the plastic parts can yield sharp
edges or burrs. These can be
removed with the help of the
diagonal cutter or a nail file.
Supervise your child when they
are using the sharp tools until
you trust that they can handle
the tools independently.
We hope you and your child
have a lot of fun building and
playing with the Candy Vending
Machine!
17
16
18
19
20
P4
P3
P18
x2
A2
P21
A4
P26
A4
Place key here
when you’re not
using it.
CANDY VEND ING MACHINE AS SEMBLY
1312
Candy Vending Machine Experiments
EXPERIMENT 1
1. Place a quarter in the coin slot at the
top of the machine and turn the
crank. Which pri ze door does the
quarter fall behin d?
Place the 25 ¢ sticker on that prize
door button.
2. Repeat for dime (10 ¢), nickel (5 ¢),
and penny (1 ¢).
3. Add the rest of the stickers to the
machine.
When the new United States government
established coins in the 1790s, the basic unit
was the silver dollar, which was actually made of silver. The half-
dollar, the quarter, and the dime were also made of silver. The dime had to
be very small because it contained only one tenth of the amount of silver in
a silver dollar. The penny and the nickel were introduced later. The U.S. Treasury decided
to make these new coins out of cheaper metals: copper for the penny, and nickel for the
nickel, so they could be larger and wouldn’t get lost in people’s pockets.
So why is a dime
smaller than a nickel
and penny, even though
it’s worth more money?
How does the coin sorter
work? Look closely at the
back of the machine, at
part P7. What do you
notice about the holes?
The holes get progressively
bigger. Take a nickel (5 ¢)
for example. As the nickel
rolls down P7, it is too big
to fall through the first and
second holes. but when it
gets to the third hole, it
falls right throug h.
W
h
a
t
’
s
h
a
p
p
e
n
i
?
EXPERIMENT 2
1. Turn the coin wheel crank until the
number 1 is lined up with the coin
slot at the top of the machine.
2. Place a coin in the coin slot, then
rotate the coin wheel cran k
clockwise. W here does the coin
come out?
3. Repeat steps 1 and 2 with differe nt
coins. What do you notice?
4. Repeat steps 1 and 2, first lini ng up a
different number on the coin cr ank.
At the top of the machine, you can use the numbers on
the coin wheel to determine which slot the coin will
drop out of. How does it work? Look closely at the back
of the machine. Part P10 has four tracks for the coin to
travel in. The track is determined by where t he coin is
placed in the coin wheel. To understand this
mechanism, slowly rotate the coin wheel crank as you
watch the back of the machine.
W
h
a
t
’
s
h
a
p
p
e
n
i
?
When you are finish ed with
the experiment s on pages
13 – 15, you can hang the
Candy Vending Mach ine on
the wall.
First remove the fee t. Then
hold the machine level
against the wall wh ile you
make pencil marks in the
centers of the two loops
at the top of the machine.
Install screw s or hooks on
those marks. Fi nally, hang
the Candy Vending Mach ine
on the supports .
Dear parents and adults,
Bekijk gratis de handleiding van Thames & Kosmos Candy Vending Machine - Super Stunts and Tricks, stel vragen en lees de antwoorden op veelvoorkomende problemen, of gebruik onze assistent om sneller informatie in de handleiding te vinden of uitleg te krijgen over specifieke functies.
Productinformatie
| Merk | Thames & Kosmos |
| Model | Candy Vending Machine - Super Stunts and Tricks |
| Categorie | Niet gecategoriseerd |
| Taal | Nederlands |
| Grootte | 11576 MB |