SureFire XC3 handleiding
Handleiding
Je bekijkt pagina 2 van 2
BEFORE INITIAL USE, REMOVE BATTERY INSULATOR
KIT CONTENTS
• XC3 WeaponLight
• One 123A Battery
• Picatinny Crossmember
• Universal Crossmember
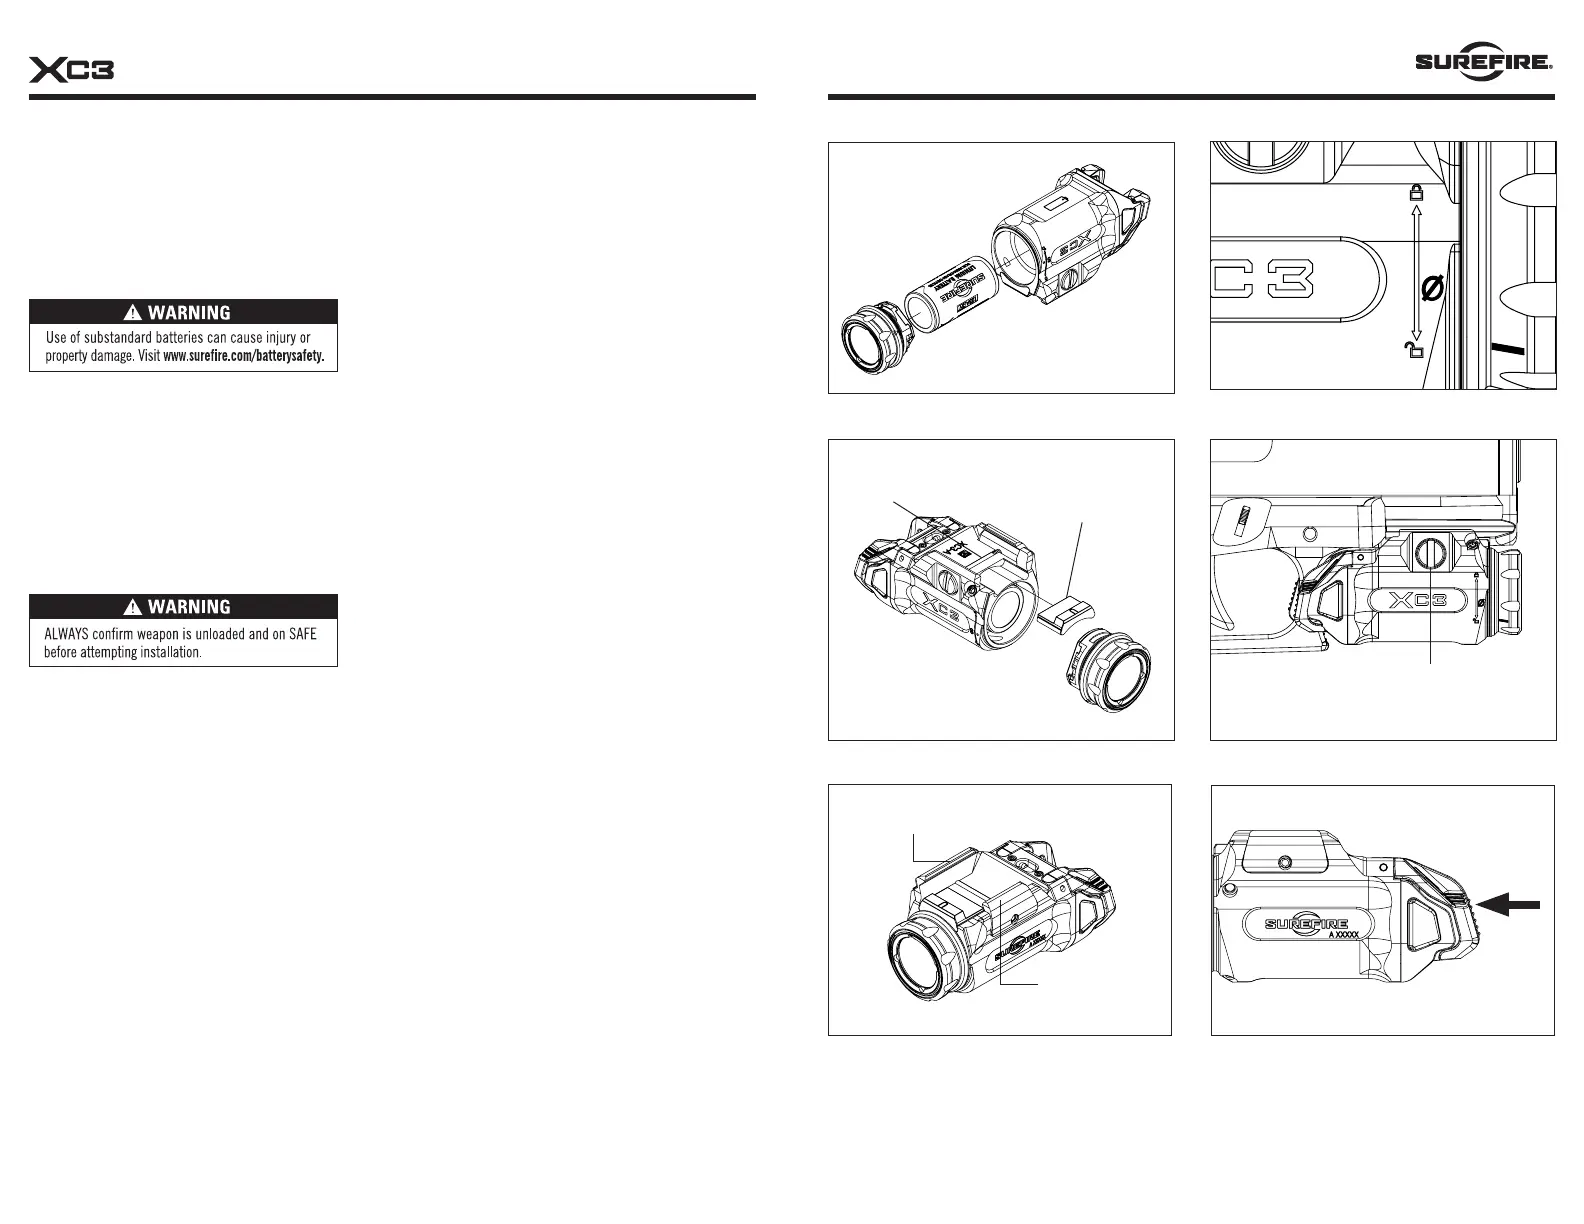
BATTERY INSTALLATION / REPLACEMENT
1. Insert 123A battery with terminals oriented as shown in
the engraved schematic on XC3 body (Figure 1).
2. Install light head by lining up the mark on the head with the
unlock symbol on the body. Push the head toward the body
and then rotate the head to either the disable position, for
light storage, or the locked position, for use (Figure 2).
CAUTION: Always use a fresh battery when replacing old ones.
MOUNTING XC3 TO WEAPON
The XC3 ships with multiple crossmembers to fit a range of firearm
rails. The Universal (marked “U”) crossmember comes pre-installed.
To attach the XC3 to a Universal accessory rail, skip ahead to
ATTACHING TO HOST WEAPON RAIL instructions. To attach the XC3
to a different rail, the Universal crossmember must be replaced with
the included appropriate crossmember. Proceed to INSTALLING /
REPLACING THE CROSSMEMBER.
INSTALLING / REPLACING THE CROSSMEMBER
1. Remove the light from the firearm.
2. Rotate the head counterclockwise to unlocked position and
pull to remove from body.
3. Slide crossmember out of cutouts to remove it from body
(Figure 3).
4. Insert appropriate crossmember for host firearm.
5. Align indicator mark on head with unlock symbol on body.
6. Reattach head and rotate it to desired (locked or disabled)
position.
ATTACHING TO HOST WEAPON RAIL
Note: The appropriate Crossmember MUST be installed (“U” for
Universal rails; “P” for Picatinny rails) to attach XC3 to a weapon’s
accessory rail. Some pistols with a MIL-STD-1913 rail may require
the “U” crossmember to properly interface with the location of the
front trigger guard surface. You may rotate the crossmembers for
more fitment options.
1. Adjust gap between fixed and movable rail by turning rail-
adjustment bolt (Figure 4) clockwise or counterclockwise
until gap is sufficiently wide to fit over weapon accessory rail
(Figure 5).
2. Align fixed rail with weapon’s accessory rail and hinge XC3
over the cross slot of host weapon.
3. Mate crossmember with corresponding slot in weapon’s
accessory rail.
4. Using a torque wrench and a flathead bit, tighten to 8 in-lb
onto a polymer pistol rail and to 8-9 in-lb on a metal pistol
rail. If a torque wrench is not available, tighten until snug
and then apply an additional 1/4 turn. DO NOT OVERTIGHTEN!
The rail-adjustment bolt will break if excessive force is
applied with a tool.
LIGHT OPERATION
For momentary-on light operation, press and hold either the
right or left side of tailcap toggle switch; release to turn light off
(Figure 6).
For constant-on operation, activate by a quick tap and release
action via either toggle switch (Figure 6).
FIGURE 1
FIGURE 5
MOVABLE RAIL
FIXED RAIL
RAIL-ADJUSTMENT BOLT
FIGURE 4
FIGURE 6
FIGURE 3
RAIL-ADJUSTMENT BOLT
UNIVERSAL CROSSMEMBER
FIGURE 2
Bekijk gratis de handleiding van SureFire XC3, stel vragen en lees de antwoorden op veelvoorkomende problemen, of gebruik onze assistent om sneller informatie in de handleiding te vinden of uitleg te krijgen over specifieke functies.
Productinformatie
| Merk | SureFire |
| Model | XC3 |
| Categorie | Niet gecategoriseerd |
| Taal | Nederlands |
| Grootte | 486 MB |

