Handleiding
Je bekijkt pagina 36 van 40
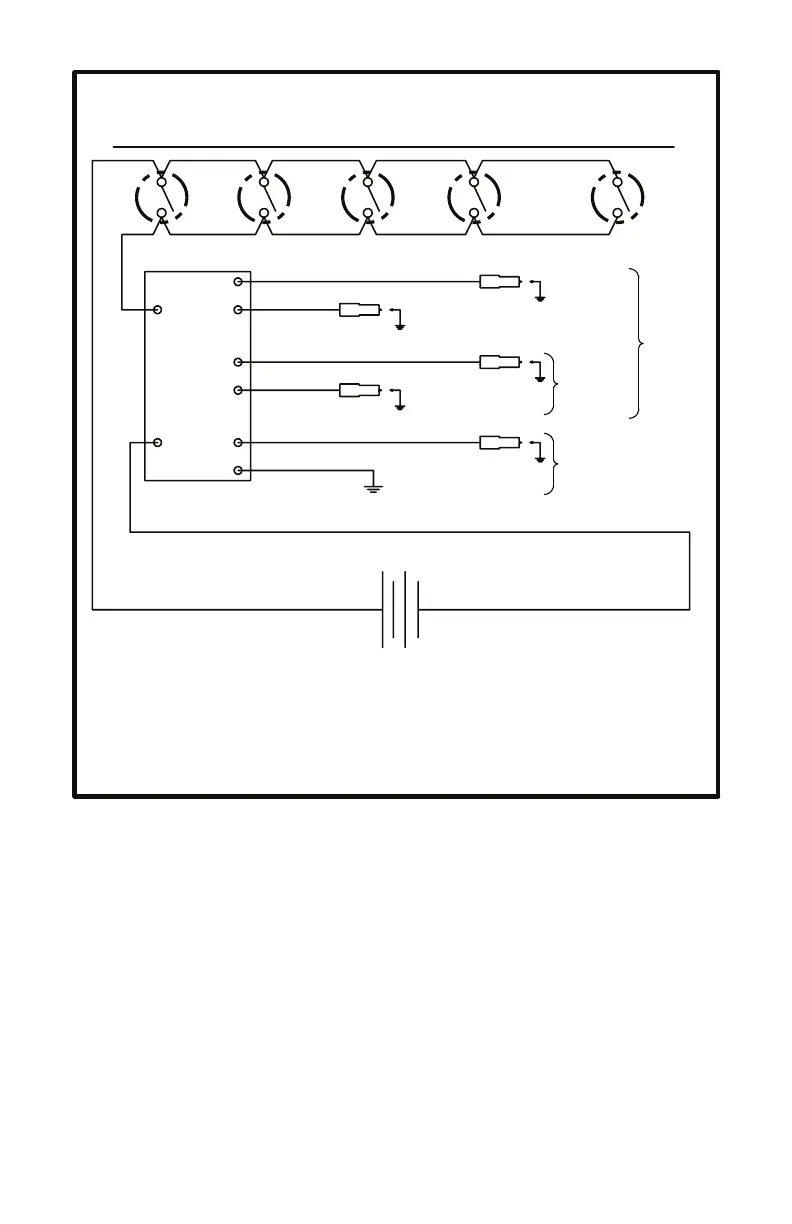
WIRING DIAGRAM FOR GAS RANGES AND
SURFACE UNITS WITH BATTERY EQUIPMENT
180-6C162
REFER ONLY TO FEATURES WHICH ARE EQUIPPED ON YOUR RANGE
IGNTION
SWITCHES
TOP
BURNER
IGNITION
LEADS
OVEN IGN.
LEAD
G
BK
IGNITION
MODULE
R
9 VOLT
DC SUPPLY
RR
RF
T'STAT
LR
LF
(IF EQUIPPED)
THIS
SECTION
EQUIPPED
ON
RANGES
THIS
SECTION
EQUIPPED
ON RANGES
WITH
SEALED
BURNERS
WIRING DIAGRAM FOR GAS SURFACE UNITS
AND WALL OVENS
REFER ONLY TO FEATURES WHICH ARE EQUIPPED ON YOUR RANGE
WARNING-ELECTRICAL GROUNDING INSTRUCTIONS:
THIS APPLIANCE IS EQUIPPED WITH A THREE-PRONG GROUNDING PLUG FOR YOUR PROTECTION
AGAINST SHOCK HAZARD AND SHOULD BE PLUGGED DIRECTLY INTO A PROPERLY GROUNDED
THREE-PRONG RECEPTACLE. DO NOT CUT OR REMOVE THE GROUNDING PRONG FROM THE PLUG.
180-6C89 REV. 1
TOP BURNER
IGNITION SWITCHES
REAR
IGNITION
LEAD
FRONT
IGNITION
LEAD
IGNITION
MODULE
OVEN T'STAT
OVEN
IGNITOR
SAFETY VALVE
CLOCK WITH TIME
OVEN LAMP SWITCH
OVEN LAMP
WALL
PLUG
TOP BURNER VALVES
Built-in top burner valves are operated by pressing the knob and turning it 90 degrees
counter-clockwise to the "LITE" position. This position is also the "HI" position
where maximum gas flow is obtained. Hold the knob in this position until the burner
successfully lights.
If the burner fails to light within 10 seconds, turn the knob back to the "OFF" position.
Let the unit sit at least 5 minutes to allow unburned gas to dissipate before attempting
to light the burner again. If the problem persists, refer to the troubleshooting guide in
your instruction manual or contact a service technician.
Once the burner has successfully lit, turn the knob to adjust the flame size as needed
for the amount of food being cooked, or the size of the utensil.
36
36
TOP BURNER VALVES
Built-in top burner valves are operated by pressing the knob and turning it 90 degrees
counter clockwise to the "LITE" position. This position is also the "HI" position
where maximum gas ow is obtained. Hold the knob in this position until the burner
successfully lights.
If the burner fails to light within 10 seconds, turn the knob back to the "OFF" position.
Let the unit sit at least 5 minutes to allow unburned gas to dissipate before attempting
to light the burner again. If the problem persists, refer to the troubleshooting guide in
your instruction manual or contact a service technician.
Once the burner has successfully lit, turn the knob to adjust the ame size as needed
for the amount of food being cooked, or the size of the utensil.
Bekijk gratis de handleiding van Summit TNM6107BRW, stel vragen en lees de antwoorden op veelvoorkomende problemen, of gebruik onze assistent om sneller informatie in de handleiding te vinden of uitleg te krijgen over specifieke functies.
Productinformatie
| Merk | Summit |
| Model | TNM6107BRW |
| Categorie | Fornuis |
| Taal | Nederlands |
| Grootte | 5509 MB |


