Structural Concepts Harmony HMBC3 handleiding
Handleiding
Je bekijkt pagina 22 van 37
22
Warning! Disconnect power before providing
maintenance and service to unit.
Caution: Lamps are treated to resist breakage and
must be replaced with similarly treated lamps.
Note: Warranty will be void if claims arise from
negligence, misuse of goods, extreme
environmental conditions or improper maintenance.
See Overview And Warnings section in manual.
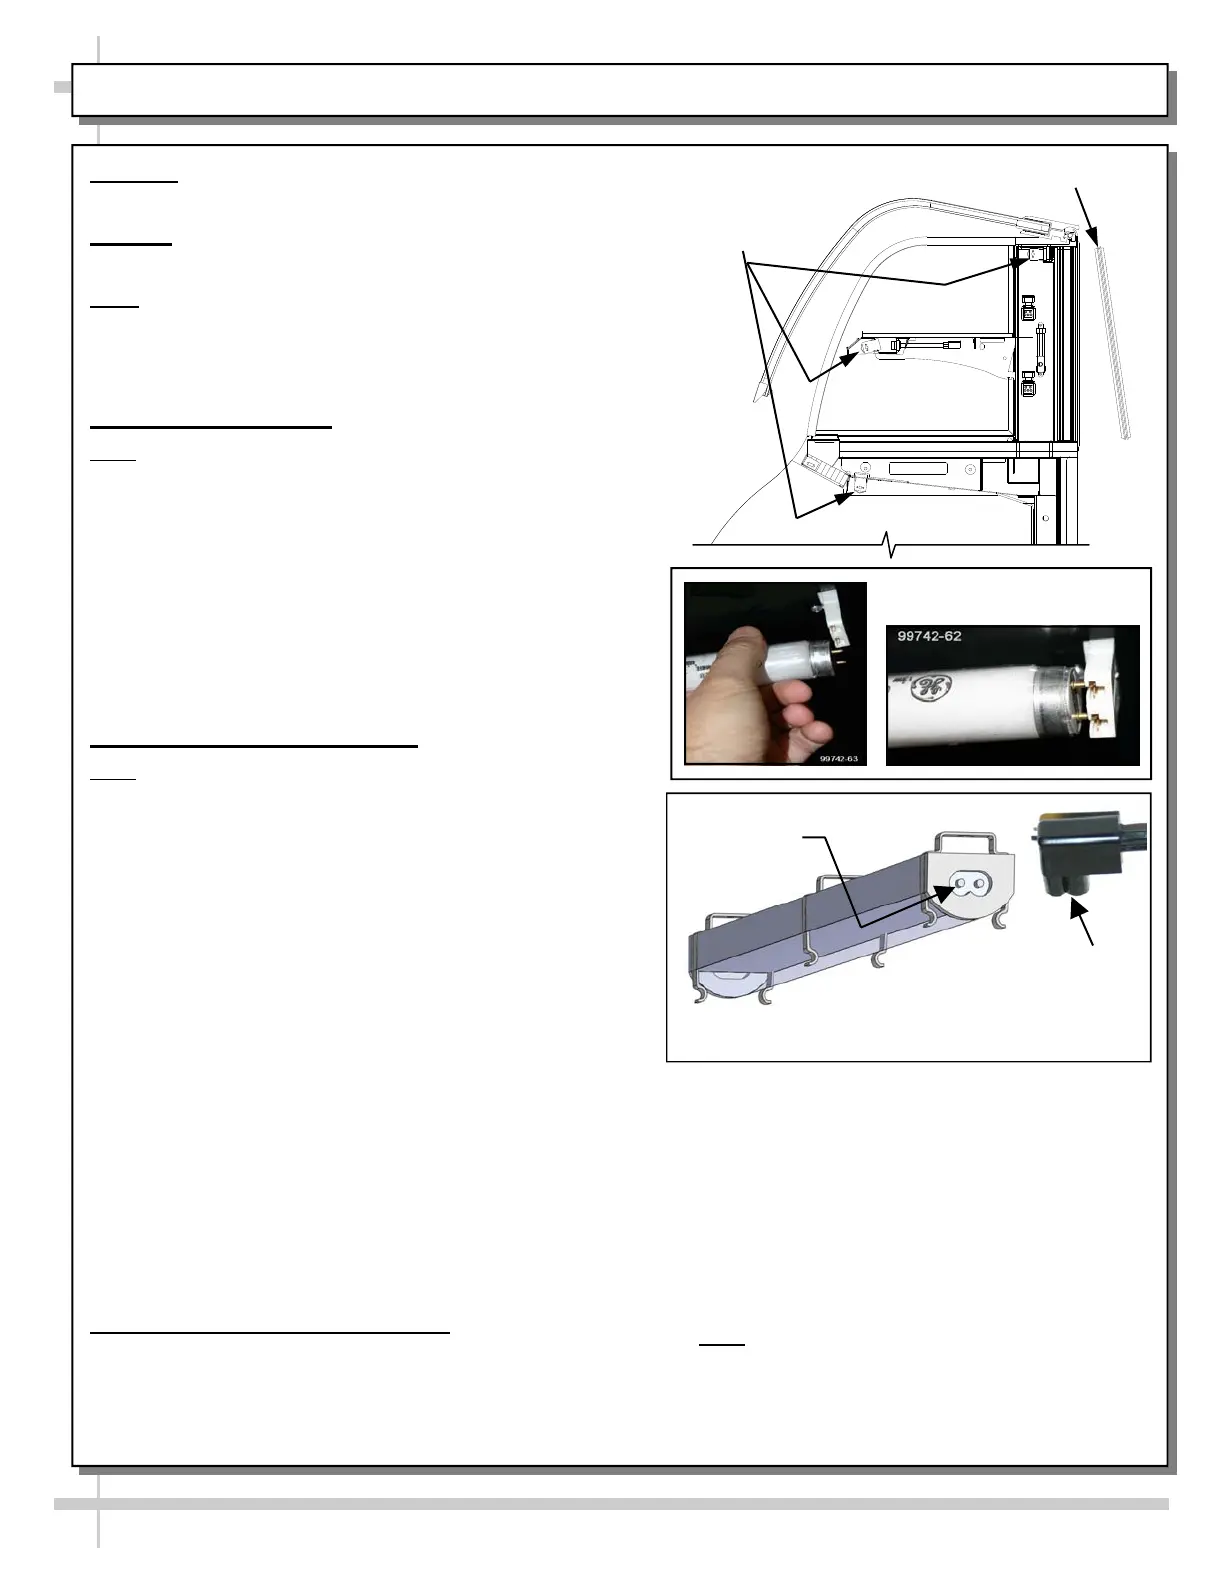
1. Rear Sliding Doors
Note: Doors are not interchangeable. There is an inner
and outer door. Outer door must be removed first and
replaced last. See illustration at top-right.
The outer door is the right hand door (from the
service side or rear of case).
Move doors toward the center of the case.
Individually lift each door up toward the top of the
case; pivot the bottom of the door out.
Replace rear sliding doors in reverse order they
were removed.
2. Fluorescent Light Fixtures
Note: Depending upon model and options, light fixtures
can have either single or dual lamps.
Light fixtures are located on underside of shelf
assemblies and at the top inside of case. See
illustration at right for general locations.
Removal of lamps:
Rotate lamp (1/4-turn) to disengage (upper or lower)
pins/contacts from mounting sockets.
Remove bulb by applying even pressure from back
side at the bulb ends and pulling the remaining
contact from sockets.
See illustrations at mid and lower-right.
Installation of lamps:
Align pins with slot.
Insert pins into socket by rotating the bulb 1/4-turn to
secure either the (upper or lower) pin contacts into
the sockets.
Rotate remaining bulb contacts (1/4-turn) into
remaining lamp mounting socket contacts.
See illustrations at right.
3. Mini-LED Style Light Fixtures
Removal of faulty mini-LED light:
To remove faulty LED light, simply grasp light near
retaining bracket; carefully pull away from bracket.
Disconnect plug from LED’s socket.
MAINTENANCE: REAR SLIDING DOORS/LIGHT FIXTURES (PERFORMED BY STORE PERSONNEL)
Light
Fixtures
Rear Doors
Contact Structural Concepts’ Technical
Service Department for replacement parts
(see the Technical Service section of
operating manual for information).
Replacement of lamp:
To replace LED light fixture, simply insert new
LED light at proper position (socket must be
near plug). Carefully snap into metal springs
so LEDs are held firmly in place.
Note: LED Light and Plug must be connected
in a specific manner or they will not work.
Make certain oval edge of plug connects to
oval edge of LED light.
See illustrations above.
Mini-LED Light Fixture
Plug’s
Oval
Form
Mini-LED’s
Oval Form
Bekijk gratis de handleiding van Structural Concepts Harmony HMBC3, stel vragen en lees de antwoorden op veelvoorkomende problemen, of gebruik onze assistent om sneller informatie in de handleiding te vinden of uitleg te krijgen over specifieke functies.
Productinformatie
| Merk | Structural Concepts |
| Model | Harmony HMBC3 |
| Categorie | Koelkast |
| Taal | Nederlands |
| Grootte | 10459 MB |


