Steinel RS LED A1 handleiding
Handleiding
Je bekijkt pagina 5 van 50
The SensorLight can be put into operation as soon as
the enclosure has been fitted and the SensorLight
has been connected to the mains power supply.
Putting the light into operation manually at the light
switch turns it OFF after 10 secs. for the calibration
phase. Once calibrated, it is activated for the sensor
mode. It is not necessary to operate the light switch a
second time.
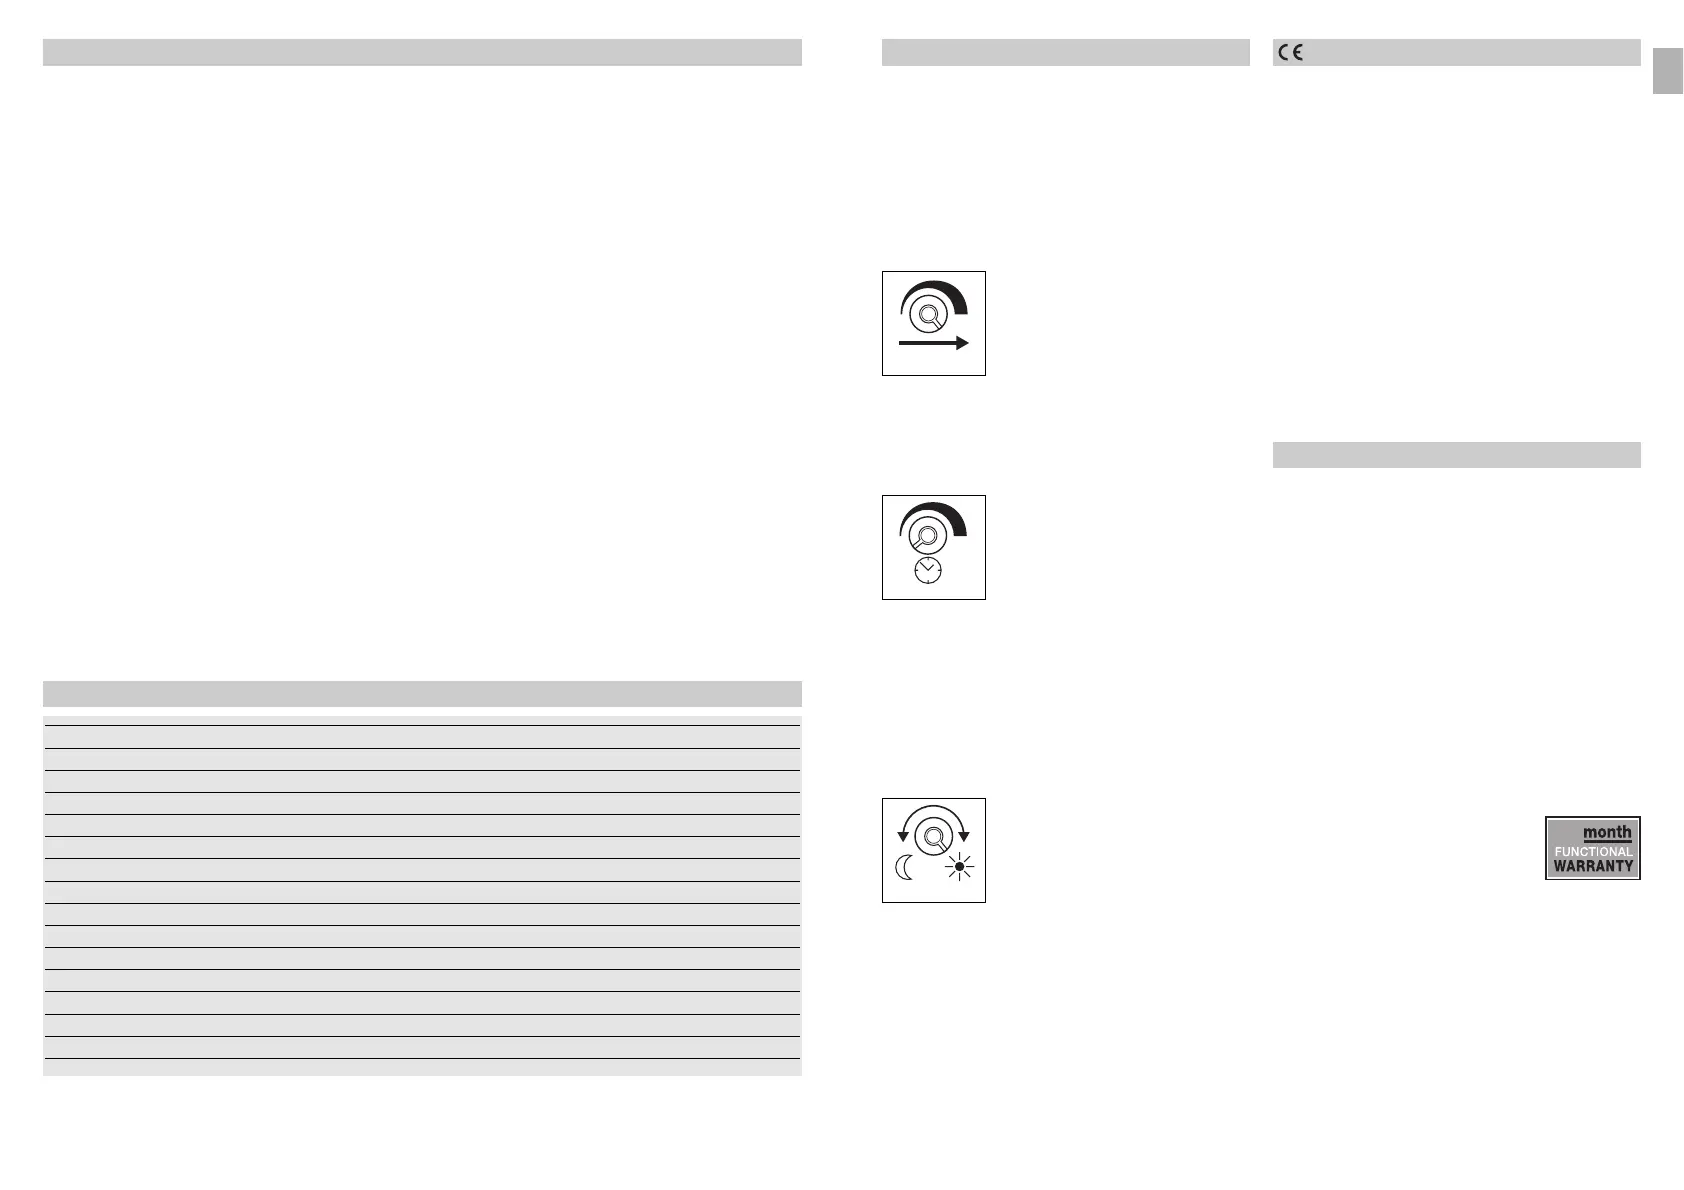
Reach setting (sensitivity)
Reach is the term used to describe the
diameter of the more or less circular
detection zone produced on the
ground after mounting the sensor
light at a height of 2.5 m. Turn the
reach control fully anticlockwise to
select minimum reach (approx. 3 m
dia.), and fully clockwise to select maximum reach
(approx. 8 m dia.). (The light leaves the factory set to
maximum reach.)
Time setting (switch-off delay)
The light can be set to stay ON for
any period of time between approx.
5 sec. (control turned fully anti-
clockwise) and a maximum of 15 min.
(control turned fully clockwise).
(The light leaves the factory set to the
shortest time.) Any movement detect-
ed before this time elapses will re-start the timer. It is
recommended to select the shortest time for adjusting
the detection zone and for performing the walk test.
Note: After the light switches OFF, it takes approx.
1 sec. before it is able to start detecting movement
again. The light will only switch ON in response to
movement once this period has elapsed.
Twilight setting (response threshold)
The chosen light response threshold
can be infinitely varied from approx.
2–2000 lux. Turn control fully anti-
clockwise to select dusk-to-dawn
operation at about 2 lux. Turn control
fully clockwise to select daylight
operation at about 2000 lux. (The
light leaves the factory set to daylight operation.) The
control must be turned fully clockwise when adjusting
the detection zone and performing the walk test in
daylight.
Functions
- 9 -
Ø 3 m – 8 m dia.
Functional Warranty
This STEINEL product has been manufactured with
great care, tested for proper operation and safety in
accordance with applicable regulations and then sub-
jected to random sample inspection. STEINEL guar-
antees that it is perfect condition and proper working
order. The warranty period is 36 months, starting on
the date of sale to the consumer. We will remedy
defects caused by material flaws or manufacturing
faults. The warranty will be met by repair or replace-
ment at our own discretion. The warranty shall not
cover damage to wear parts, damage or defects
caused by improper treatment or maintenance.
Further consequential damage to other objects is
excluded.
Claims under the warranty will only be accepted if the
unit is sent fully assembled and well packed complete
with a brief description of the fault, a receipt or
invoice (date of purchase and dealer's stamp) to the
appropriate Service Centre.
Repair Service:
Our Customer Service Department
will repair faults not covered by
warranty or after the warranty period.
Please send the product well
packed to your nearest Service
Centre.
36
Declaration of conformity
This product complies with
- Low Voltage Directive 2006/95/EC
- EMC Directive 2004/108/EC
- RoHS Directive 2002/95/EC
- R&TTE Directive 1999/05/EC
5 sec. – 15 min.
2 – 2000 lux
Installation
Important: Make sure the installation site is
not sub-
ject to
vibration.
Connecting a dimmer will result in damage to the
SensorLight.
Please note that the light must be protected by a 10 A
circuit breaker.
1. Hold enclosure against the wall/ceiling and
mark drill holes, paying attention to any existing
wiring in the wall/ceiling.
2. Drill the holes, insert wall plugs (6 mm dia.).
3. Pierce sealing plug for power supply lead.
4. Pass power supply leads through.
5. Screw enclosure into place.
6. Connecting the mains power supply lead (see fig.).
The mains power supply lead is a 3-core
cable:
L = phase conductor (usually black or brown)
N = neutral conductor (usually blue)
PE = protective earth conductor (green/yellow)
If you are in any doubt, identify the conductors using
a voltage tester; switch off the current again. Connect
the phase conductor (L) and neutral conductor (N) to
the terminal block. Insulate any PE protective earth
conductor with adhesive tape.
Technical specifications
Dimensions (H x W x D): 275 mm dia. x 95 mm
Material: Aluminium (base), opal glass (shade)
Mains voltage: 230 – 240 V, 50 Hz
Output: 12 W LED / 270 lm
Colour temperature: 3200 kelvin (warm white)
LED life expectancy: 50.000 hours
HF-system: 5.8 GHz
Angle of coverage: 360° with 160° aperture angle also through glass, wood and stud walls
Detection reach: 3 m – 8 m all round
Twilight setting: 2 – 2000 lux
Time setting: 5 sec. to 15 min.
IP rating: IP 44
Protection class: II
Power consumption: approx. 0.9 W
Temperature range: -10° C to +50° C
- 8 -
Important: Reversing the connections will result in a
short-circuit in the light unit or in your fuse box later
on. In this case, you must identify the individual con-
ductors once again and re-connect them. A mains
switch for switching the unit ON and OFF may of
course be installed in the mains power supply lead.
7. Set functions , , .
8. Fit glass shade and turn clockwise to secure it in
place.
Surface wiring:
Surface wiring can be carried out as shown in
diagram I on page 2.
GB
Bekijk gratis de handleiding van Steinel RS LED A1, stel vragen en lees de antwoorden op veelvoorkomende problemen, of gebruik onze assistent om sneller informatie in de handleiding te vinden of uitleg te krijgen over specifieke functies.
Productinformatie
| Merk | Steinel |
| Model | RS LED A1 |
| Categorie | Verlichting |
| Taal | Nederlands |
| Grootte | 9814 MB |
Caratteristiche Prodotto
| Kleur van het product | Wit |
| Diepte | 95 mm |
| Materiaal behuizing | Glas |
| Internationale veiligheidscode (IP) | IP44 |
| Montagewijze | Opbouw |
