Standard Horizon CP175C handleiding
Handleiding
Je bekijkt pagina 35 van 82
GPS chartplotters Page 37
5. CREATING MARKS
Definitions:
MARK
Can be a stand alone position or be linked to a Route. A Mark is place on the Chart Page using
[MARK] or by entering in information in the
MARK/WAYPONTS LIST "NEW MARK" selection.
WAYPOINTS
Always linked to a Route. Are placed on the Chart page using [ROUTE].
NOTE
The difference between a Mark and a Waypoint is
a. When a Route is created using WAYPOINTS and the ROUTE is deleted the WAYPOINTs are
also deleted.
b. If a Route is created using MARKS and the ROUTE is deleted the MARKs remain.
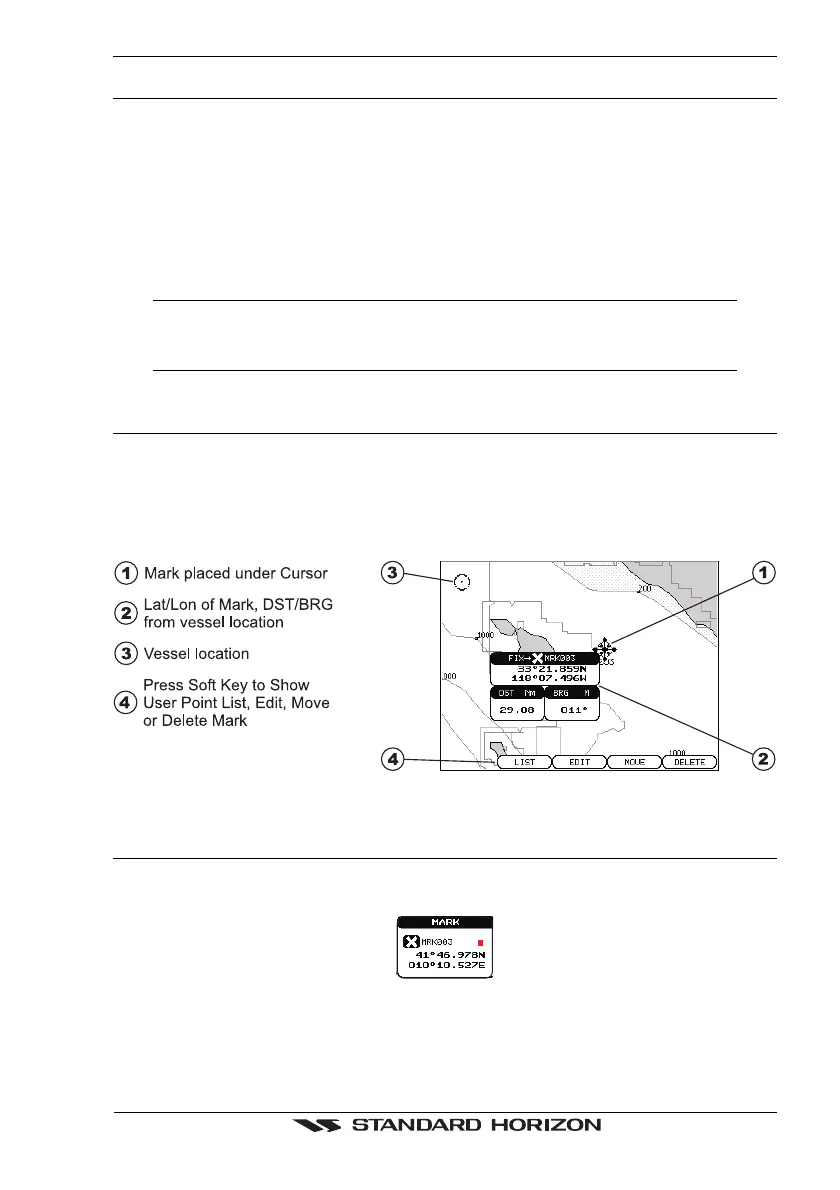
5.0 CREATING A NEW MARK USING THE CHART PAGE
1. Move the ShuttlePoint knob to the desired or approx. Lat/Lon and press [MARK].
2. You will notice a Mark is placed under the location of the Cursor and a popup window
is shown with the exact Lat/Lon of the Mark.
3. If the position is incorrect press the EDIT Soft Key that will allow you to change the
position, Mark name, icon type and color of the icon.
Figure 5.0 - Mark creation
5.1 EDITING A MARK
If a Mark has previously been created and you wish to Edit it, move Cursor over the top of
the Mark.
Figure 5.1 - Mark editing
1. After a Mark is created. Press [ENTER], select EDIT using the ShuttlePoint knob and
press [ENTER]. On the CP175C or CP1000C press the EDIT Soft Key to show the edit
popup window.
Bekijk gratis de handleiding van Standard Horizon CP175C, stel vragen en lees de antwoorden op veelvoorkomende problemen, of gebruik onze assistent om sneller informatie in de handleiding te vinden of uitleg te krijgen over specifieke functies.
Productinformatie
| Merk | Standard Horizon |
| Model | CP175C |
| Categorie | Niet gecategoriseerd |
| Taal | Nederlands |
| Grootte | 6096 MB |


