Stamos S-PLASMA 85H handleiding
Handleiding
Je bekijkt pagina 9 van 99
16 17
Rev. 04.04.2022 Rev. 04.04.2022
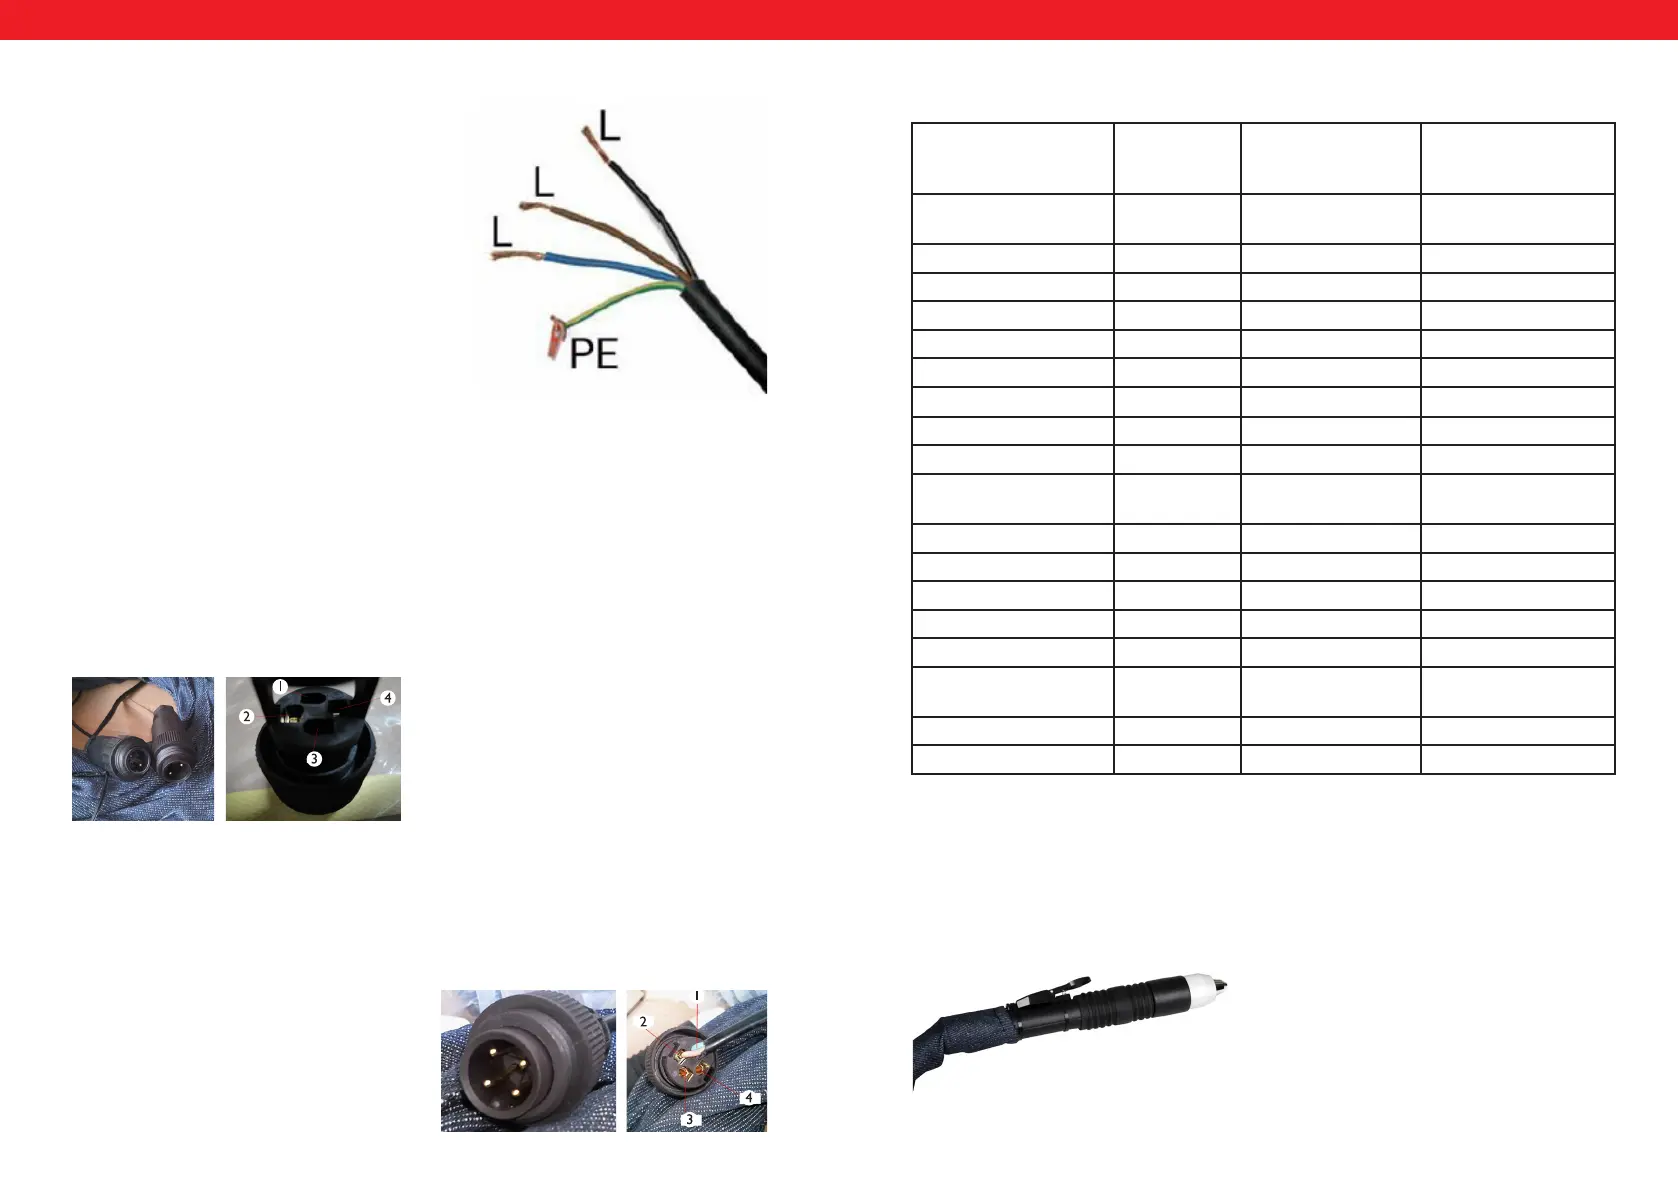
Anschluss S-Plasma 85H + 125H / 85CNC + 125CNC
Netzanschlussplan
Die gelb-grüne Ader ist für den Schutzlei-
teranschluss PE vorgesehen. Die drei Phasen
(schwarz, braun und blau) können beliebig an
L1, L2 und L3 angeschlossen werden. Bitte las-
sen Sie diese Arbeiten nur von einer qualizier-
ten Elektrofachkraft ausführen lassen).
Achtung!!!
Schweißgeräte mit Starkstromanschluss dürfen nur durch eine Elektrofachkraft ange-
schlossen werden!
DE
Technische Details
S-Plasma
55H
S-Plasma 85H
und
S-Plasma 85CNC*
S-Plasma 125H
und
S-Plasma 125CNC*
Eingangsspannung 230V
1-Phase
400V
3-Phasen
400V
3-Phasen
Frequenz 50Hz 50Hz 50Hz
Eingangsstrom 16A 19 A 20 A
Leerlaufspannung 230 V 280 V 300 V
Gehäuseschutzgrad IP20S IP20S IP21S
Isolationsklasse F F F
Überspannungsschutz ja ja ja
Kühlung Lüfter Lüfter Lüfter
Magnetventil ja ja ja
Einschaltdauer ED
bei max. A
60% 60% 60%
A bei 100% duty cycle
42,6 65,8 96,8
Schneidstrom 10-55 A 20-85 A 10-125 A
Zündung Kontakt Non-Kontakt Non-Kontakt
Schnitttiefe 17 mm 27 mm 34 mm
Schnittbreite 1 mm 1,2 mm 1,4 mm
Kompressor Anschluss 4,5 bar,30-100
1/min.
5,5 bar,
175 l/min.
7 bar
250 l/min
Gewicht (netto) 9.4 kg 19,5 kg 30 kg
Abmessung L/B/H (mm) 530/380/380 660/370/450 660/370/450
DE
* Achtung: Die Modelle S-Plasma 85CNC sowie S-Plasma 125CNC sind mit einem
zusätzlichen CNC-Anschluss ausgestattet. Außerdem sind diese zwei Plasmaschnei-
dermodelle mit einem einfachen Brenner ausgestattet.:
S-PLASMA 125CNC | Plasma Cutter CNC
DE
Um den Plasmaschneider an die CNC-Maschine anzuschließen, müssen die zwei
Stöpsel in dem Stecker verbunden werden.
Stöpsel 4: Positiver Pol
Stöpsel 2: Negativer Pol
S-PLASMA 85CNC | Plasma Cutter CNC
DE
Um den Plasmaschneider an die CNC-Maschine anzuschließen, müssen die zwei
Stöpsel in dem Stecker verbunden werden: Pin 3 und Pin 4. Die CNC-Funktion
funktioniert unter der Voraussetzung, dass die CNC-Maschine eingeschaltet ist.
Andererseits, für den Fall dass die CNC-Maschine ausgeschaltet ist, funktioniert
nur ein manuelles Schneiden.
Pin 3: Positiver Pol
Pin 4: Negativer Pol
CNC ANSCHLUSS CNC CONNECTION PODŁĄCZENIE CNC
EN
In order to connect the plasma cutter to the CNC machine, the two pins in the
plug should be connected:
Pin 4: positive pole
Pin 2: negative pole
PL
Aby podłączyć przecinarkę do maszyny CNC należy podłączyć dwa piny we
wtyczce:
Pin 4: biegun dodatni
Pin 2: biegun ujemny
EN
In order to connect the plasma cutter to the CNC machine, the two pins in the
plug should be connected: pin 3 and pin 4. CNC function will work under con-
dition that CNC machine is on, otherwise, when CNC machine is off – manual
cutting works. Pin 1 and pin 2 (with wiring connected already) are for manual
cutting.
Pin 3: positive pole
Pin 4: negative pole
PL
Aby podłączyć przecinarkę do maszyny CNC należy podłączyć dwa piny we
wtyczce: pin 3 oraz pin 4. CNC będzie działać w przypadku gdy maszyna CNC
będzie włączona, w przeciwnym przypadku będzie działało tylko cięcie ręczne.
Pin 1 oraz 2 są podłączone fabrycznie i jest to podłączenie tylko i wyłącznie do
cięcia ręcznego:
Pin 3: biegun dodatni
Pin 4: biegun ujemny
Um den Plasmaschneider an die CNC-Maschine anzuschließen, müssen die zwei Stöp-
sel in dem Stecker verbunden werden.
Stöpsel 4: Positiver Pol
Stöpsel 2: Negativer Pol
Um den Plasmaschneider an die CNC-Maschine anzuschließen, müssen die zwei Stöp-
sel in dem Stecker verbunden werden: Pin 3 und Pin 4. Die CNC-Funktion funktio-
niert unter der Voraussetzung, dass die CNC-Maschine eingeschaltet ist. Andererseits,
für den Fall dass die CNC-Maschine ausgeschaltet ist, funktioniert nur ein manuelles
Schneiden.
Pin 3: Positiver Pol
Pin 4: Negativer Pol
CNC ANSCHLUSS S-PLASMA 125CNC
CNC ANSCHLUSS S-PLASMA 85CNC
Bekijk gratis de handleiding van Stamos S-PLASMA 85H, stel vragen en lees de antwoorden op veelvoorkomende problemen, of gebruik onze assistent om sneller informatie in de handleiding te vinden of uitleg te krijgen over specifieke functies.
Productinformatie
| Merk | Stamos |
| Model | S-PLASMA 85H |
| Categorie | Niet gecategoriseerd |
| Taal | Nederlands |
| Grootte | 25357 MB |