Sony SNC-HM662 handleiding
Handleiding
Je bekijkt pagina 2 van 2
Installing the Camera
1
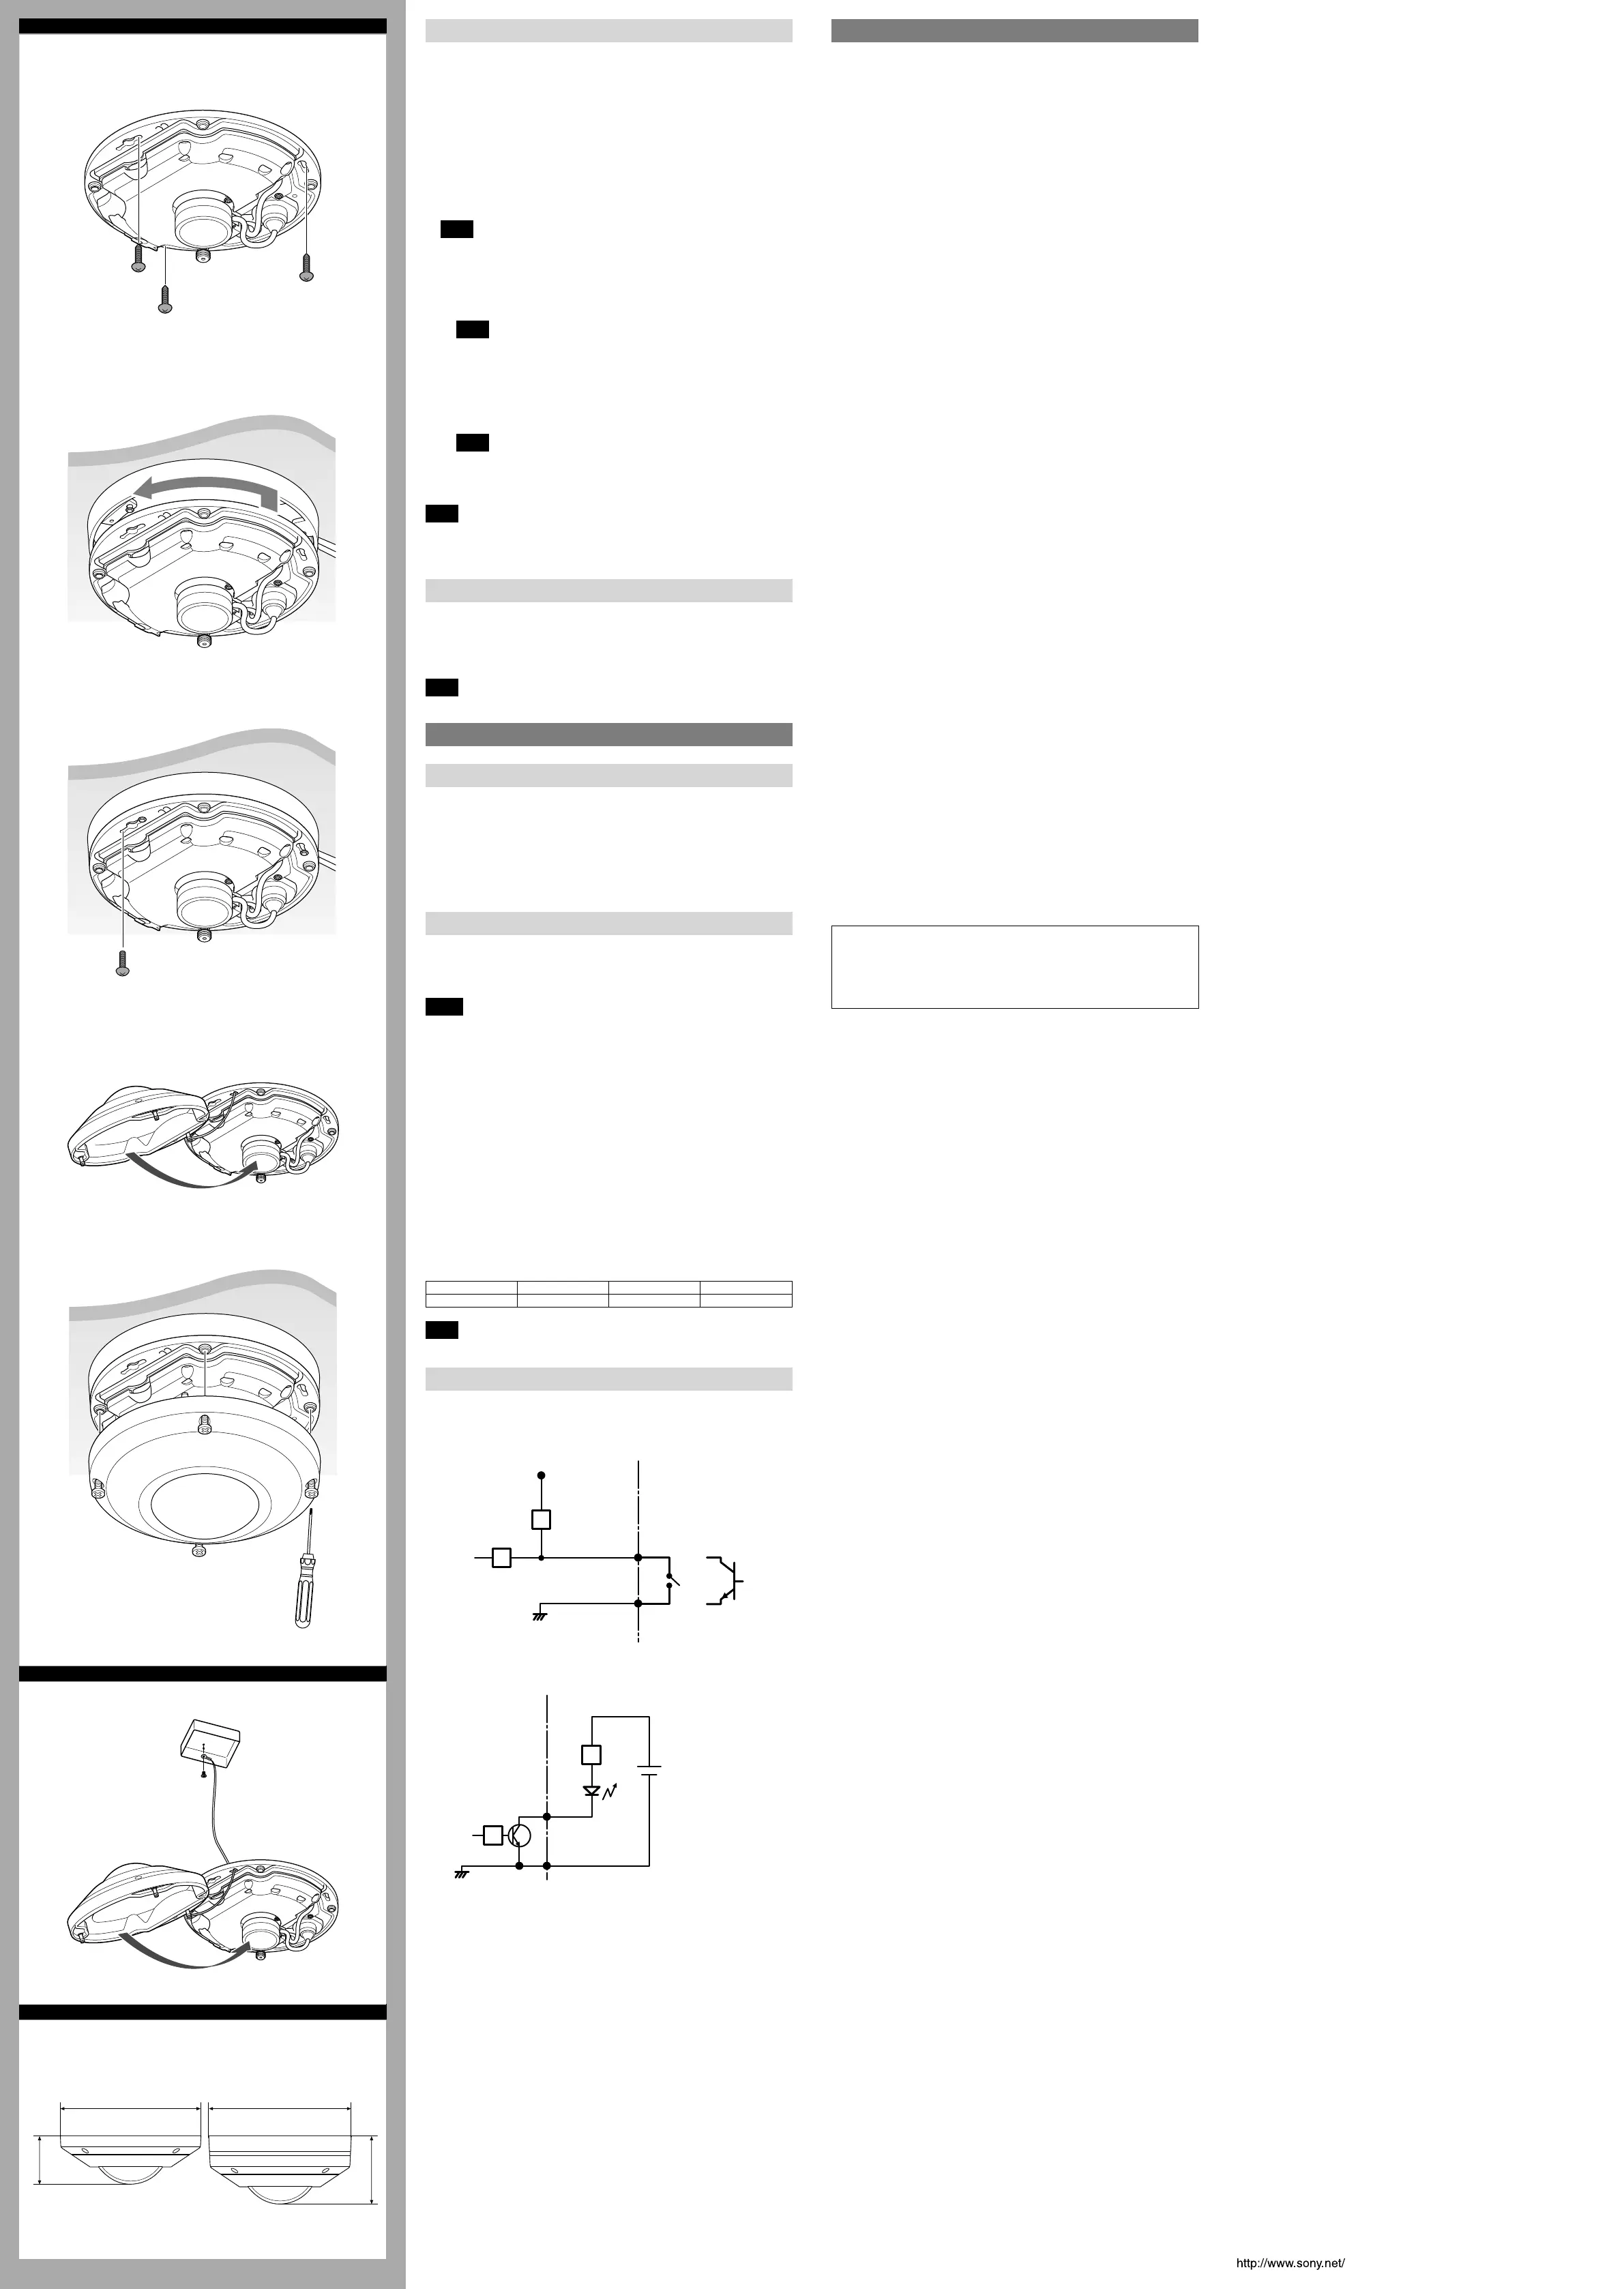
Attach the camera base.
When you do not use the mounting plate
(When connecting cables from the bottom of the camera)
Secure the camera base on the ceiling/wall with the three screws. Refer to
“Mounting screws” for screws to be used.
When you use the mounting plate
(When connecting cables from the side of the camera)
Attach the camera base to the mounting plate, then turn the camera base
counterclockwise.
Tighten the camera mounting screws (supplied) with the supplied
screwdriver to secure the camera base to the mounting plate.
Note
Do not use other than the supplied screws. Otherwise, the camera unit may
not be secure and could fall.
2 Attach the dome case.
Replace the desiccant that is attached to the inside of the dome case, with
the supplied desiccant, using the supplied double-sided tape.
Note
When removing the desiccant from the Mylar sheet which is inside of the
dome cover, be careful not to deform the Mylar sheet.
Attach the dome case while the spring contact is aligned to the built-in
microphone contact.
Secure the dome case and camera base by tightening the four screws with
the supplied screwdriver.
Note
Be sure that all the screws are tightened correctly. Otherwise, waterproof
performance may be impaired.
Remove the protecting film from the dome cover.
Note
Do not install the camera to the place where the power cable, connecting cables,
or connectors are submerged. It may cause water to seep inside the camera, or
failure.
Attaching the fall prevention rope
If you install the camera in a high place or ceiling, attach the optional fall
prevention rope to prevent the camera from falling.
Thread the rope through the strap hole of the camera as illustrated, then fix the
rope to the junction box, etc., on the ceiling/wall with a screw (not supplied).
For details of the fall prevention rope, contact your Sony dealer or sales agent.
Note
When attaching the rope, be sure not to short out the metal parts.
Connection
Connecting to the Network
Connect the LAN connector of the camera to a PoE* supported device (such as a
hub) using the network cable (straight, not supplied).
The electrical power is supplied through the network cable. For details, refer to
the instruction manuals of the PoE supported devices.
(* PoE: The acronym for Power over Ethernet. IEEE802.3af standard compliant
devices.)
It is also possible to connect the LAN port of the camera to a router or hub in the
network using a network cable (not supplied).
Connecting the Power Source
The camera can be powered in either of the following ways.
12 V DC
Power supply equipment pursuant to IEEE802.3af (PoE* system)
* PoE means Power over Ethernet.
Notes
Do not turn off the camera immediately after turning it on. Wait for at least five
minutes before turning off the camera.
Do not input 12 V DC power if power is supplied by a PoE system.
Connecting to the power supply equipment pursuant to IEEE802.3af
The power supply equipment pursuant to IEEE802.3af supplies the power
through the network cable. For details, refer to the Instruction Manual of the
equipment.
Connecting to 12 V DC source
Connect the power input terminal of the I/O cable (black) to a 12 V DC source.
Use a 12 V DC source isolated from 100 to 240 V AC. Usable voltage range is as
follows.
12 V DC: 10.8 V to 13.2 V
- In the USA, the product shall be powered by a UL Listed Class 2 Power
Supply Only.
- In Canada, the product shall be powered by a CSA certified Class 2 Power
Supply Only.
Use UL cable (VW-1 style 10368) for 12 V DC connection.
Recommended power cable
CABLE (AWG) #24 #22 #20
Max. length (m) 9 15 23
Note
Use the power supply equipment with surge protector.
Connecting the I/O Connectors
Wiring diagram for sensor input
Mechanical switch/open collector output device
Camera side
3.3 V
Mechanical switch
Open collector
output device
Outside
or
GND
GND
Sensor input
Wiring diagram for alarm output
External power supply
(24 V DC max.)
Alarm Output
GND
Circuit example
GND
Camera side
Outside
E
When you do not use the mounting plate
1
When you use the mounting plate
Camera mounting screws (supplied)
2
F
Rope (not supplied)
Junction box, etc.
G
When you do not use the
mounting plate
When you use the mounting
plate
Unit: mm (inches)
Ø145.0 (5 /)
54.0 (2 /)
Ø147.0 (5 /)
70.0 (2 /)
Specifications
Compression
Video compression format JPEG/H.264
Audio compression format G.711/AAC
Maximum frame rate 1080p mode
30 fps
Fisheye mode (H.264)
10 fps
Fisheye mode (JPEG)
13 fps
Camera
Image device 1/2.5 type CMOS
Effective picture elements: Approx. 4,910,000
Minimum illumination F2.0/Auto gain control maximum rate MAX/50
IRE (IP)/10 fps (fisheye mode)
Color: 0.7 lx
Black & White: 0.3 lx
Lens
Focal length 0.98 mm to 1.12 mm
Maximum relative aperture F2.0
View angle Vertical: 182°
Horizontal: 182°
Minimum object distance 500 mm
Interface
LAN port (PoE) 10BASE-T/100BASE-TX, auto negotiation (RJ45)
I/O port Sensor input: × 1, make contact, break contact
Alarm output: × 1 (24 V DC, 0.5 A)
microSD memory card slot
Microphone input Minijack (monaural)
Plug-in-power supported (rated voltage: 2.5 V DC)
Recommended load impedance: 2.2 k
Line output Minijack (monaural), Maximum output level:
1 Vrms
Others
Power supply IEEE802.3af compliant (PoE system)
12 V DC ±10%
Power consumption 6.0 W max.
Operating temperature Start temperature: −20 °C to +50 °C (−4 °F to
+122 °F)
Working temperature: −30 °C to +50 °C (−22 °F
to +122 °F)
Storage temperature −25 °C to +60 °C (−13 °F to +140 °F)
Operating humidity 20% to 90%
Storage humidity 20% to 95%
Dimensions (diameter/height)
145.0 mm × 54.0 mm (5 / inches × 2 / inches),
not including the mounting plate
Mass Approx. 640 g (1 lb 6.6 oz), not including the
cables and mounting plate
Supplied accessories CD-ROM (supplied programs) (1)
I/O cable (1)
Mounting plate (1)
Alignment sticker for the mounting plate (1)
Alignment sticker for the camera base (1)
Camera mounting screws (1)
Double-sided tape (1)
Rubber seal plug (1)
Rubber washer (1)
Safety Regulations, Installation Manual (1 set)
Screwdriver (1)
Desiccant (1)
Design and specifications are subject to change without notice.
Recommendation of Periodic Inspections
In case using this device over an extended period of time, please have it
inspected periodically for safe use.
It may appear flawless, but the components may have deteriorated over time,
which may cause a malfunction or accident.
For details, please consult the store of purchase or an authorized Sony dealer.
Bekijk gratis de handleiding van Sony SNC-HM662, stel vragen en lees de antwoorden op veelvoorkomende problemen, of gebruik onze assistent om sneller informatie in de handleiding te vinden of uitleg te krijgen over specifieke functies.
Productinformatie
| Merk | Sony |
| Model | SNC-HM662 |
| Categorie | Bewakingscamera |
| Taal | Nederlands |
| Grootte | 1152 MB |
Caratteristiche Prodotto
| Kleur van het product | Black, White |
| Gewicht | 640 g |
| Soort | IP-beveiligingscamera |
| Ondersteunde videoformaten | H.264, M-JPEG |
| Vormfactor | Dome |


