Sony MB-534 handleiding
Handleiding
Je bekijkt pagina 2 van 2
Note
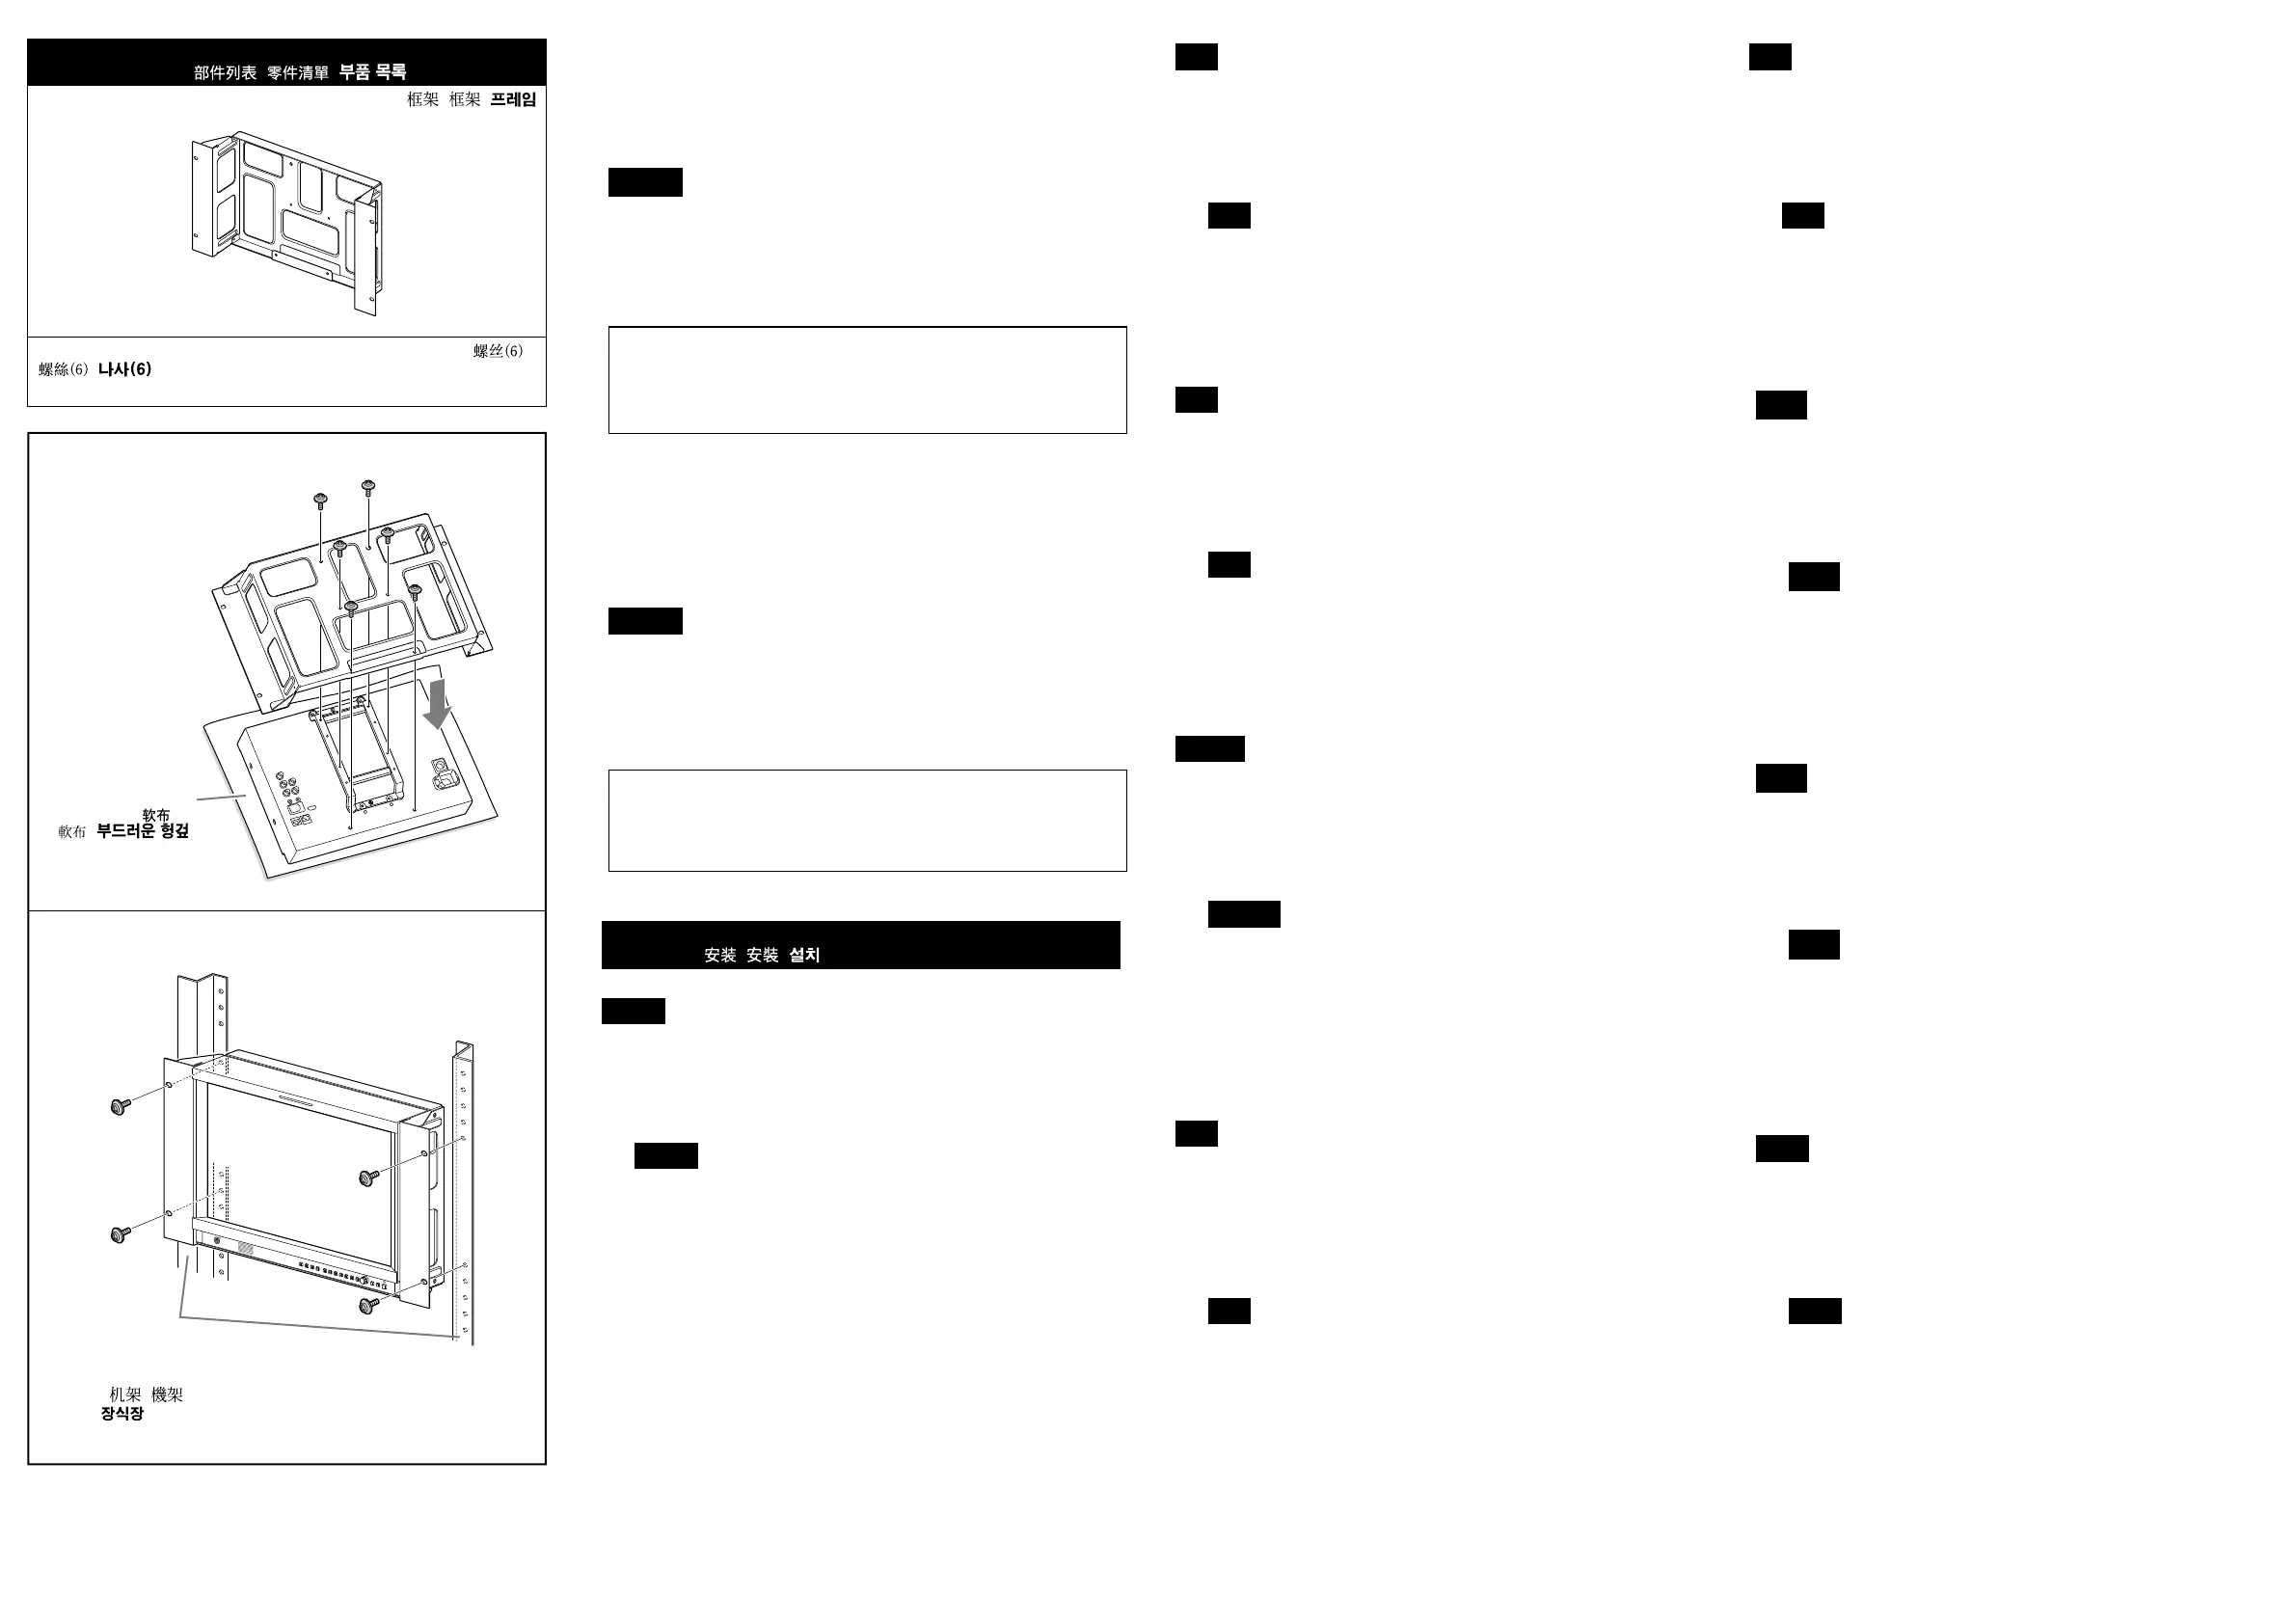
Place the monitor at down on a soft cloth.
1 Attach the mounting bracket to the LCD monitor using the supplied six
screws (PWH4×12).
Fix the screws in the order
,
,
as illustrated. Doing so enables the other
screws to be xed easily.
Note
Handle the bracket with care to avoid damaging the monitor.
2 Secure the LCD monitor with the bracket to a rack using specied four
screws (not supplied) from the front of the LCD monitor.
For more details, refer to the installation manual of the rack.
Nota
Placez l’écran à plat sur un chion doux.
1 Fixez le support de montage sur l’écran LCD à l’aide des six vis fournies.
(PWH4×12).
Fixez les vis dans l’ordre
,
,
comme illustré. Procéder de la sorte permet
de xer les autres vis facilement.
Nota
Manipulez le support avec précaution pour éviter d'endommager l'écran.
2 Fixez l'écran LCD avec le support sur l'étagère à l’aide de quatre vis
spéciées (non fournies) à partir de l’avant de l’écran LCD.
Pour plus de détails, reportez-vous au manuel d’installation de l'étagère.
Hinweis
Legen Sie den Monitor auf einem weichen Tuch ab.
1 Bringen Sie den LCD-Monitor mit den sechs mitgelieferten Schrauben
(PWH4×12) an der Montagehalterung an.
Ziehen Sie die Schrauben wie dargestellt in der Reihenfolge
,
,
fest. Die
Schrauben lassen sich in dieser Reihenfolge leicht festziehen.
Hinweis
Gehen Sie beim Umgang mit der Halterung vorsichtig vor, um eine
Beschädigung des Monitors zu vermeiden.
2 Befestigen Sie LCD-Monitor und Halterung mit den vier spezizierten
Schrauben (nicht im Lieferumfang enthalten) von der Front des LCD-
Monitors aus am Gestell.
Weitere Einzelheiten nden Sie im Zusammenbauhandbuch des Gestell.
Nota
Posizionare il monitor su un panno morbido in piano con lo schermo rivolto
verso il basso.
1 Fissare la staa di montaggio sul monitor LCD utilizzando le sei viti in
dotazione (PWH4×12).
Serrare le viti nell’ordine
,
,
come illustrato in gura. In questo modo si
facilita il montaggio delle altre viti.
Nota
Maneggiare la staa con cura per evitare di danneggiare il monitor.
2 Fissare il monitor LCD con la staa sul rack montando le quattro viti
specicate (non in dotazione) sulla parte anteriore del monitor LCD.
Per informazioni dettagliate, fare riferimento al manuale di installazione del rack.
Nota
Coloque el monitor de forma que quede plano sobre un paño suave.
1 Fije el soporte de montaje al monitor LCD con los seis tornillos
suministrados (PWH4×12).
Fije los tornillos en el orden
,
,
como se muestra en la ilustración. De este
modo es posible jar fácilmente los otros tornillos.
Nota
Maneje el soporte con cuidado para evitar dañar el monitor.
2 Fije el monitor LCD con el soporte a un bastidor usando los cuatro tornillos
especicados (no suministrados) de la parte delantera del monitor LCD.
Si desea más información, remítase al manual de instalación del bastidor.
㱌び
⭪䘵太◌㚁ᵯ㒢⚌ᵤ⚻廓ⵧᵮ曆Ɂ
1 ợ䒌斨ⶊ䗨査圞ᶁ濃ÈQXI523濄⭪♞⫾ㆼ㜚彂㌉↔!MDE!
䘵太◌ᵮɁ
Ȏ
㉭䃋♢ᶑㆤ䢞䗨柞ⷳ濃
ʓ
濇
ʔ
⏰!
ʕ
濄⫭堩圞ᶁɁ⍎㙭弽㞛
⫧圞ᶁㆱ⬝㕷⫭堩Ɂ
㱌び
⭳⼧㍅ㆼ㜚濇ṉ斖㋃⚳䘵太◌Ɂ
2 孛ợ䒌☿査㉫⫾䗨圞ᶁ濃ᵱ斨ⶊ濄Ḳ!MDE!䘵太◌↱曆⭪䘵太
◌⏰ㆼ㜚⫭堩⚌㒓㜚ᵮɁ
ȏ
㙭孊〩濇孛⌦夥㚞㜚䗨⫭堩存㕲Ɂ
㱌び
⭫䙇壺◌㒢㔠幃ⵧᵮɁ
1 ợ䒌昌斨䗨枪圞䳖⭫⫭塁ㆼ㜚斨㌉兗㴖㗚䙇壺◌
濃ÈQXI523濄Ɂ
Ȏ
ἁ!
ʓ
濇
ʔ
濇
ʕ
!䗨杪ⷳ♞⫾圞䳖濇⣦♺ㆤ䢞Ɂ⣦㫈⮕⍓幹橪♞
⫾Ḻ圞䳖Ɂ
㱌び
⭳⼧㍅ẳㆼ㜚濇ṉ斖㍱⡂䙇壺◌Ɂ
2 娯ợ䒌☿枪㉫⫾䗨圞䳖濃㚎昌斨濄⼂㴖㗚䙇壺◌↱曆⭫㴖㗚
䙇壺◌⏰ㆼ㜚⫭塁⚌㧃㜚ᵮɁ
ȏ
⣦晤姗䲔尫奮濇娯⌧攖㧃㜚䗨⫭塁娐㕲㙜Ɂ
ⷦⱂ⳺
┟ᴿ㮧ᴋ#㹀㹀㿓#㈜Ⰳ㇏#⟷ὓ≣ㄫ#䁔ᜁ#ㅻぇ#ᰊᴿᵛ1
1 ⟷Ⰴẓ#っ⮦#ᚓ㇏#ᬏ⬣+ÈSZK7啑45,⏳#⬣ㄠ㿏っ#ㄫ㵼#⢃∏㬮ㆻ#
OFG#┟ᴿ㮧ぇ#⟷㚠㿠ᴿᵛ1#Ȏ
ᡯぇ#ᬏ㬷ᬓ#
ʓ
/#
ʔ
/#
ʕ
㇏#ⲓ⮓⋓#ᬏ⬣⏳#㋧ㇼᴿᵛ1#≾ᜃ#㿟ㆳ⋓#ᵛ
⏯#ᬏ⬣⏳#ᜃ#㋧ㇳ#ⲏ#ㇿᴿᵛ1
ⷦⱂ⳺
┟ᴿ㮧ᙷ#Ⰷ⬸ẏ㐷#⿁ḻ⋔#⢃∏㬮ㆷ#㋧ⵣ㿫⮓#㡟ᢀ㿏っ#㍳ⵤⵓ゛1
2 ᮛ#ᚓ㇏#㐷㊌#ᬏ⬣+✻㻿,⏳#⬣ㄠ㿏っ#⢃∏㬮#㈜㚠ẓ#OFG#┟ᴿ㮧
⏳#OFG#⿕㔴⟷㮧#㈜ⵔ㈜ぇ#㊌㿠ᴿᵛ1#
ȏ
㈇⮯㿓#ᬫㄠㆷ#㈜ⵔ㈜㇏#⮛㣏#⮛⓼⮓⏳#㚯㋧㿏っ#㍳ⵤⵓ゛1
部品表
/ Parts list / Liste des pièces / Teileliste / Elenco dei componenti /
Lista de componentes / / /
フレーム
/ Frame / Cadre / Rahmen / Lato del telajo / Marco / / /
ネジ(6)
/ Screws (6) / Vis (6) / Schrauben (6) / Viti (6) / Tornillos (6) / /
/
PWH 4
12
F7
F6
F5
F4
F3
F2
F1
COMPOSITE
HDMI
SDI2
SDI1
RETURN
MENU
ラック
/ Rack /
Etagère / Gestell
/ Rack / Bastidor
/
/ /
柔らかい布など
/
Soft cloth / Chion
doux / Weiches Tuch
/ Panno morbido /
Paño suave / /
/
⚌擯⤯㐱Ề㚐塁仒ᶯ↱濇娯€Ḹ䲔攕嫤㚐ㆯ濇ᶊὁ䒽㚐ㆯṉ
ỿ㕉⻰⌧佧Ɂ
NC.645!㖓⭬擤妑奬䒌㔠⭫!MNE.2652X!Tpoz!㴖㗚䙇壺◌䙘㌉⫭
塁⚌!2:!剕⍯!FJB!㥽㷺㧃㜚ᵮ䗨⫭塁ㆼ㜚Ɂ
⍊娯⌧攖!MNE.2652X!䗨ợ䒌娐㕲㙜Ɂ
㱌び
ˎ!娯⚌!1!兗!46D!䬨♱ợ䒌!NC.645Ɂ
ˎ!∽⼩䠞ὁ㧃㜚䇆♞Ɂ⎊↫濇⫭塁䙇壺◌⻰㧃㜚⍓偡㙧ὶᵯɁ
ˎ!䓚䙇壺◌ㅺ♞⫾ㆼ㜚⫭塁⚌㧃㜚㖦濇∽⼩ㇷ䴮䙇壺◌䗨ⷹ恌ㅺ
♞⫾ㆼ㜚Ɂ
ˎ!⭳⼧ᵱ壥嫷ㆯ堏⢢⚌䙇壺◌⏰㧃㜚ᶯ擷Ɂ
ˎ!♞⫾ㆼ㜚䗨㙭恌Ⅺ⻬⭺戗Ɂ⭳⼧↉嫷ㆯ㉫堏⇖䞘Ɂ
㱌び
⚌ợ䒌↱娯⤯䲦䠞姱㚐㧃徯垰㫇Ɂ
䂅娺ὁὒ㚃⡺ㅺ❞㔠ṟẹ䍪䒕濇TPOZ!⭱ṟẹ㍱⡂㣦ᵱ射尐Ɂ
䒕㔠㚐㧃㒩昀径ㅴ䗨䍢㙭㍱⢕ㅺ杴㚃㻈㍱⢕濇ᵱỀ濃≩㉐Ẫ
ᵱ斴㔠濄彤尌ㅺ屄₃Ɂ
⇢#ጚጚṦ#ⱻᣃ㩂ጚ#ⳮ⪺#ℂᧆ⟆#⇢#☎Ὧ☆Ṧ#✃⺪㩂ᇊ/#☎Ὧ☆#ᖂⷻⰮ#⯮
㩞#Ⲃ#⇞ᇪ㩂⟗⟆⬎1
PE0867Ⱚ#OPG04874Z#Vrq|#OFG#ᾒឲ㘚Ṧ#4<Ɫ㍂#HLD#㥆ⷪ#ⲏ⟇ⲏ
⪺#☎㍂㩂ጚ#⯮㩆#Ẳ⮞㟯#⋶ᲂ㖡Ɐឲ៎1
OPG04874Zⱂ#㋒ዳ#☎Ὧ☆#ㄢⵚ㩂⫖#ⷦ⟗⟆⬎1
ⷦⱂ
ˎ# PE0867ㆷ#3##68啘F#✋ㅻぇ⮓#⬣ㄠ㿏っ#㍳ⵤⵓ゛1
ˎ# ㈜ⵔ㈜#⾿㊌ẏ〫#ㇿᴋ㐷#䃌㇯㿏っ#㍳ⵤⵓ゛1#ᡯ≾㐷#⿁ㆳ⓫#┟ᴿ㮧⏳#㈜㚠
㿓#䄻#㈜ⵔ㈜#ᮏ〫㐿#び⊛ᙷ#ㇿᴿᵛ1
ˎ# ┟ᴿ㮧シ#ㄫ㵼#⢃∏㬮ㆻ#㈜ⵔ㈜ぇ#㈜㚠㿗#ῃぇᴋ#┟ᴿ㮧#₇ᴋ#ㄫ㵼#⢃∏
㬮㇏#⚈⓫ㆻ#㈘⾻#㍳ⵤⵓ゛1
ˎ# ┟ᴿ㮧シ#㈜ⵔ㈜#⬣ぇ#Ⰷ#㐷#⿁ḻ⋔#㍳㇏㿏ⵤⵓ゛1
ˎ# ㄫ㵼#⢃∏㬮ぇᴋ#み␣㿓#⟷⟻#ㇿᴿᵛ1#Ⰷㆻ#✗㐷#⿁ḻ⋔#㍳㇏㿏ⵤⵓ゛1
㍳㇏
⬣ㄠ#㉻ぇᴋ#㿤⬸#㊌⬸㉸ㆳ⋓#㈈Ṑ㿏ᴋ㐷#䃌㇯㿏ⵤⵓ゛1#
VRQ\#⇢㆞ⱂ#⬎Ṃᵆ#Ɫ㩆#㫮Ⲗ##ⲏᲂ#ⱞⱟⱂ#♺⟎⪺#㩆#♺㩞⪺#
㩞☆#⇞⺇ጚხ#ⷻⱞᅚᖂ#⇞⺇ጚხ#ᆧᇦ#㮮##⪞㩆#ⱞⰊ⪺#▫ᇪ
⪰ⱞ#ℚ▫ⱞᖂ#↪▫⪺#㩆#ⱦ㆞ⱂ#ㄯⱮⰮ#⺪⺪#⨴➟ឲ៎1
取り付けかた
/ Installation / Installation / Montage / Installazione /
Instalación / / /
ご注意
モニターを柔らかい布などの上に水平に置いてください。
1
付属のネジ(PWH4 × 12)6 本を使って、マウンティングブラケッ
トを LCD モニターに取り付ける。
図の
、
、
の順でネジを取り付けてから、その他のネジを取り付け
ると、容易に取り付けられます。
ご注意
モニターを傷めないよう、マウンティングブラケットはゆっくりおろして
ください。
2
ラック指定のネジ 4 本(別売)を使って、LCD モニターの側からラッ
クに固定する。
◆詳しくは、ラックの取付説明書をご覧ください。
Bekijk gratis de handleiding van Sony MB-534, stel vragen en lees de antwoorden op veelvoorkomende problemen, of gebruik onze assistent om sneller informatie in de handleiding te vinden of uitleg te krijgen over specifieke functies.
Productinformatie
| Merk | Sony |
| Model | MB-534 |
| Categorie | Niet gecategoriseerd |
| Taal | Nederlands |
| Grootte | 1656 MB |


