Sonnenkonig BKT 1 handleiding
Handleiding
Je bekijkt pagina 37 van 49
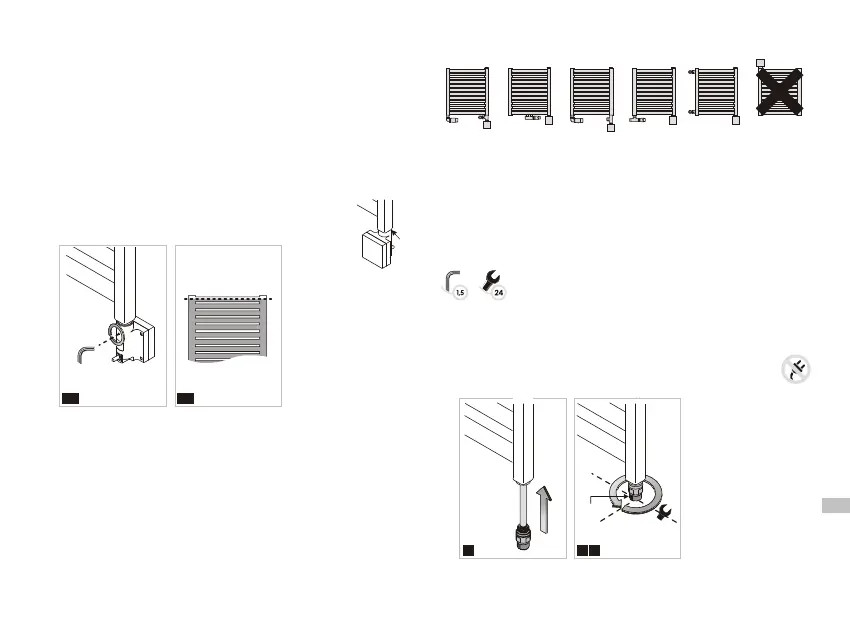
6. Put the radiator back in an upright position and check the level of the liquid
inside it.
7. Make sure that the connection between the radiator and the heating element is
tight.
8. Install the controller – fit the indents on the head (A) with the indents in the
controller (B).
9. Position the controller casing in a way providing an easy and comfortable
access.
WARNING! If you feel resistance when twisting the controller it means that you
have reached the maximum twisting span in that direction. Try to twist the controller
in the opposite direction. Any damage to the device will result in annulment of the
warranty.
Correctly installed controller entirely covers the head of the heating
element (see drawing)
DUAL FUEL radiator:
10
10. Secure the casing at the back with Allen key.
11. Connect the device to electricity and turn on the heating element unit (upper
collector opening must be open!).
12. Set the maximum possible temperature required and observe the liquid level
rise – the excess liquid may be slopping through the upper opening – remove
excess liquid in order not to allow for the heating element unit to be flooded or
wetted.
13. When level of the heating medium stops rising, wait another 5 minutes, turn off
the heating element unit and disconnect the device from electricity.
14. Do not wait until the radiator cools down and pour a small amount of the liquid
out – to the mid level of the top pipe.
15. Close the upper opening of the collector with a dedicated seal and put it back
on the wall.
16. Connect the heating element unit to the socket / installation. The device is
ready to work.
12
1. Radiator connected to central heating system to which heating element unit is
installed additionally.
2. Central heating installation must be fitted with the valves enabling
disconnecting the radiator from the rest of the system.
3. It is recommended to bleed the radiator after every longer interval in use. The
device is fitted with a safety tool protecting the radiator from operating in dry
conditions, however, it will operate correctly only when the radiator is correctly
filled.
4. Heating element must not be installed horizontally or turned downwards.
Tools required for installation of heating element unit
– Allen key no 1.5 (included)
– spanner no 24
Installation of the heating element unit
WARNING! The device must not be connected to electricity during
installation. Unlug the device prior to installation.
1
2 3
A
1. In case of a radiator connected to central heating system, close both valves
and remove the heating medium.
6
A
8
B
max.
340º
9
1
2 3
A
5
4
Complete SKT unit contains Terma-SPLIT
heating element and controller for it.
Depending on the model of the controller, it
can also be completed by a remote wall-
mounted programmer.
1. SPLIT heating element
2. Heating element
3. Heating element head
4. Controller
5. Clamping screw
6. Power cord (versions –PB, PB (FP6),
–PW)
7. Masking cover for X-type connection
(versions –M, -MS, available only for
SKT 1)
ELECTRIC radiator:
1. Radiator powered by the heating element only, not connected to the central
heating system.
2. Water, water with anti-freezing agent or the right type of oil should be used as
a heating medium – possibility of installation and correct use is conditioned by
meeting manufacturer's requirements on the radiator and heating element.
3. Filling the radiator with too much liquid leads to exceeding of acceptable
pressure and damaging of the radiator or heating element. If You are filling the
radiator yourself, please act strictly according to the below instructions.
4. Other methods of correct filling of radiator can be found on www.termaheat.pl.
5. Do not assemble or disassemble the device by twisting the casing of the
controller. Please use the right key for this purpose!
6. Heating element should not be fitted horizontally or turned downwards.
Tools required for installation of heating element unit
– Allen key 1.5 (included)
– spanner no 24
– screwdriver (for –M and –MS versions)
Installation of the heating element unit
WARNING! The device must not be connected to electricity during
installation. Unplug the device prior to installation.
WARNING! Please take every precaution when filling the radiator in order to avoid
being burnt by hot liquid!
PB/SW
M/MS
1
2
3
4
5
6
7
1. Insert heating element (1) into the threaded opening at the bottom end of the
collector.
2. Twist the head of the heating element with a spanner no 24.
3. Position the element in such a way so that the indent in the head connection
(A) was directed towards you or sideways.
4. Put the radiator in an oblique position to make sure that the upper collector
opening is in the highest point !!!The radiator must not be rested on the heating
element controller or any other parts of the connection at any time!!!
5. Fill the radiator with the heating medium.
Bekijk gratis de handleiding van Sonnenkonig BKT 1, stel vragen en lees de antwoorden op veelvoorkomende problemen, of gebruik onze assistent om sneller informatie in de handleiding te vinden of uitleg te krijgen over specifieke functies.
Productinformatie
| Merk | Sonnenkonig |
| Model | BKT 1 |
| Categorie | Niet gecategoriseerd |
| Taal | Nederlands |
| Grootte | 4215 MB |


