Handleiding
Je bekijkt pagina 6 van 274
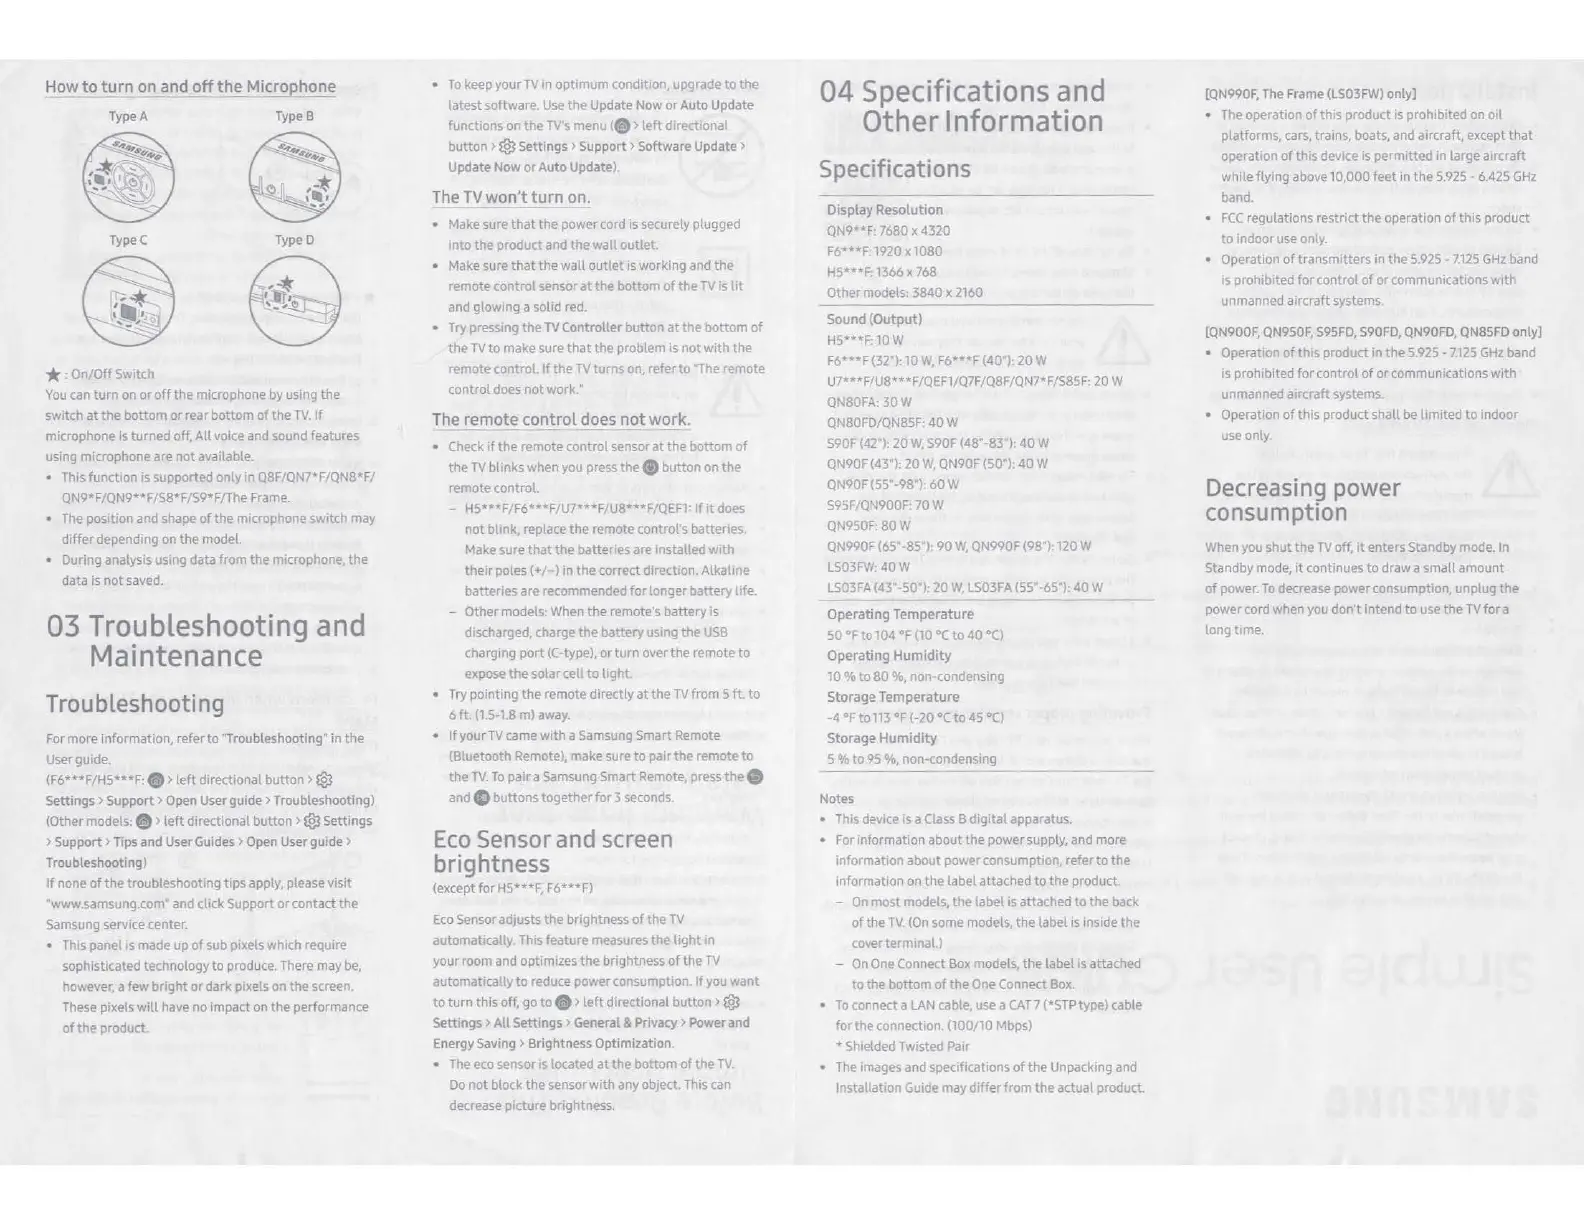
H
ow
to
turn
on and
off
the
Microphone
Type A Type B
TypeC TypeD
* :
On/Off
Switch
You
can
turn
on
or
off
the
microphone by using
the
switch
at
the
bottom
or
rear
bottom
of
the
TV.
If
microphone is
turned
off,
All
voice and sound features
using microphone are
not
available.
• This function is supported
only
in
Q8F/QN7'F/QN8*F/
QN9*F/QN9**F/S8*F/S9*F/The Frame.
• The position and shape
of
the
microphone switch
may
differ
depending on
the
model.
• During analysis using
data
from
the
microphone,
the
data
is
not
saved.
03 Troubleshooting and
Maintenance
Troubleshooting
For more information, refer
to
"Troubleshooting• in the
User guide.
(F6*
..
F/H5***F: 9 >
left
directional
button>®
Settings > Suppo
rt
> Open User guide > Troubleshooting)
(Other modets: .
>
left
directional
button>®
Settings
> Su
pport
> Tips and User Guides > Open User guide >
Troubleshooting)
If
none
of
the
troubleshooting
tips
apply. please visit
"www.samsung.com" and click Support
or
contact
the
Samsung service
center
• This panel
Is
made up
of
sub pixels which require
sophisticated technology
to
produce. There may
be,
however, a few
bright
or
dark
pixels on
the
screen.
These pixels
will
have no impact
on
the
performance
of
the
product.
•
To
keep
your
TV
in
optimum
condition, upgrade
to
the
latest software Use
the
Update
Now
or
Auto Update
functions on
the
TV's
menu{.>
left
directional
button>®
Settings> Support> Software Update>
Update Now
or
Auto
Update).
Th
e TV won't turn on.
• Make sure
that
the
power
cord is securely plugged
into
the product and
the
wall
outlet
• Make sure
that
the
wall
outlet
is working and
tre
remote
control
sensor
at
the
bottom
of
the
TV
Is
ht
and glowing a solid red.
• Try pressing
the
TV Controller
button
at
the
bottom
of
the
TV
to
make sure
that
the
problem is
not
with
the
remote
control.
If
the
TV
turns on, refer
to
"The remote
control
does
not
work:
The
remote
co
ntrol
does
not
wo
rk.
• Check
If
the
remote
control
sensor
at
the
bottom
of
the
TV
blinks when you press
the.
button
on
the
remote control.
-
HS•••FtF6•••FtU7**•F/US•••FtQEF1:
If
It
does
not
blink, replace
the
remote control's batteries.
Make sure
that
the batteries are installed
with
their
poles(+/-)
in
the
correct direction.
Alkaline
batteries are recommended
for
longer battery
He.
- Other models: When the remote's battery is
discharged, charge
the
battery us,ng the
USB
charging
port
(C-type),
or
turn
over
the
remote
to
expose
the
solar
cell
to
lrght
• Try pointing
the
remote directly
at
the
TV
from 5
ft.
to
6 ft. (1.5-1.8
ml
away.
•
If
your
TV
came
with
a Samsung Smart Remote
(Bluetooth Remote), make sure
to
pair
the
remote
to
the
TV.
To
pair
a Samsung Smart Remote, press
the
8
and O buttons together
for
3 seconds.
Eco
Sensor and screen
brightness
(except
for
HS·
..
F.
F6•••F)
Eco Sensor adjusts
the
brightness
of
the
TV
automatically. This feature measures
the
light
in
your room and optimizes
the
brightness
of
the
TV
automatically
to
reduce power consumption.
If
you
want
to
turn
this
off, go
to.>
left
directional
button>®
Settings >
All
Settings> General & Privacy > Power and
Ener
gy
Saving > Brightness Optimization.
• The eco sensor
IS
located
at
the
bottom
of
the
TV.
Do
not
block the sensor
with
any object. This can
decrease
picture
brightness.
04 Specifications and
Other Information
Specifications
Disp
la
y
Resolution
QN9••f·
7680 X 4320
F6•••f·
1920 X
1080
HS
..
*F: 1366 x 768
Other models:
3840
x 2160
Sound
(Output)
H5
..
*F:
10W
F6•••F(32"):
10
W,
F6'
..
F (40"):
20
W
U7***F/US•••f/QEF1/Q7F/QSF/QN7•F/S85F· 20 W
QN80FA.30W
QNSOFD/QNSSF
40
W
S90F (42"):
20
W,
S90F
(48"
-83*):
40
W
QN90F (43"): 20
W,
QN90F (50"):
40
W
QN90F (55*·98"):
60
W
S95F/QN900F· 70 W
QN950F. SOW
QN990F
(65"·85"):
90W,
QN990F (98"): 120 W
LS03FV/:
40
W
LS03FA
(43* 50"):
20
W,
LS03FA (55",-t,S"):
40
W
Operating
Temp
erature
50
°F
to 104
°F
(10
•c
to
40
•CJ
Operating
Humidity
10 %
to
80
%, non-condensing
Storage
Temperature
-4 °Fto113
°F
(-20
•c
to
45
°CJ
Storage
Humidity
5 %
to
95 %, non-condensing
Notes
• This device is
a Class B
digital
apparatus.
• For information
about
the
power
supply, and more
information about power consumption, refer
to
the
information on
the
label attached
to
the
product.
- On
most
models,
the
label
is attached
to
the
back
of
the
TV.
(On some models,
the
label
is inside
the
cover terminal.)
- On
One
Connect Box models, the label is attached
to the
bottom
of
the
One Connect
Box.
•
To
connect a LAN cable, use a
CAT
7 (*STP type) cable
for
the
connection. (100/10 Mbps)
• Shielded Twisted Pair
•
Tre
images and specifications
of
the
Unpacking and
Installation Guide may
differ
from
the
actual product.
[QN990F, The Frame (LS03FW) only)
•
The operation
of
this
product is prohibited on
oil
platforms, cars, trains, boats, and aircraft, except
that
operation
of
this
device is permitted in
large
aircraft
while
flying above 10,000 feet In
the
5.925 • 6.425
GHz
band.
•
FCC
regulations restrict
the
operation
of
this
product
to
indoor use only.
• Operation
of
transmitters in
the
5.925 •
7.125
GHz
band
is prohibited
for
control
of
or
communications
with
unmanned aircraft systems.
[QN900F, QN950F,
S9
5
FD,
S90FD,
QN
90FD, QN85
FD
only]
• Operation
of
this
product
In
the
5.925 •
7.125
GHz
band
is prohibited
for
control
of
or
communications
with
unmanned aircraft systems.
• Operation
of
this
product
shall
be
limited
to
indoor
use only.
Decreasing power
consumption
When you shut
the
TV
off,
it
enters Standby mode. In
Standby mode,
it
continues
to
draw
a
small
amount
of
power
To
decrease power consumption, unplug
the
power
cord when you don't intend
to
use
the
TV
for
a
longtime.
03 Troubleshooting and
Maintenance
3
3
3
e
e
d
o
>3
04 Specifications and
Other Information
H
ow
to
turn
on and
off
the
Microphone
Type A Type B
TypeC TypeD
* :
On/Off
Switch
You
can
turn
on
or
off
the
microphone by using
the
switch
at
the
bottom
or
rear
bottom
of
the
TV.
If
microphone is
turned
off,
All
voice and sound features
using microphone are
not
available.
• This function is supported
only
in
Q8F/QN7'F/QN8*F/
QN9*F/QN9**F/S8*F/S9*F/The Frame.
• The position and shape
of
the
microphone switch
may
differ
depending on
the
model.
• During analysis using
data
from
the
microphone,
the
data
is
not
saved.
03 Troubleshooting and
Maintenance
Troubleshooting
For more information, refer
to
"Troubleshooting• in the
User guide.
(F6*
..
F/H5***F: 9 >
left
directional
button>®
Settings > Suppo
rt
> Open User guide > Troubleshooting)
(Other modets: .
>
left
directional
button>®
Settings
> Su
pport
> Tips and User Guides > Open User guide >
Troubleshooting)
If
none
of
the
troubleshooting
tips
apply. please visit
"www.samsung.com" and click Support
or
contact
the
Samsung service
center
• This panel
Is
made up
of
sub pixels which require
sophisticated technology
to
produce. There may
be,
however, a few
bright
or
dark
pixels on
the
screen.
These pixels
will
have no impact
on
the
performance
of
the
product.
•
To
keep
your
TV
in
optimum
condition, upgrade
to
the
latest software Use
the
Update
Now
or
Auto Update
functions on
the
TV's
menu{.>
left
directional
button>®
Settings> Support> Software Update>
Update Now
or
Auto
Update).
Th
e TV won't turn on.
• Make sure
that
the
power
cord is securely plugged
into
the product and
the
wall
outlet
• Make sure
that
the
wall
outlet
is working and
tre
remote
control
sensor
at
the
bottom
of
the
TV
Is
ht
and glowing a solid red.
• Try pressing
the
TV Controller
button
at
the
bottom
of
the
TV
to
make sure
that
the
problem is
not
with
the
remote
control.
If
the
TV
turns on, refer
to
"The remote
control
does
not
work:
The
remote
co
ntrol
does
not
wo
rk.
• Check
If
the
remote
control
sensor
at
the
bottom
of
the
TV
blinks when you press
the.
button
on
the
remote control.
-
HS•••FtF6•••FtU7**•F/US•••FtQEF1:
If
It
does
not
blink, replace
the
remote control's batteries.
Make sure
that
the batteries are installed
with
their
poles(+/-)
in
the
correct direction.
Alkaline
batteries are recommended
for
longer battery
He.
- Other models: When the remote's battery is
discharged, charge
the
battery us,ng the
USB
charging
port
(C-type),
or
turn
over
the
remote
to
expose
the
solar
cell
to
lrght
• Try pointing
the
remote directly
at
the
TV
from 5
ft.
to
6 ft. (1.5-1.8
ml
away.
•
If
your
TV
came
with
a Samsung Smart Remote
(Bluetooth Remote), make sure
to
pair
the
remote
to
the
TV.
To
pair
a Samsung Smart Remote, press
the
8
and O buttons together
for
3 seconds.
Eco
Sensor and screen
brightness
(except
for
HS·
..
F.
F6•••F)
Eco Sensor adjusts
the
brightness
of
the
TV
automatically. This feature measures
the
light
in
your room and optimizes
the
brightness
of
the
TV
automatically
to
reduce power consumption.
If
you
want
to
turn
this
off, go
to.>
left
directional
button>®
Settings >
All
Settings> General & Privacy > Power and
Ener
gy
Saving > Brightness Optimization.
• The eco sensor
IS
located
at
the
bottom
of
the
TV.
Do
not
block the sensor
with
any object. This can
decrease
picture
brightness.
04 Specifications and
Other Information
Specifications
Disp
la
y
Resolution
QN9••f·
7680 X 4320
F6•••f·
1920 X
1080
HS
..
*F: 1366 x 768
Other models:
3840
x 2160
Sound
(Output)
H5
..
*F:
10W
F6•••F(32"):
10
W,
F6'
..
F (40"):
20
W
U7***F/US•••f/QEF1/Q7F/QSF/QN7•F/S85F· 20 W
QN80FA.30W
QNSOFD/QNSSF
40
W
S90F (42"):
20
W,
S90F
(48"
-83*):
40
W
QN90F (43"): 20
W,
QN90F (50"):
40
W
QN90F (55*·98"):
60
W
S95F/QN900F· 70 W
QN950F. SOW
QN990F
(65"·85"):
90W,
QN990F (98"): 120 W
LS03FV/:
40
W
LS03FA
(43* 50"):
20
W,
LS03FA (55",-t,S"):
40
W
Operating
Temp
erature
50
°F
to 104
°F
(10
•c
to
40
•CJ
Operating
Humidity
10 %
to
80
%, non-condensing
Storage
Temperature
-4 °Fto113
°F
(-20
•c
to
45
°CJ
Storage
Humidity
5 %
to
95 %, non-condensing
Notes
• This device is
a Class B
digital
apparatus.
• For information
about
the
power
supply, and more
information about power consumption, refer
to
the
information on
the
label attached
to
the
product.
- On
most
models,
the
label
is attached
to
the
back
of
the
TV.
(On some models,
the
label
is inside
the
cover terminal.)
- On
One
Connect Box models, the label is attached
to the
bottom
of
the
One Connect
Box.
•
To
connect a LAN cable, use a
CAT
7 (*STP type) cable
for
the
connection. (100/10 Mbps)
• Shielded Twisted Pair
•
Tre
images and specifications
of
the
Unpacking and
Installation Guide may
differ
from
the
actual product.
[QN990F, The Frame (LS03FW) only)
•
The operation
of
this
product is prohibited on
oil
platforms, cars, trains, boats, and aircraft, except
that
operation
of
this
device is permitted in
large
aircraft
while
flying above 10,000 feet In
the
5.925 • 6.425
GHz
band.
•
FCC
regulations restrict
the
operation
of
this
product
to
indoor use only.
• Operation
of
transmitters in
the
5.925 •
7.125
GHz
band
is prohibited
for
control
of
or
communications
with
unmanned aircraft systems.
[QN900F, QN950F,
S9
5
FD,
S90FD,
QN
90FD, QN85
FD
only]
• Operation
of
this
product
In
the
5.925 •
7.125
GHz
band
is prohibited
for
control
of
or
communications
with
unmanned aircraft systems.
• Operation
of
this
product
shall
be
limited
to
indoor
use only.
Decreasing power
consumption
When you shut
the
TV
off,
it
enters Standby mode. In
Standby mode,
it
continues
to
draw
a
small
amount
of
power
To
decrease power consumption, unplug
the
power
cord when you don't intend
to
use
the
TV
for
a
longtime.
Bekijk gratis de handleiding van Samsung QN75QN990F, stel vragen en lees de antwoorden op veelvoorkomende problemen, of gebruik onze assistent om sneller informatie in de handleiding te vinden of uitleg te krijgen over specifieke functies.
Productinformatie
| Merk | Samsung |
| Model | QN75QN990F |
| Categorie | Televisie |
| Taal | Nederlands |
| Grootte | 42841 MB |


