Handleiding
Je bekijkt pagina 17 van 32
installing your air conditioner _17
ENGLISH
Indoor Unit Installation
It is recommended to install the Y- joint before installing the
indoor unit.
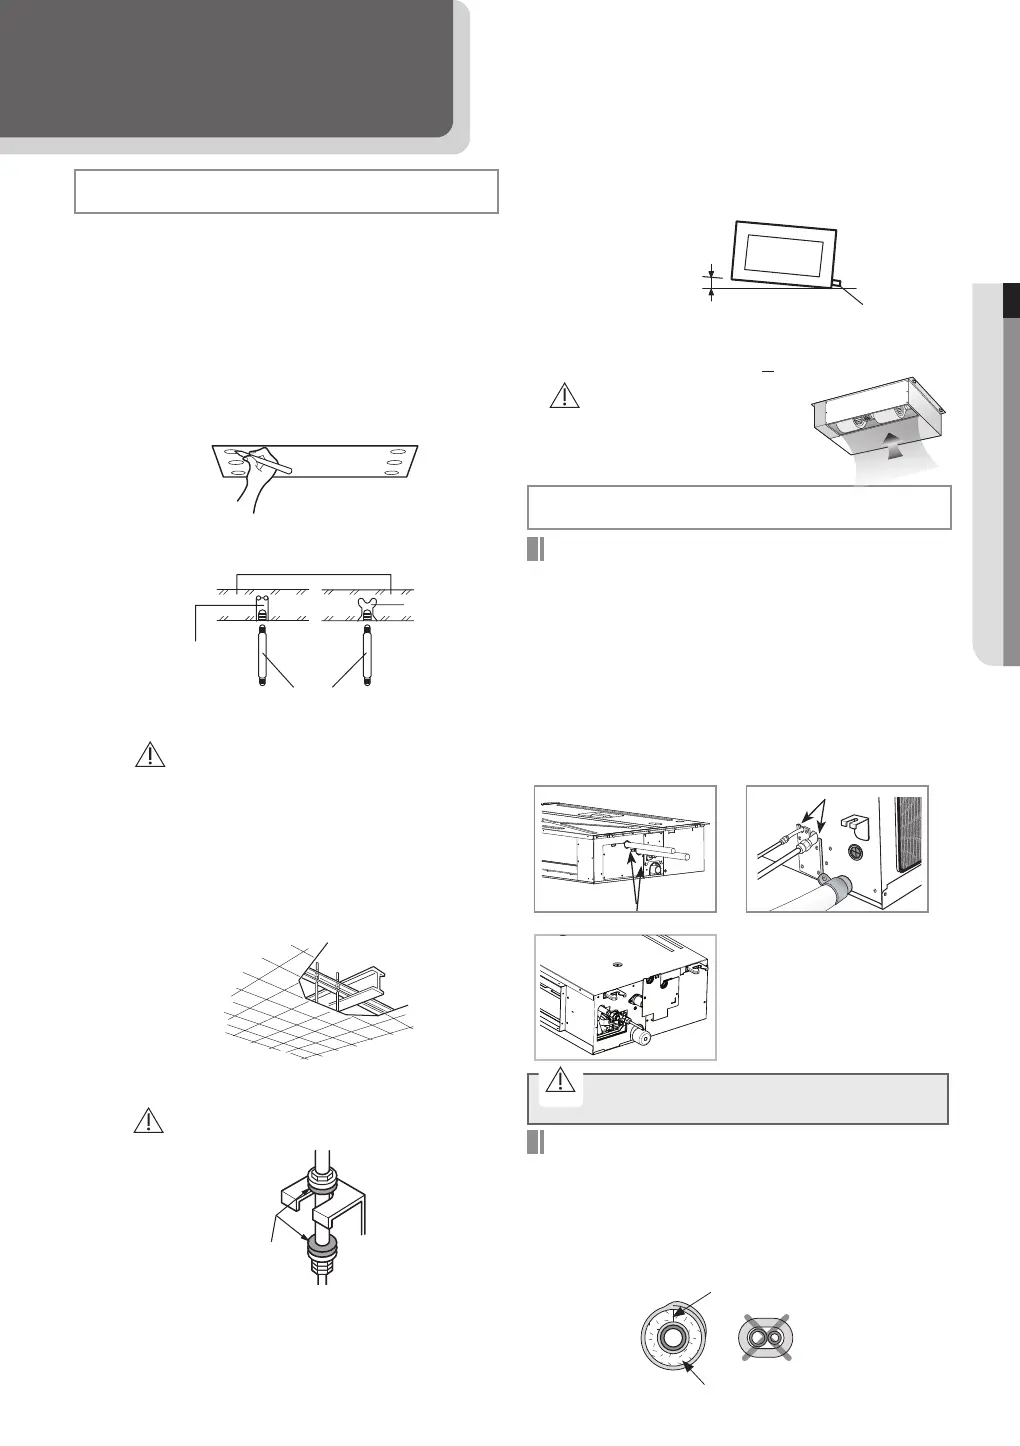
1.
Place the pattern sheet on the ceiling at the spot where you
want to install the indoor unit.
Since the diagram is made of paper, it may
shrink or stretch slightly due to temperature or
humidity. For this reason, before drilling the holes
maintain the correct dimensions between the
markings.
Pattern sheet is supplied depending on the
model type.
NoteNote
2.
Insert bolt anchors, use existing ceiling supports or
construct a suitable support as shown in figure.
3.
Install the suspension bolts depending on the ceiling type.
Ensure that the ceiling is strong enough to
support the weight of the indoor unit.
Before hanging the unit, test the strength
of each attached suspension bolt.
If the length of suspension bolt is more than
1.5m, it is required to prevent vibration.
If this is not possible, create an opening on
the false ceiling in order to be able to use it
to perform the required operations on the
indoor unit.
4.
Screw eight nuts to the suspension bolts making space for
hanging the indoor unit.
You must install the suspension bolts more than
four when installing the indoor unit.
5.
Hang the indoor unit to the suspension bolts between two nuts.
Piping must be laid and connected inside the ceiling
when suspending the unit. If the ceiling is already con-
structed, lay the piping into position for connection to
the unit before placing the unit inside the ceiling.
NoteNote
Concrete
Suspension bolt(Φ9.52 or M10)
Hole in anchor
Hole in plug
Insert
Ceiling support
6.
Screw the nuts to suspend the unit.
7.
Adjust level of the unit by using measurement plate for all 4 sides.
For proper drainage of condensate, give a
10mm(3mm) slant to the left or right side of the
unit which will be connected with the drain hose,
as shown in the figure. Make a tilt when you wish to
install the drain pump, too.
NoteNote
Performing Leak Test & Insulation
LEAK TEST WITH NITROGEN(before opening valves)
In order to detect basic refrigerant leaks, before recreating the
vacuum and recirculating the R410A, it’s responsible of installer
to pressurize the whole system with nitrogen(using a pressure
regulator) at a pressure above 4.1MPa(gauge).
LEAK TEST WITH R410A(after opening valves)
Before opening valves, discharge all the nitrogen into the
system and create vacuum. After opening valves check leaks
using a leak detector for refrigerant R410A.
Leak test
Rubber
1.
To avoid condensation problems, place T13.0 or thicker
Acrylonitrile Butadien Rubber separately around each
refrigerant pipe.
Always make the seam of pipes face upwards.
NoteNote
Once you have checked that there are no leaks in the system,
you can insulate the piping and hose.
Insulation
No gap
NBR(T13.0 or thicker)
Installation Part
g AMNLD: 3mm
AM022/028/036NMD: 3mm
AMNMD / AMNHD: 10mm
Drain hose port
10mm(3mm)
AMNLD /
AM022/028/036NMD
Leak check
AM NMD / AM NHD
Leak check
Noise will increase 3~6 dB(A)
when the air flow enters from
the bottom side (Only for
Slim Duct/Home Duct Type
product).
Air Flow
CAUTION
CAUTION
CAUTION
AM MNLEH
CAUTION
Discharge all the nitrogen to create a vacuum and
charge the system.
Bekijk gratis de handleiding van Samsung AM112FNLDEH/EU, stel vragen en lees de antwoorden op veelvoorkomende problemen, of gebruik onze assistent om sneller informatie in de handleiding te vinden of uitleg te krijgen over specifieke functies.
Productinformatie
| Merk | Samsung |
| Model | AM112FNLDEH/EU |
| Categorie | Airco |
| Taal | Nederlands |
| Grootte | 4379 MB |
Caratteristiche Prodotto
| Kleur van het product | Geborsteld staal |
| Snoerlengte | 2.5 m |
| Soort | Binneneenheid airconditioning |
| Koelend medium | R410A |
| Air conditioner functies | Cooling, Fan, Heating |


