Royal Catering RCKK-80.2 handleiding
Handleiding
Je bekijkt pagina 6 van 23
11
Rev. 09.09.2019
3. Cutting
a) Set the meat cutting thickness between 1 and 8 mm
by turning the cutting thickness adjustment knob.
b) Turn right to increase the thickness of the cut or turn
left to reduce it.
c) Meat should be cut from top to bottom.
d) Switch on the device only after placing the blade on
the point from which the cutting will begin.
d) Apply the sharpening stone so that it is in contact
with the blade guard and the blade at an angle of
15° - 20°.
e) Start the device and gently press the sharpening
stone to the blade.
f) Adjust the blade guard so that there is no gap
between the blade guard and the blade.
g) Lay the sharpening stone on the unsharpened side of
the blade and gently press.
h) Turn the device on and continue the operation for
maximum 10 seconds.
Important: applying sharpening stone to the other (not
sharpened) side of the knife serves to remove excess metal
accumulated during the rst sharpening.
3.4. CLEANING AND MAINTENANCE
a) Unplug the mains plug and allow the device to cool
completely before each cleaning, adjustment or
replacement of accessories, or if the device is not
being used. Wait for the rotating elements to stop..
b) Use only non-corrosive cleaners to clean the surface.
c) Use only mild, food-safe detergents to wash the
device.
d) After cleaning the device, all parts should be dried
completely before using it again.
e) Store the unit in a dry, cool place, free from moisture
and direct exposure to sunlight.
f) Do not spray the device with a water jet or submerge
it in water.
g) Do not allow water to get inside the device through
vents in the housing of the device.
h) The device must be regularly inspected to check its
technical eciency and spot any damage.
i) Use a soft cloth for cleaning.
a
c
d
f
e
b
1
B
1. Cutting thickness adjustment
2. Blade guard
3. Cover xing screw
4. Blade
5. ON/OFF button
6. Housing
7. Handle
8. Battery (RCKK-80WL only)
9. Fixing screw
10. Reset button (RCKK-80.2 only)
11. Power cord (RCKK-80.2 only)
12. Charger (RCKK-80WL only)
13. Battery (RCKK-80WL only)
3.2. PREPARING FOR USE
APPLIANCE LOCATION
Do not use in temperatures of more than 45°C and if
humidity exceeds 85%. Ensure unobstructed access to the
electricity plug at all times. Keep away from heat sources
and ames to prevent the housing unit or power cable
from melting. Make sure the power source reects the
parameters on the rating plate! Before rst use, dismantle
and wash all parts that come in direct contact with food.
3.3. DEVICE USE
1. Charging the battery (RCKK-80WL only):
a) Only use a dedicated charger from the manufacturer.
b) The battery is partially charged when delivered and
must be fully charged before use.
Important: After the device turns o automatically,
do not press the on / o button.
c) To remove batteries from the device, gently press
the battery eject button.
d) Place the batteries in the charger connected to the
power source.
10
Rev. 09.09.2019
LED
indicator
Battery
status
Red
LED
Green
LED
Action
Getting
ready to
charge
OFF ON Charger
ready to
charge
Charging
in progress
Charging
ongoing
ON OFF Charger is
charging
Battery
fully
charged
Battery
fully
charged
OFF ON Charging
complete
Charging
error
Battery
can’t be
charged
ON/
blink-
ing
OFF Can’t be
charged.
Try again
later
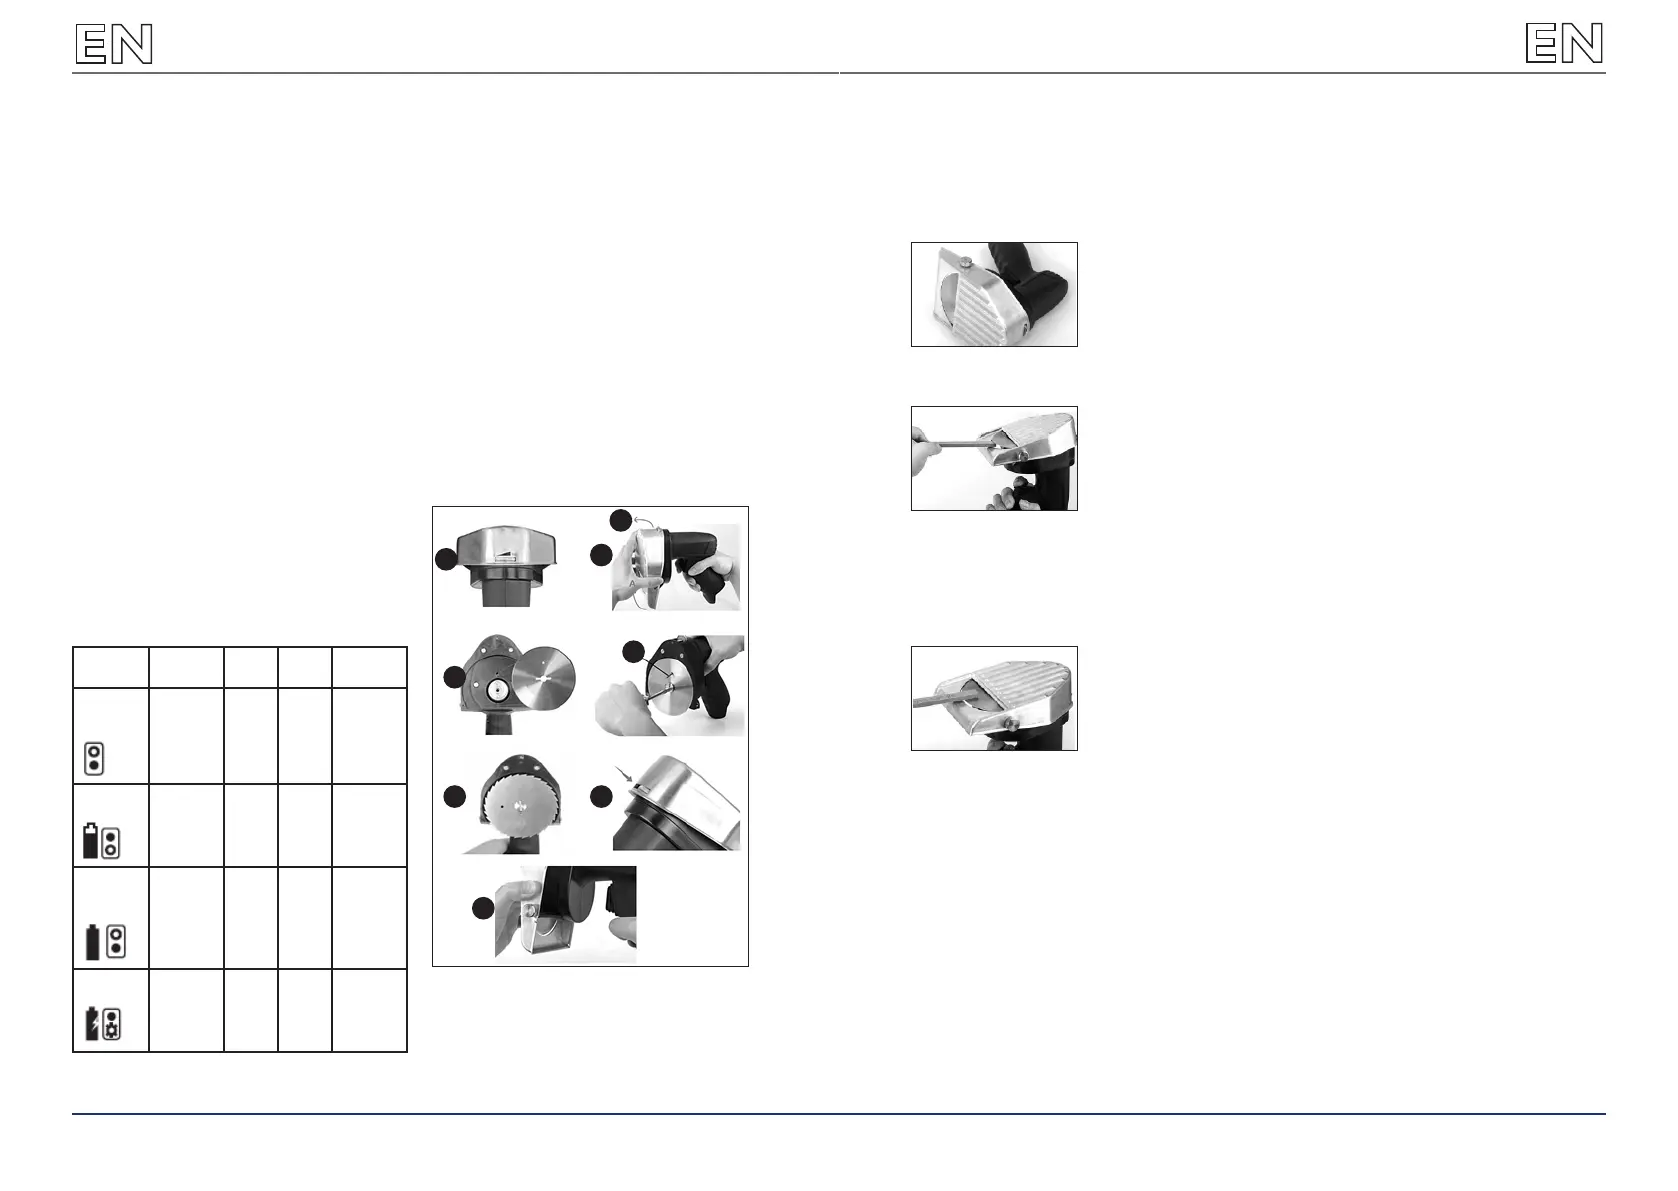
2. Blade replacement
CAUTION: Do not remove the blade guard while
the machine is running and when it is connected to
a power source.
a) Set the cutting thickness adjustment knob to the „0“
position.
b) Remove the blade cover.
• Hold the cover with one hand, loosen the screw
counter clockwise, turn clockwise in „B“ direction.
• Remove the cover from the device.
c) Blade removal
• Prevent blade rotation by placing a locking pin in the
blade hole and the face panel of the device. Place the
locking pin in the locking pin hole.
• Using a at-blade screwdriver, loosen the blade
xing screw.
Note: Only catch and hold the blade with protective
gloves on.
Important: Always place the blade with the sharp
side facing the motor.
d) Insert a new blade and carefully tighten the xing
screw (no screwdriver is needed for this step).
e) Re-install the blade guard.
• Make sure the adjustment screw is in place above the
cover.
f) Tighten the xing screw clockwise.
4. Sharpening
Note: Do not force sharpening stone between the
blade guard and the blade during operation.
Important: Wear eye protection during sharpening.
a) Hold the device handle and the sharpening stone
rmly.
b) Lower the blade guard so that there is a proper gap
between the guard and the blade.
c) Lay the device on its side and make it steady.
j) Do not leave the battery in the device if it will not be
used for a longer period of time.
k) Do not use sharp and/or metal objects for cleaning
(e.g. a wire brush or a metal spatula) because they
may damage the surface material of the appliance.
SAFE REMOVAL OF BATTERIES AND RECHARGEABLE
BATTERIES.
The devices (RCKK-30WL) have Li-Ion 2000 mAh 1.5
A batteries. Remove used batteries from the device using
the same procedure by which you installed them. Recycle
batteries with the appropriate organisation or company.
DISPOSING OF USED DEVICES
Do not dispose of this device in municipal waste systems.
Hand it over to an electric and electrical device recycling
and collection point. Check the symbol on the product,
instruction manual and packaging. The plastics used to
construct the device can be recycled in accordance with
their markings. By choosing to recycle you are making
a signicant contribution to the protection of our
environment. Contact local authorities for information on
your local recycling facility.
Bekijk gratis de handleiding van Royal Catering RCKK-80.2, stel vragen en lees de antwoorden op veelvoorkomende problemen, of gebruik onze assistent om sneller informatie in de handleiding te vinden of uitleg te krijgen over specifieke functies.
Productinformatie
| Merk | Royal Catering |
| Model | RCKK-80.2 |
| Categorie | Niet gecategoriseerd |
| Taal | Nederlands |
| Grootte | 5433 MB |


