Handleiding
Je bekijkt pagina 12 van 68
PR189DV / PR191DV
12
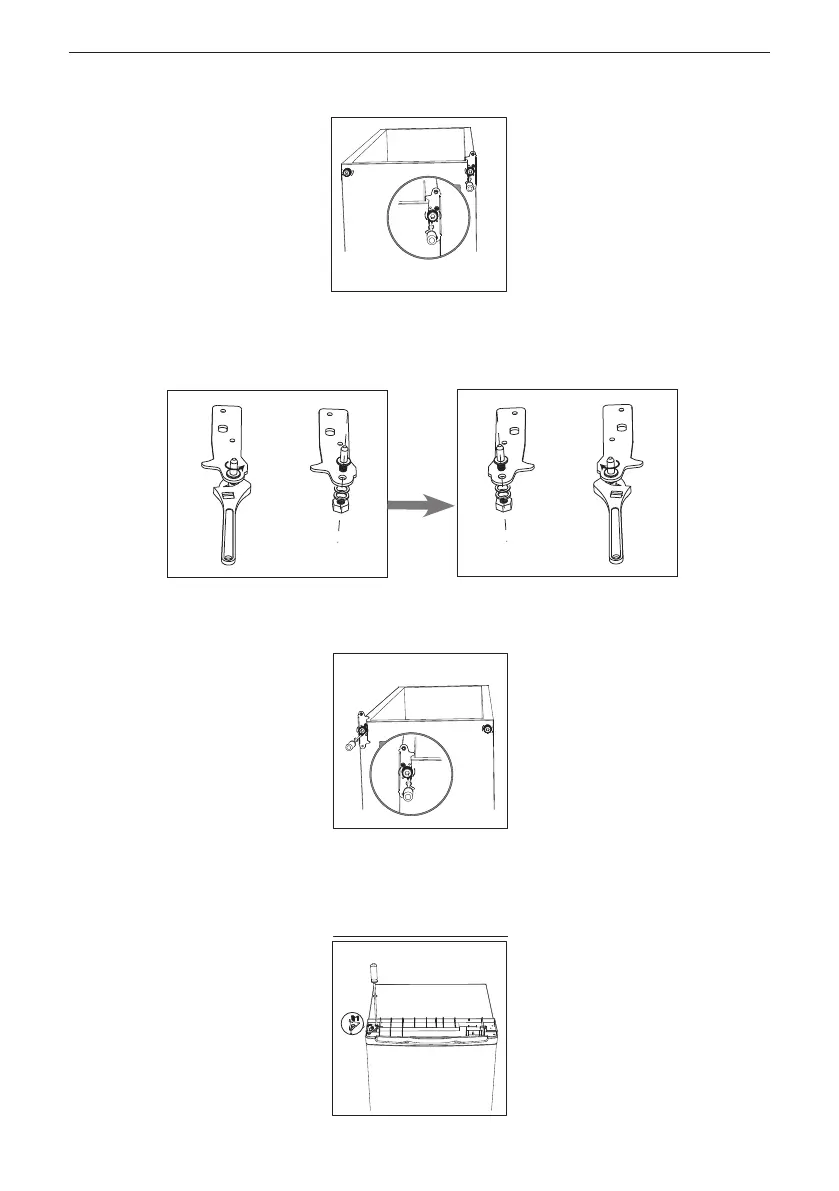
4. Verwijder de onderste schroef, scharnierbeugel en het stelvoetje onderaan het
apparaat.
Reverse Door
Tool required: Philips screwdriver, Flat bladed screwdriver, Hexagonal spanner.
Ensure the unit is unplugged and empty.
To take the door off, it is necessary to tilt the unit backwards. You should rest the unit on something solid
so that it will not slip during the door reversing process.
All parts removed must be saved to do the reinstallation of the door.
Do not lay the unit flat as this may damage the coolant system.
It' s better that 2 people handle the unit during assembly.
1. Remove two screws at rear side of top cover.
2. Remove top cover and thermostat knob, then place it aside.
3. Unscrew top hinge and then remove door and place it on a soft pad to
avoid scratch.
4. Unscrew bottom hinge. Then remove the adjustable feet from both
side.
7
unscrew
5. Maak de scharnierpin los van de scharnierbeugel. Keer de beugel om en maak
de pin weer vast.
5. Unscrew and remove the bottom hinge pin, turn the bracket over and replace it.
6. Refit the bracket fitting the bottom hinge pin. Replace both adjustable
feet.
7. Place the door back on. Ensure the door is aligned horizontally and
vertically, so that the seals are closed on all sides before finally
tightening the top hinge.
8. Put the top cover and fix it with 2 screws on the back.
Unscrew
Screw
8
Reverse Door
9. Fix the thermostat knob.
screw
6. Bevestig de schroeven, scharnierbeugel en het stelvoetje aan de andere kant
van de bodem.
5. Unscrew and remove the bottom hinge pin, turn the bracket over and replace it.
6. Refit the bracket fitting the bottom hinge pin. Replace both adjustable
feet.
7. Place the door back on. Ensure the door is aligned horizontally and
vertically, so that the seals are closed on all sides before finally
tightening the top hinge.
8. Put the top cover and fix it with 2 screws on the back.
Unscrew
Screw
8
Reverse Door
9. Fix the thermostat knob.
screw
7. Zet de deur voorzichtig op zijn plaats. Zorg dat de deur zowel horizontaal als
verticaal is uitgelijnd zodat de afdichtingen op alle zijden gesloten zijn voordat
je het bovenste scharnier volledig vastmaakt. Breng de scharnier terug en
schroef vast op de bovenkant van het apparaat.
5. Unscrew and remove the bottom hinge pin, turn the bracket over and replace it.
6. Refit the bracket fitting the bottom hinge pin. Replace both adjustable
feet.
7. Place the door back on. Ensure the door is aligned horizontally and
vertically, so that the seals are closed on all sides before finally
tightening the top hinge.
8. Put the top cover and fix it with 2 screws on the back.
Unscrew
Screw
8
Reverse Door
9. Fix the thermostat knob.
screw
Bekijk gratis de handleiding van Primo PR191DV, stel vragen en lees de antwoorden op veelvoorkomende problemen, of gebruik onze assistent om sneller informatie in de handleiding te vinden of uitleg te krijgen over specifieke functies.
Productinformatie
| Merk | Primo |
| Model | PR191DV |
| Categorie | Vriezer |
| Taal | Nederlands |
| Grootte | 4492 MB |


