Philco PD 1046 ETX handleiding
Handleiding
Je bekijkt pagina 21 van 36
Copyright © 2020, Fast ČR, a. s. Revision 10/2022
EN - 19
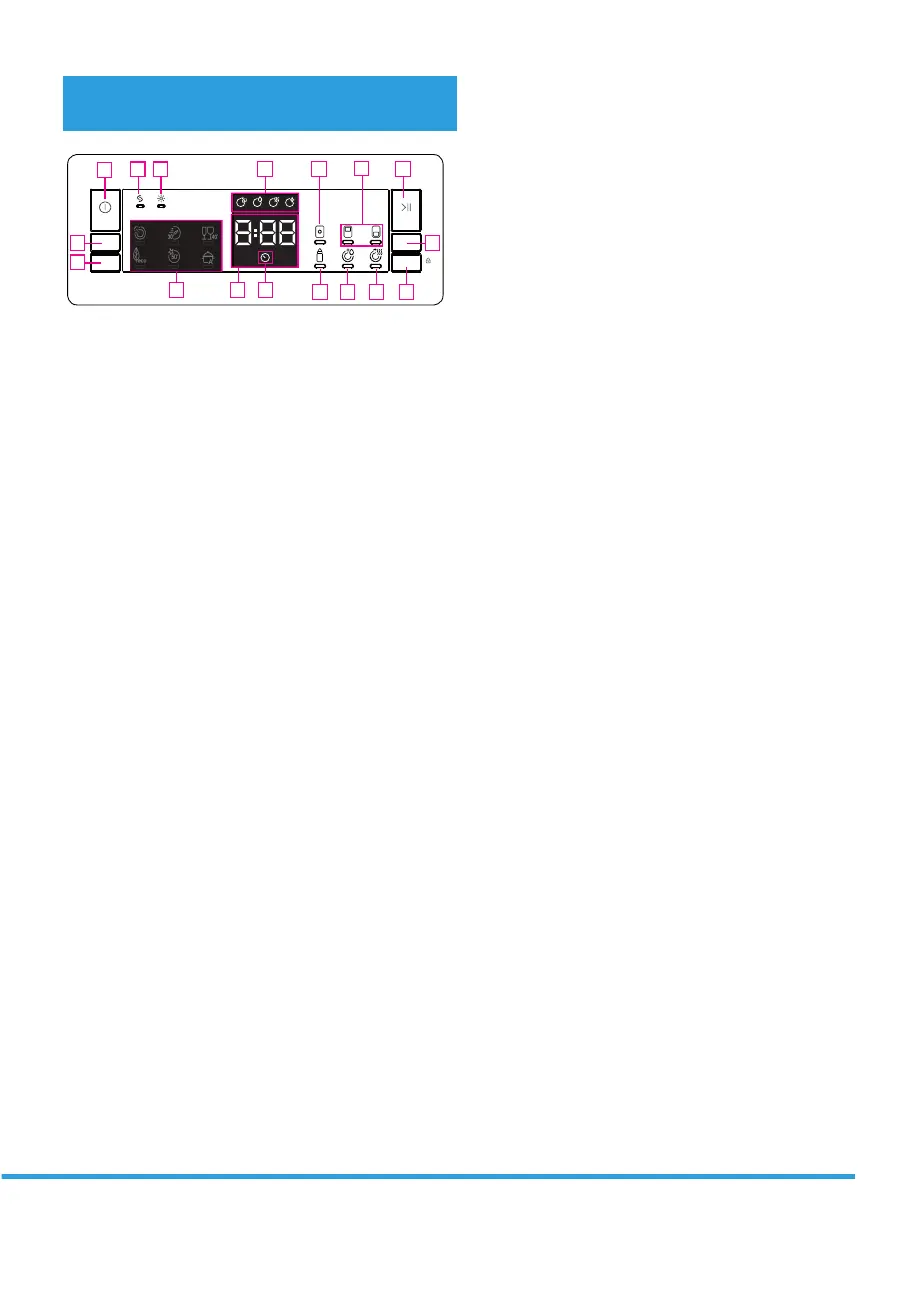
PART 7: THE CONTROL PANEL
1. The ON/OFF button
2. The Program Selection button
2.1 Program indicators
3. The Delayed Start button
3.1 The Delayed Start indicator
4. The Remaining Time indicator
5. The Start/Pause button
6. The Options button
7. The Select button
8. The Rinsing agent indicator
9. The Salt indicator
10. The Tablet indicator
11. The Half Load indicator
12. The Extra Hygiene indicator
13. The Extra Rinsing option
14. The Extra Drying indicator
15. Washing phases indicators
a- The washing phase indicator
b- The rinsing phase indicator
c- The drying phase indicator
d- The nal phase indicator
1. The ON/OFF button
To switch the appliance on, press the ON/OFF
button.
2. The Program Selection button
Select the suitable program by pressing the Program
button. The indicator of the selected program (2.1)
will light up. For details on the programs, please see
UIFi1SPHSBNUBCMFwTFDUJPO
3. The Delayed Start button
By pressing the Delayed Start button before starting
the program, you can delay the program by 1-2 ... 24
hours (3). The Delayed Start indicator (3.1) will light
up. In order to change the delay duration, rst press
the Start/Pause button, then press the Delay Time
button and select new time value. To activate the
new delay time, press the Start/Pause button.
In order to cancel the delay, you must change the
value to 0 hours using the Delay Time button.
4. The Remaining Time indicator
You can monitor the progress of the program using
the Washing, Rinsing, Drying, End and Remaining
Time indicators.
5. The Start/Pause button
You can start the program by pressing the Start/
Pause button. The Washing indicator lights up and
the Remaining Time indicator will show the duration
of the program. It will also display the remaining
time during the program. If you open the appliance
door while the program is running, the duration
of the program will pause and the indicator of the
current washing phase will start ashing.
6. The Options button
You can select options by pressing the Options
button repeatedly. The selected option is indicated
by a ashing LED indicator.
7. The Select button
An option can be selected by pressing the Select
button. The LED indicator of the selected option will
remain lit.
8. The Rinsing agent indicator
When the rinsing agent level is low, the insucient
rinsing agent indicator will illuminate and you will
have to rell the rinsing chamber.
9. The Salt indicator
If the amount of softening salt is insucient, the low
salt indicator will illuminate and you should add salt.
10. The Tablet indicator
When using multi-tablets containing salt, polish
and other agents, select the Tablet function. The
Tablet indicator will stay on as long as this option is
selected. This option will change the temperature
and duration of the washing.
11. The Half Load indicator
By choosing the Half Load function you can select
the area of the dishwasher that contains the dishes
to be washed. You can select both baskets, only the
upper basket or only the lower basket. Press the
button until the symbol corresponding to the basket
containing the dishes that you want to wash lights
up. When this feature is turned on, the Half Load
indicator is on. Dishes placed in other sections will
not be washed.
Bekijk gratis de handleiding van Philco PD 1046 ETX, stel vragen en lees de antwoorden op veelvoorkomende problemen, of gebruik onze assistent om sneller informatie in de handleiding te vinden of uitleg te krijgen over specifieke functies.
Productinformatie
| Merk | Philco |
| Model | PD 1046 ETX |
| Categorie | Vaatwasser |
| Taal | Nederlands |
| Grootte | 4286 MB |