NEO Tools 10-811 handleiding
Handleiding
Je bekijkt pagina 7 van 52
7
The operator must remember that common sense and caution are
factors that cannot be built into this product, but must be provided
by the operator.
• For safety reasons and to prevent damage to expensive
components, it is recommended that the user has knowledge of
basic car repairs and a working knowledge of car systems.
• We believe that the information contained in this document is
reliable. However, general technical information is provided by us
free of charge and you use it at your own discretion and risk. We
shall not be liable for results or damages resulting from the use of
such information in whole or in part. Always refer to the specific
instructions and technical information provided by the vehicle
manufacturer.
• The manufacturer disclaims any responsibility for damage to
vehicles or components if such damage is the result of incompetent
operation by the operator or failure to observe the basic safety rules
set out in the operating instructions.
• This equipment is intended only for professional use by personnel
trained to perform the service functions for which it is designed.
• This equipment is designed to service a variety of engines in a safe
and convenient manner. However,
• differences in makes and models of motors may prevent the unit
from being used as intended. DO NOT attempt to force the use of
this unit in applications for which it was not designed.
• The procedures documented in this manual are intended to serve
as guidelines for the use of this equipment.
• In addition to these tips, the manufacturer's recommended
procedures should always be followed when servicing any vehicle.
• The use of this device is simple and straightforward provided the
instructions are followed. Use common sense when using this
appliance and only use this appliance.
• Use the device for its intended purpose
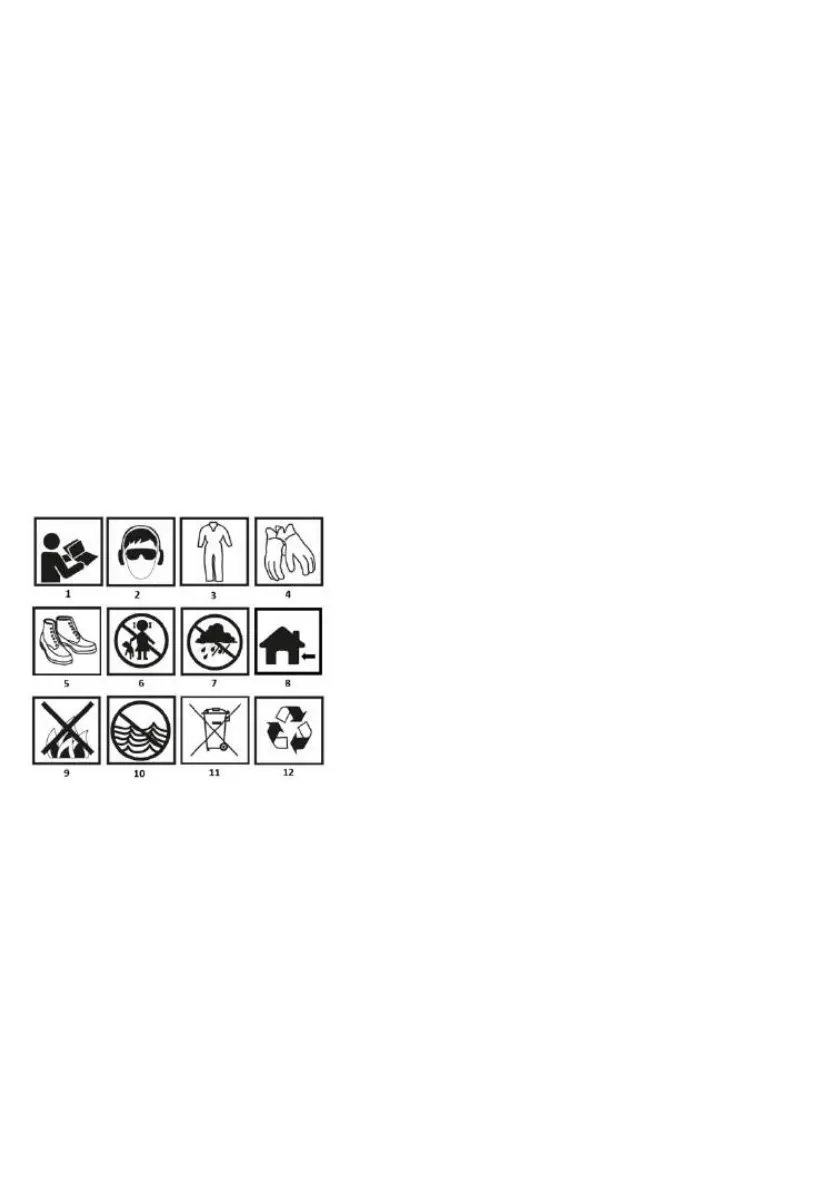
Pictograms and warnings
1.Read the operating instructions carefully
2.Wear safety goggles and a protective mask
3.Wear protective clothing
4.Wear protective gloves
5.Wear oil-resistant and slip-resistant safety footwear
6.Keep out of the reach of children
7.Protect from moisture
8.For indoor use
9.Do not throw into fire
10.Do not throw into water
11.Do not dispose of with household waste
12.Subject to separate waste collection
PRODUCT DESCRIPTION
The 70-litre capacity mobile oil skimmer is designed to efficiently drain
used oil from the vehicle. The unit has a pressurised self-draining
function, which uses compressed air to drain the used oil from the
tank.
SPECIFIC SAFETY INSTRUCTIONS AND WARNINGS
• WARNING: DO NOT exceed the maximum tank pressure listed in
the product specification. Failure to do so may lead to product failure
and may result in personal injury and/or property damage.
• WARNING: DO NOT make any adjustments to the oil drain when it
is connected to the ventilation system or when the product is in use
• is in use. Non-compliance can lead to oil leaks and property
damage.
• WARNING: DO NOT use this product to pump water/petrol or other
liquids for which this product is not intended.
• WARNING: Always allow the engine to cool down before draining
the oil. Hot oil can cause severe burns.
• It is not intended for use with petrol.
• DO NOT exceed the rated capacity of the tank. Overloading may
cause damage or failure of the oil drain.
• Keep your hands away from any adjustment points during assembly,
use and transport.
• Only use the oil drain on dry, oil/fat free, even, sanded surfaces.
Ensure that the surface is able to support the weight of the drain at
maximum capacity.
• Wear protective clothing, gloves and goggles when handling used
fluids.
• DO NOT leave the oil drain unattended while working or removing
oil.
• Never use or store near an open flame or heat source.
• DO NOT leave under the car jack when lowering the vehicle to the
ground surface.
MONTAGE
• Remove the entire contents of the pack.
• Fit the swivel castors. Insert the caster bolt through the designated
holes on the front of the unit. Place a washer on the bolt, then a lock
washer and a lock nut. Tighten the retaining nut using a 19 mm
spanner.
• Fit the control tank to the main tank.
• Fully open the valve lever on the fitting attached to the top of the oil
tank. Screw the adjustable extension into the threaded part of the
fitting.
NOTE: When the valve lever is fully open, the extension will enter the
tank.
Push the sink bowl onto the top of the extension.
GRAVITATIONAL ACTION
WARNING: Always read the product warnings, safety instructions and
installation instructions before use.
• Adjust the height of the sink bowl to the lowest setting by unscrewing
the adjustment knob on the extension.
• Slide the beaker under the raised vehicle, making sure the beaker
bowl is directly under the engine oil drain plug.
• Grasping the top of the extension, lift the sump until it is
approximately 10 cm (4") below the oil drain plug. While supporting
the top of the extension, tighten the adjustment knob as far as it will
go.
• Ensure that the valve lever on the connector is fully open.
• Ensure that the valve on the discharge hose is fully closed.
• Unscrew the engine oil drain plug and allow the used oil to drain
completely into the sump pan.
• Once the oil is completely drained, lower the sump as described in
step 1 and remove it from under the vehicle.
VACUUM ACTION
• Connect the vacuum hose to the connector and open the
compressed air valve.
• Connect a suitably sized suction probe to the pump tube, then insert
the probe into the dipstick guide and close the valve on the pump
tube.
• Observe the pressure drop on the pressure gauge.
• When the vacuum drops to negative open the valve, the used oil will
be drawn into the control tank by the suction JUDGE.
• .The air pressure at the entrance to the suction machine should be
8 BAR. If the pressure is lower, cases such as pumping failure or
slow flow due to insufficient vacuum are possible. For optimal flow,
use a suction probe with the highest possible flow rate. In a straight
control channel, use steel probes with a flow rate of 1.8 or 1.4 l/min.
In a curved control duct, use plastic probes with a flow rate of: 1.8
or 0.8 or 0.4 l/min. Oil can be sucked in as long as the probe is 2 - 3
cm longer than the oil level dipstick. However, the probe should not
touch the bottom of the oil sump.
• Before starting to siphon, determine in the vehicle's technical
manual whether oil siphoning is possible. If not, use the method of
pouring the oil through the plug in the oil sump.
NOTE: The beaker should be rolled carefully when full. The centre of
gravity may shift, causing the beaker to tilt.
NOTE: Check the emptying capacity using the emptying level indicator on
the side of the tank.
Bekijk gratis de handleiding van NEO Tools 10-811, stel vragen en lees de antwoorden op veelvoorkomende problemen, of gebruik onze assistent om sneller informatie in de handleiding te vinden of uitleg te krijgen over specifieke functies.
Productinformatie
| Merk | NEO Tools |
| Model | 10-811 |
| Categorie | Niet gecategoriseerd |
| Taal | Nederlands |
| Grootte | 13125 MB |


