Handleiding
Je bekijkt pagina 19 van 36
19
PL
PANEL STEROWANIA
Funkcję można wybrać za pomocą przycisku funkcyjnego na panelu sterowania piekarnika, a
temperaturę gotowania można ustawić za pomocą termostatu (lampka sygnalizacyjna zaświeci
się, gdy temperatura zostanie ustawiona za pomocą termostatu), piekarnik rozpocznie pracę po
ustawieniu mechanicznego lub cyfrowego timera.
23
4. Use of the oven
4.1. Cooling fan
-Thanks to the ventilation system in our product, the front part of the
product and the furniture are cooled when necessary. After the cooling
process is completed, the system is automatically deactivated. The hot
air inside the product is discharged out of the product through the
ventilation gaps. Do not close the ventilation gaps to prevent the oven
from overheating.
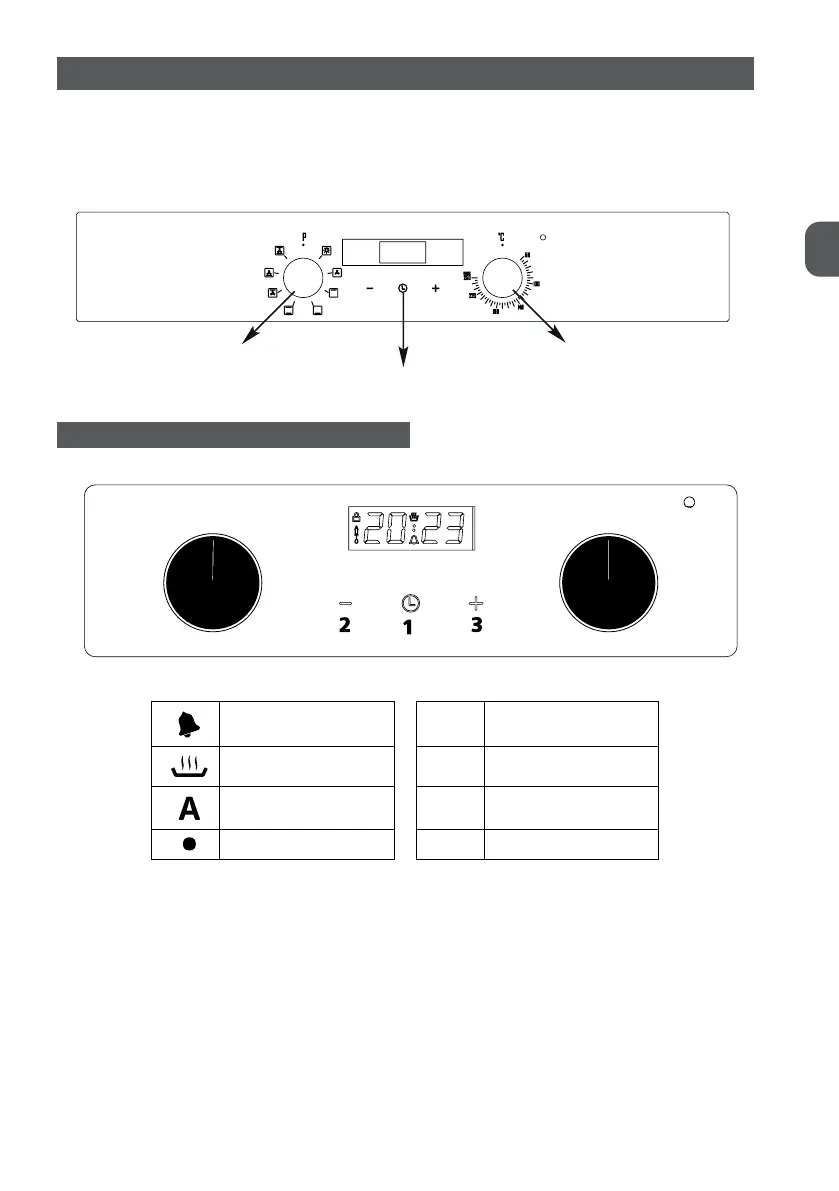
4.2. Control panel (*)
-The function can be selected with the function button on the control
panel of the oven and the cooking temperature can be adjusted with the
thermostat (the signal lamp will light up when the temperature is
adjusted with the thermostat), the oven will start working by setting the
mechanical or digital timer.
*Visuals are Representative.
Function Button
Digital Timer
Thermostat
*Visuals are Representative.
Function Button
Mechanical Timer
Thermostat
Przycisk funkcyjny Termostat
Przycisk funkcji
KORZYSTANIE Z ZEGARA CYFROWEGO
24
4.2.1. Use of Digital Timer
Minute Reminder
Cooking Icon
Automatic Cooking Icon
Point Icon
1 Function Selector Button
2 Minus Button
3 Plus Button
2 and 3 Manuel
4.2.1.1 Setting the Time of Day (24 Hours)
After connecting or reconnecting to a power source, “0.00” and “AUTO” ash.
Press and hold 1 for about 2 seconds, the dot icon starts blinking. Use 2 and 3
to set the current time. Approx. 7 seconds after the end of the set time, the new
data is memorized. Time correction can be made after; Press buttons 2 and 3 for
approx. 2 seconds, the dot icon starts blinking. You can then set the current time.
Caution. If the correct time is not set, the oven may not function properly.
4.2.1.2 Manual Operation
If the programmer is not in semi-automatic or fully automatic mode,
the oven can be used manually without cooking time setting.
4.2.1.3 Setting the Minute Reminder
You can activate the minute reminder at any time, these are functions that work
independently of the activity status of other programs. The time you can set ran-
ges from 1 minute to 23 hours 59 minutes.
• Press and hold button 1 until the minute counter icon starts blinking. “0.00”
starts ashing.
• Use buttons 3 and 2 to enter the required time. The minute reminder icon rema-
ins on the screen. After the set time has elapsed, the minute reminder icon starts
ashing again and an audible signal warns for approx. 7 minutes.
-Press 1, 2 or 3 to turn off the signal;
-When 1 is pressed for about 2 seconds, the minute reminder icon disappears
and the display shows the current time.
Przypomnienie
minutowe
1
Przycisk wyboru
funkcji
24
4.2.1. Use of Digital Timer
Minute Reminder
Cooking Icon
Automatic Cooking Icon
Point Icon
1 Function Selector Button
2 Minus Button
3 Plus Button
2 and 3 Manuel
4.2.1.1 Setting the Time of Day (24 Hours)
After connecting or reconnecting to a power source, “0.00” and “AUTO” ash.
Press and hold 1 for about 2 seconds, the dot icon starts blinking. Use 2 and 3
to set the current time. Approx. 7 seconds after the end of the set time, the new
data is memorized. Time correction can be made after; Press buttons 2 and 3 for
approx. 2 seconds, the dot icon starts blinking. You can then set the current time.
Caution. If the correct time is not set, the oven may not function properly.
4.2.1.2 Manual Operation
If the programmer is not in semi-automatic or fully automatic mode,
the oven can be used manually without cooking time setting.
4.2.1.3 Setting the Minute Reminder
You can activate the minute reminder at any time, these are functions that work
independently of the activity status of other programs. The time you can set ran-
ges from 1 minute to 23 hours 59 minutes.
• Press and hold button 1 until the minute counter icon starts blinking. “0.00”
starts ashing.
• Use buttons 3 and 2 to enter the required time. The minute reminder icon rema-
ins on the screen. After the set time has elapsed, the minute reminder icon starts
ashing again and an audible signal warns for approx. 7 minutes.
-Press 1, 2 or 3 to turn off the signal;
-When 1 is pressed for about 2 seconds, the minute reminder icon disappears
and the display shows the current time.
Ikona gotowania 2 Przycisk Minus
24
4.2.1. Use of Digital Timer
Minute Reminder
Cooking Icon
Automatic Cooking Icon
Point Icon
1 Function Selector Button
2 Minus Button
3 Plus Button
2 and 3 Manuel
4.2.1.1 Setting the Time of Day (24 Hours)
After connecting or reconnecting to a power source, “0.00” and “AUTO” ash.
Press and hold 1 for about 2 seconds, the dot icon starts blinking. Use 2 and 3
to set the current time. Approx. 7 seconds after the end of the set time, the new
data is memorized. Time correction can be made after; Press buttons 2 and 3 for
approx. 2 seconds, the dot icon starts blinking. You can then set the current time.
Caution. If the correct time is not set, the oven may not function properly.
4.2.1.2 Manual Operation
If the programmer is not in semi-automatic or fully automatic mode,
the oven can be used manually without cooking time setting.
4.2.1.3 Setting the Minute Reminder
You can activate the minute reminder at any time, these are functions that work
independently of the activity status of other programs. The time you can set ran-
ges from 1 minute to 23 hours 59 minutes.
• Press and hold button 1 until the minute counter icon starts blinking. “0.00”
starts ashing.
• Use buttons 3 and 2 to enter the required time. The minute reminder icon rema-
ins on the screen. After the set time has elapsed, the minute reminder icon starts
ashing again and an audible signal warns for approx. 7 minutes.
-Press 1, 2 or 3 to turn off the signal;
-When 1 is pressed for about 2 seconds, the minute reminder icon disappears
and the display shows the current time.
AUTOGOTOWANIE 3 Przycisk Plus
24
4.2.1. Use of Digital Timer
Minute Reminder
Cooking Icon
Automatic Cooking Icon
Point Icon
1 Function Selector Button
2 Minus Button
3 Plus Button
2 and 3 Manuel
4.2.1.1 Setting the Time of Day (24 Hours)
After connecting or reconnecting to a power source, “0.00” and “AUTO” ash.
Press and hold 1 for about 2 seconds, the dot icon starts blinking. Use 2 and 3
to set the current time. Approx. 7 seconds after the end of the set time, the new
data is memorized. Time correction can be made after; Press buttons 2 and 3 for
approx. 2 seconds, the dot icon starts blinking. You can then set the current time.
Caution. If the correct time is not set, the oven may not function properly.
4.2.1.2 Manual Operation
If the programmer is not in semi-automatic or fully automatic mode,
the oven can be used manually without cooking time setting.
4.2.1.3 Setting the Minute Reminder
You can activate the minute reminder at any time, these are functions that work
independently of the activity status of other programs. The time you can set ran-
ges from 1 minute to 23 hours 59 minutes.
• Press and hold button 1 until the minute counter icon starts blinking. “0.00”
starts ashing.
• Use buttons 3 and 2 to enter the required time. The minute reminder icon rema-
ins on the screen. After the set time has elapsed, the minute reminder icon starts
ashing again and an audible signal warns for approx. 7 minutes.
-Press 1, 2 or 3 to turn off the signal;
-When 1 is pressed for about 2 seconds, the minute reminder icon disappears
and the display shows the current time.
Ikona punktu 2 i 3 Manuel
Bekijk gratis de handleiding van MPM -63-BO-30, stel vragen en lees de antwoorden op veelvoorkomende problemen, of gebruik onze assistent om sneller informatie in de handleiding te vinden of uitleg te krijgen over specifieke functies.
Productinformatie
| Merk | MPM |
| Model | -63-BO-30 |
| Categorie | Oven |
| Taal | Nederlands |
| Grootte | 3299 MB |
