Handleiding
Je bekijkt pagina 8 van 24
8
PL
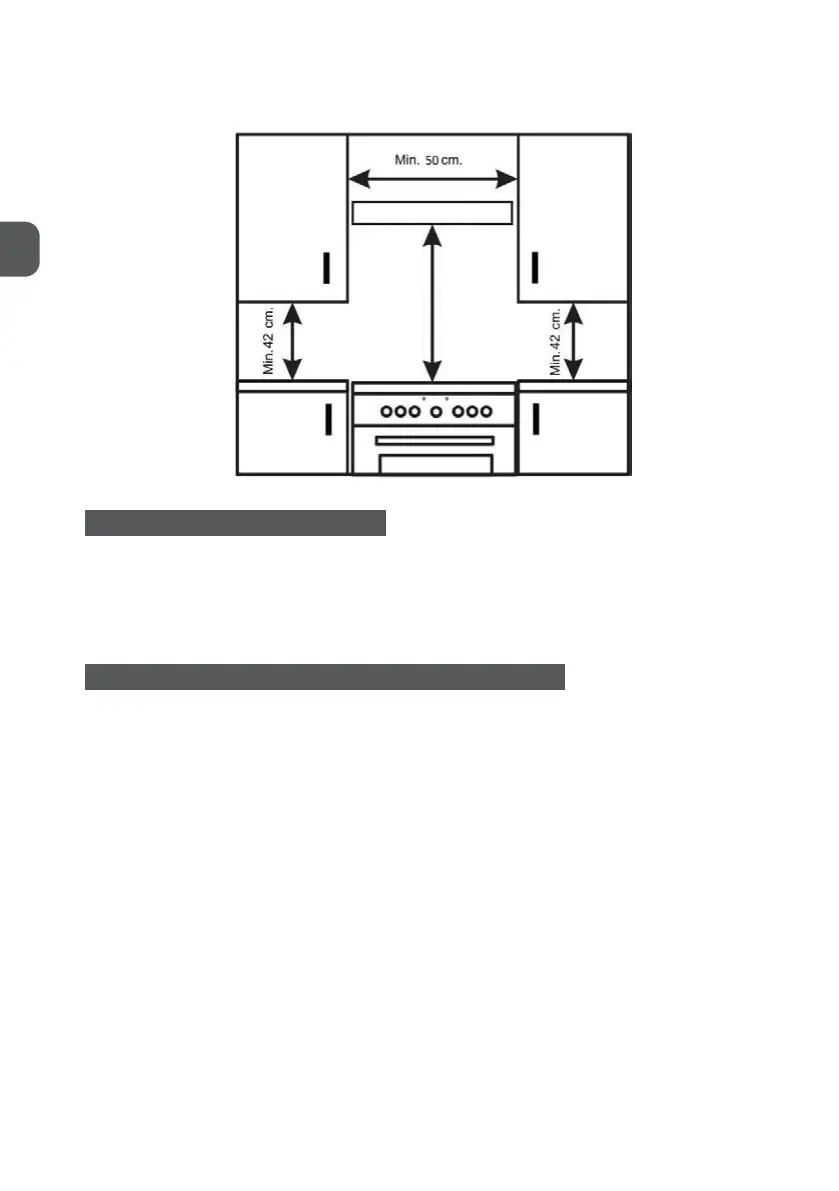
7. Wycięcie pod szaę kuchenną powinno mieć wymiary wskazane na rysunku.
8. Ściana stykająca się z tyłem kuchenki musi być wykonana z materiału ognioodpornego.
8
The following instructions should be read by a qualified technician to ensure that the appliance is installed, regulated and
technically serviced correctly in compliance with current regulations. Important: remember to disconnect the appliance from
electricity by turn off the mains before regulating the appliance or
carrying out any maintenance work.
Positioning
Important: The hob should never be installed in proximity of a door access. People opening and closing the door could come
into contact with pots or pans cooking on the hob. This unit may be installed and used only in permanently ventilated rooms.
Unpacking
1. Be careful when unpacking and installing the appliance. Sharp edges might cause accidents.
2. The oven is heavy and care must be taken when moving it. Ensure that all packing, both inside and outside the cooker, has
been removed before the oven is used.
3. Unpack the oven from the carton, check and make sure it has not been dam
aged in any way. If you have any doubts, do
not use it, contact the service center or where you buy the oven.
Installation
The cooker is designed to fit between kitchen cabinets. The space either side need only be sufficient to allow withdrawal of
the cooker for servicing. It can be
used with cabinet one side or both as well as in a corner setting. It can also be used free-standing.
The appliances can be installed next to furniture units which are no taller than the top of the cooker ho
bs. If the cooker is
placed touching walls or sides of neighboring cabinets, these must be capable of withstanding a temperature rise of 50°C
above room temperature. For a correct installation of the cooker the following precautions must be followed:
1. The cooker may be located in a kitchen, a diner or bed sitting room, but not in a bathroom or shower room.
2. Kitchen cabinet installed next to the cooker that are taller than the top of the cooker hobs must be situated at least 20 c
m
from the edge of the hobs.
3. Hoods must be installed according to the requirements in the installation manual for the hoods themselves and in any case
at a minimum distance of 65 cm.
4. Place the wall cabinets adjacent to the hood at a minimum height of 42 cm from the hobs as indicated in figure 1.
5. The hoods must be installed according to the requirements in the hood handbook.
6. Should the cooker be installed beneath a wall cabinet, the latter should be situated at least 70 cm awa
y from the hobs as
indicated in figure 1.
7. cut-out for the cooker cabinet should have the dimensions indicated in the figure 1.
8. The wall in contact with the back of the cooker must be of flameproof material.
Leveling Your Appliance
Okap kuchenny
Min. 65 cm (z kapturem)
Min. 70 cm (bez kaptura)
POZIOMOWANIE URZĄDZENIA
Wyjmij 4 nóżki kuchenki zkomory piekarnika, które są zapakowane razem ze wspornikiem,
anastępnie przykręć je do 4 cokołów wdolnej części kuchenki. Wrazie potrzeby można
wypoziomować kuchnie. Wysokość kuchenki można regulować za pomocą regulowanych
nóżek wcokole. Wyreguluj nóżki, przechylając kuchenkę na bok. Następnie zainstaluj pro
-
dukt na miejscu. Ważne jest, aby kuchenka stała poziomo przed instalacją.
MONTAŻ ŁAŃCUCHA ZABEZPIECZAJĄCEGO IHAKA
Aby zapobiec przewróceniu się kuchenki do przodu, do tylnej części kuchenki MUSZĄ
być przymocowane dwa odcinki łańcucha, które powinny być zawsze przymocowane do
dostarczonych haków.
Haki powinny być przymocowane do ściany ztyłu kuchenki. Łańcuchy powinny być za
-
wsze przymocowane do haków, gdy kuchenka jest oparta ościanę.
Przymocuj haki do ściany bezpośrednio za kuchenką po obu stronach. Przed użyciem lub
czyszczeniem piekarnika należy przymocować łańcuch do haka.
Bekijk gratis de handleiding van MPM -55-KEI-39, stel vragen en lees de antwoorden op veelvoorkomende problemen, of gebruik onze assistent om sneller informatie in de handleiding te vinden of uitleg te krijgen over specifieke functies.
Productinformatie
| Merk | MPM |
| Model | -55-KEI-39 |
| Categorie | Fornuis |
| Taal | Nederlands |
| Grootte | 3053 MB |


