Milwaukee M12 Fuel 2519-21 handleiding
Handleiding
Je bekijkt pagina 5 van 28
5
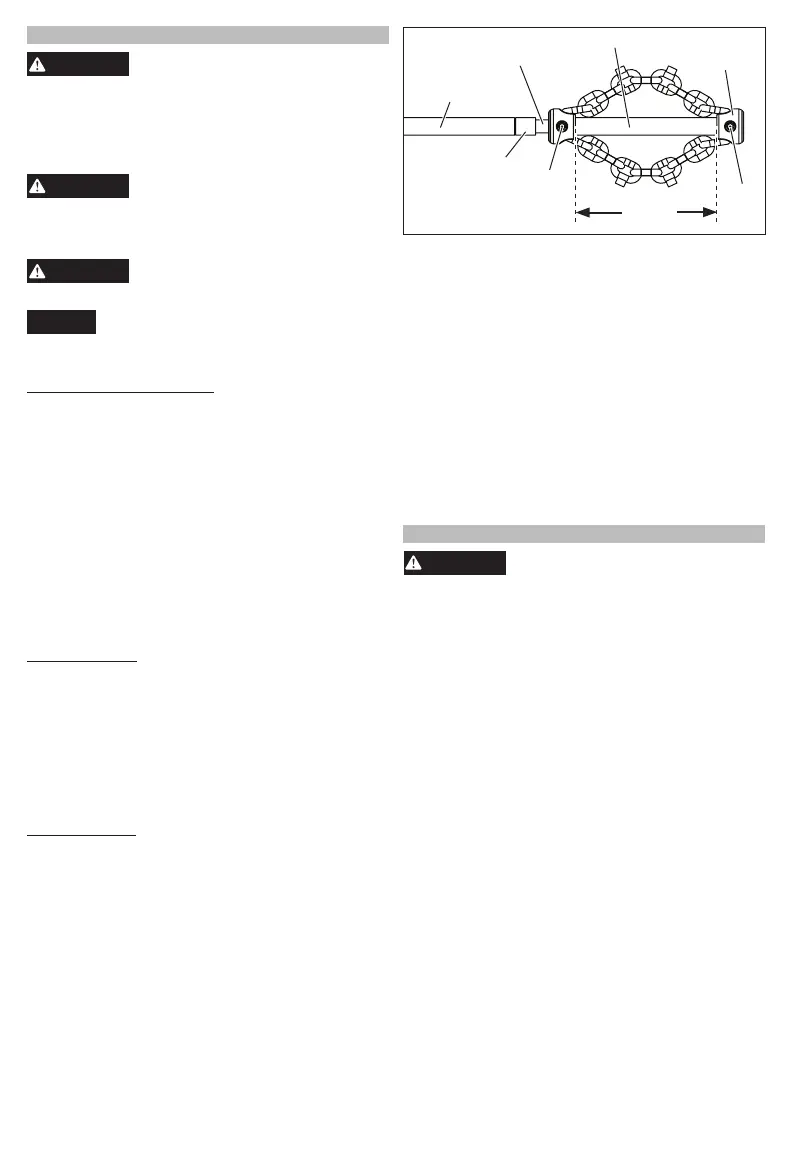
Collar spacer
Set
screw
Exposed cable
1/4" maximum
Sheath
Collar
distance
Knocker
collar
Knocker
bushing
Set
screw
1. WARNING! Remove battery to avoid starting the tool.
2. Test t the chain knocker and collar spacer on the
cable as shown. Chains should be straight; do not
assemble with chains twisted. Cable end should
be ush with the end of the collar. Check length
of exposed cable.
3. Tighten the set screws with the supplied hex
wrench to secure the chain knocker to the cable.
Failure to secure properly can result in damage or
the knocker being lost down the drain.
Drain Cleaning Setup
1. Place the chain snake no further than 2' from the
drain.
WARNING!
Greater distance can cause twist-
ing, kinking, breaking, or whipping of the cable.
2. Remove the foot pedal from storage and unwrap
the cord and place to the side, ensuring the cord
will not tangle with the cable.
OPERATION
WARNING
To reduce the risk of short circuit,
when setting tool or battery down,
do not allow battery to contact corrosive or con-
ductive uid.
To reduce the risk of injury, always wear proper
eye protection marked to comply with ANSI Z87.1.
Always wear leather gloves over latex/rubber
gloves to avoid entanglement.
Fuel Gauge
To determine the amount of charge left in the battery,
turn the tool on. The fuel gauge will light up for 2-3
seconds. When less than 10% of charge is left, 1
light on the fuel gauge will ash 4 times.
To signal the end of charge, 1 light on the fuel gauge
will ash 8 times and the tool will not run. Charge
the battery pack.
If the battery becomes too hot, the fuel gauge lights
will ash and the tool will not run. Allow the battery
to cool down.
Reverse Protection
The chain snake is equipped with a reverse protec-
tion feature. If the chain snake runs in reverse for
three seconds, the tool will turn o and the fuel gauge
lights will ash.
Selecting Speed
Rotate the speed control dial to the desired speed.
The farther the dial is rotated the higher the speed.
ASSEMBLY
WARNING
Recharge only with the charger
specied for the battery. For spe-
cic charging instructions, read the operator’s
manual supplied with the charger and battery.
Removing/Inserting the Battery
To remove the battery, push in the release buttons
and pull the battery pack away from the tool.
WARNING
Always lock the trigger or remove
the battery pack any time the tool
is not in use.
To insert the battery, slide the pack into the body
of the tool. Make sure it latches securely into place.
WARNING
Only use accessories specically
recommended for this tool. Others
may be hazardous.
NOTICE
To prevent damage to the cable and at-
tachments, only use in recommended pipe
size.
Installing Chain Knocker
Selecting a chain knocker:
Only use chain knockers designed for 1/4" cable.
Select the proper chain knocker size by the drain
capacity and application.
Chain knockers without carbide cutting tips can be
used in common pipe types. These chain knockers
work well in grease and similar blockages.
Chain knockers with carbide cutting tips can be used
for breaking up more challenging blockages and
debris. Carbide cutting tips are used for aggressive
cleaning and could damage pipe, especially softer
materials (such as plastics and Orangeburg), thin
walled pipe, or if the chain knocker is kept in one
position for an extended time.
Do not use chain knockers for cleaning in glass, ce-
ramic, porcelain or similar material xtures or pipes.
Damage could occur.
Collar distance:
A proper collar distance will allow the chains to
spread an appropriate amount when rotated to clean
the pipe walls. Use the supplied collar spacer sized
for the chain knocker. If additional exibility is re-
quired to navigate a bend, the collar spacer can be re-
moved and the collar distance can be set with a tape
measure. Operating without a collar spacer makes
it more likely for the cable to ip over in use and be
damaged. Do not operate carbide cutters without a
collar spacer to reduce risk of cable damage.
Exposed cable:
The amount of exposed cable (cable not covered by
sheath) should not exceed 1/4". The more exposed
cable there is, the more likely the cable will ip and
be damaged. Exposed cable is set with a bushing
("Knocker bushing") made from the extra sheath
provided. Only use sheath of the correct size for the
cable. Any time sheath is cut, it should be cut cleanly
and squarely. Do not damage the cable when cutting
the sheath.
Bekijk gratis de handleiding van Milwaukee M12 Fuel 2519-21, stel vragen en lees de antwoorden op veelvoorkomende problemen, of gebruik onze assistent om sneller informatie in de handleiding te vinden of uitleg te krijgen over specifieke functies.
Productinformatie
| Merk | Milwaukee |
| Model | M12 Fuel 2519-21 |
| Categorie | Niet gecategoriseerd |
| Taal | Nederlands |
| Grootte | 5360 MB |


