Milwaukee M12 Fuel 2476-20 handleiding
Handleiding
Je bekijkt pagina 4 van 16
4
1
2
3
10
4
9
8
5
7
6
11
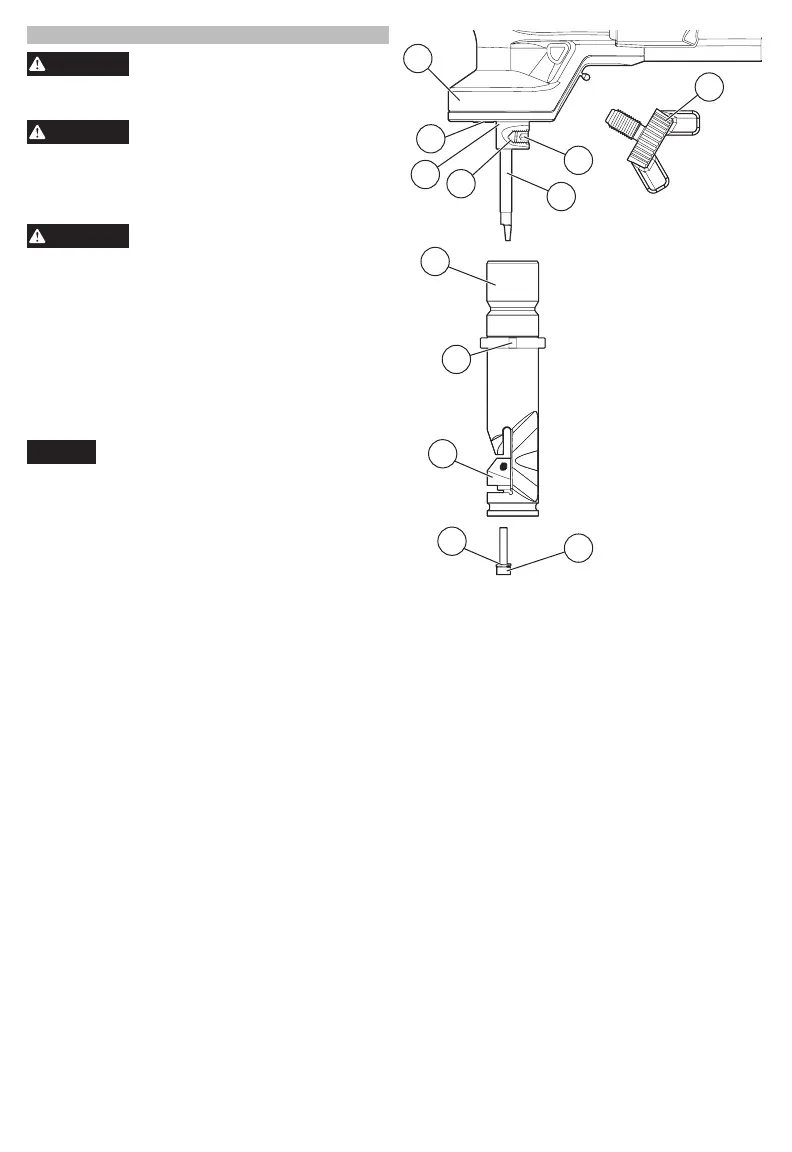
1. Gear case
2. Die holder rotation
knob
3. Set screw
4. Punch
5. Die holder screws
6. Lockwasher
7. Die
8. Locating notches
9. Die holder
10. Detent hole
11. Punch holder
12. LED
12
ASSEMBLY
WARNING
Recharge only with the charger
specied for the battery. For spe-
cic charging instructions, read the operator’s
manual supplied with your charger and battery.
WARNING
Only use accessories specically
recommended for this tool. Others
may be hazardous.
Removing/Inserting the Battery
To remove the battery, push in the release buttons
and pull the battery pack away from the tool.
WARNING
Always remove the battery pack
any time the tool is not in use.
To insert the battery, slide the pack into the body
of the tool. Make sure it latches securely into place.
Attaching/Removing Chip Collection Bag
To attach the chip collection bag, pinch the clips at
the top of the bag and slide into the groove at the
bottom of the die holder.
To remove the chip collection bag, pinch the clips at
the top of the bag and pull the bag down.
Empty the chip collection bag oten during use, and
before storing. An overfull chip collection bag can
cause cutting problems.
NOTICE
Discard chips separate from where you
store the tool to avoid chips and metal dust
from damaging the tool.
Punch and Die Replacement
Replace punch and die at the same time, or as neces-
sary. Use a 2.5 mm open end wrench when replacing
punch/dies.
1. Remove battery pack and place on a level surface.
2. Remove the die holder.
3. Punch Removal: Loosen the set screw with
2.5 mm HEX wrench. Remove punch and set
screw and discard.
4. Punch and Set Screw Installation: Align punch
detent with set screw in punch holder. Tighten set
screw securely to below the surface of the punch
holder.
5. Die Removal: Remove the two die holder screws
and lockwashers with 2.5 mm HEX wrench. Dis-
card two die holder screws and die.
6. Die and Die Holder Screw Installation: Place
die in position. Screw holes in die and die holder
will align when die is properly seated. Replace
the two die holder screws and lockwashers and
tighten securely.
7. Position die holder in desired direction of cut using
locating pin. Replace collar and tighten securely.
Bekijk gratis de handleiding van Milwaukee M12 Fuel 2476-20, stel vragen en lees de antwoorden op veelvoorkomende problemen, of gebruik onze assistent om sneller informatie in de handleiding te vinden of uitleg te krijgen over specifieke functies.
Productinformatie
| Merk | Milwaukee |
| Model | M12 Fuel 2476-20 |
| Categorie | Niet gecategoriseerd |
| Taal | Nederlands |
| Grootte | 2832 MB |


