Milwaukee 3712 handleiding
Handleiding
Je bekijkt pagina 3 van 15
4
5
OPERATION
WARNING
To reduce the risk of injury or tem-
porary eects on vision, do not
look directly into the laser when it is on.
CAUTION
Use of controls or adjustments or
performance of procedures other
than those specied herein may result in hazard-
ous radiation exposure.
NOTICE
Perform the Accuracy Field Check
procedure immediately upon unboxing
of each new Remote/Receiver and before expo-
sure to jobsite conditions. See "Accuracy Field
Check" for information. Should any deviation from
listed product accuracy be found, please con-
tact a MILWAUKEE service facility. Failure to do so
could result in rejection of warranty claim.
Turning the Remote/Receiver ON/OFF
1. To turn ON, press the power button until the laser
remote/receiver beeps. The icons and LED will
ash for 1 second, then return to the home screen.
NOTE: On initial startup, use the up/down arrows
to select the desired language, then press OK to
conrm. The backlight will illuminate after any
button press or when a laser beam is detecting
on the sensor. The backlight will stay on for 15
seconds. The timer will reset every time a button
is pressed or when a laser is sensed for the rst
time (i.e. it won't stay on if a laser stays on the
sensor, but if a laser moves o then back on, the
timer will reset).
2. To turn OFF, long press the power button for more
than 1 second. Auto shut-o will occur if there are
no button presses and no laser beam detected
for 15 minutes.
NOTE: The laser and remote/receiver are
independent of one another. A power button
press on the remote/receiver will power o the
remote/receiver, and the laser will remain on.
Center Find
Center nd feature is only compatible with certain
RPM's and accuracy settings and is not compatible
with channel link. Some settings may automatically
change when this function is being used. Press the
OK button to clear any setting change notication of
the remote/receiver.
1. Place the paired remote/receiver in the desired
location.
NOTE: The remote/receiver must be aligned with
the Y axis of the rotary laser. For best results, use
the iron sight on top of the laser to align directly
with the remote/receiver sensor.
2. Press the center nd button on the remote/receiver
or navigate the center nd icon in the main menu
and press the OK button. The laser will begin to
slope in the Y axis searching for the Remote/
Receiver.
3. Once the laser detects the remote/receiver, the
remote/receiver will show "center found" at the
top of the screen.
NOTE: If the center is not found, the remote/receiver
will display "not found". Press the OK button, and the
remote/receiver will go to the main menu, and the
laser will start the self-leveling procedure. Select the
center nd icon from the menu, and try steps 1 - 3
again until the center is found.
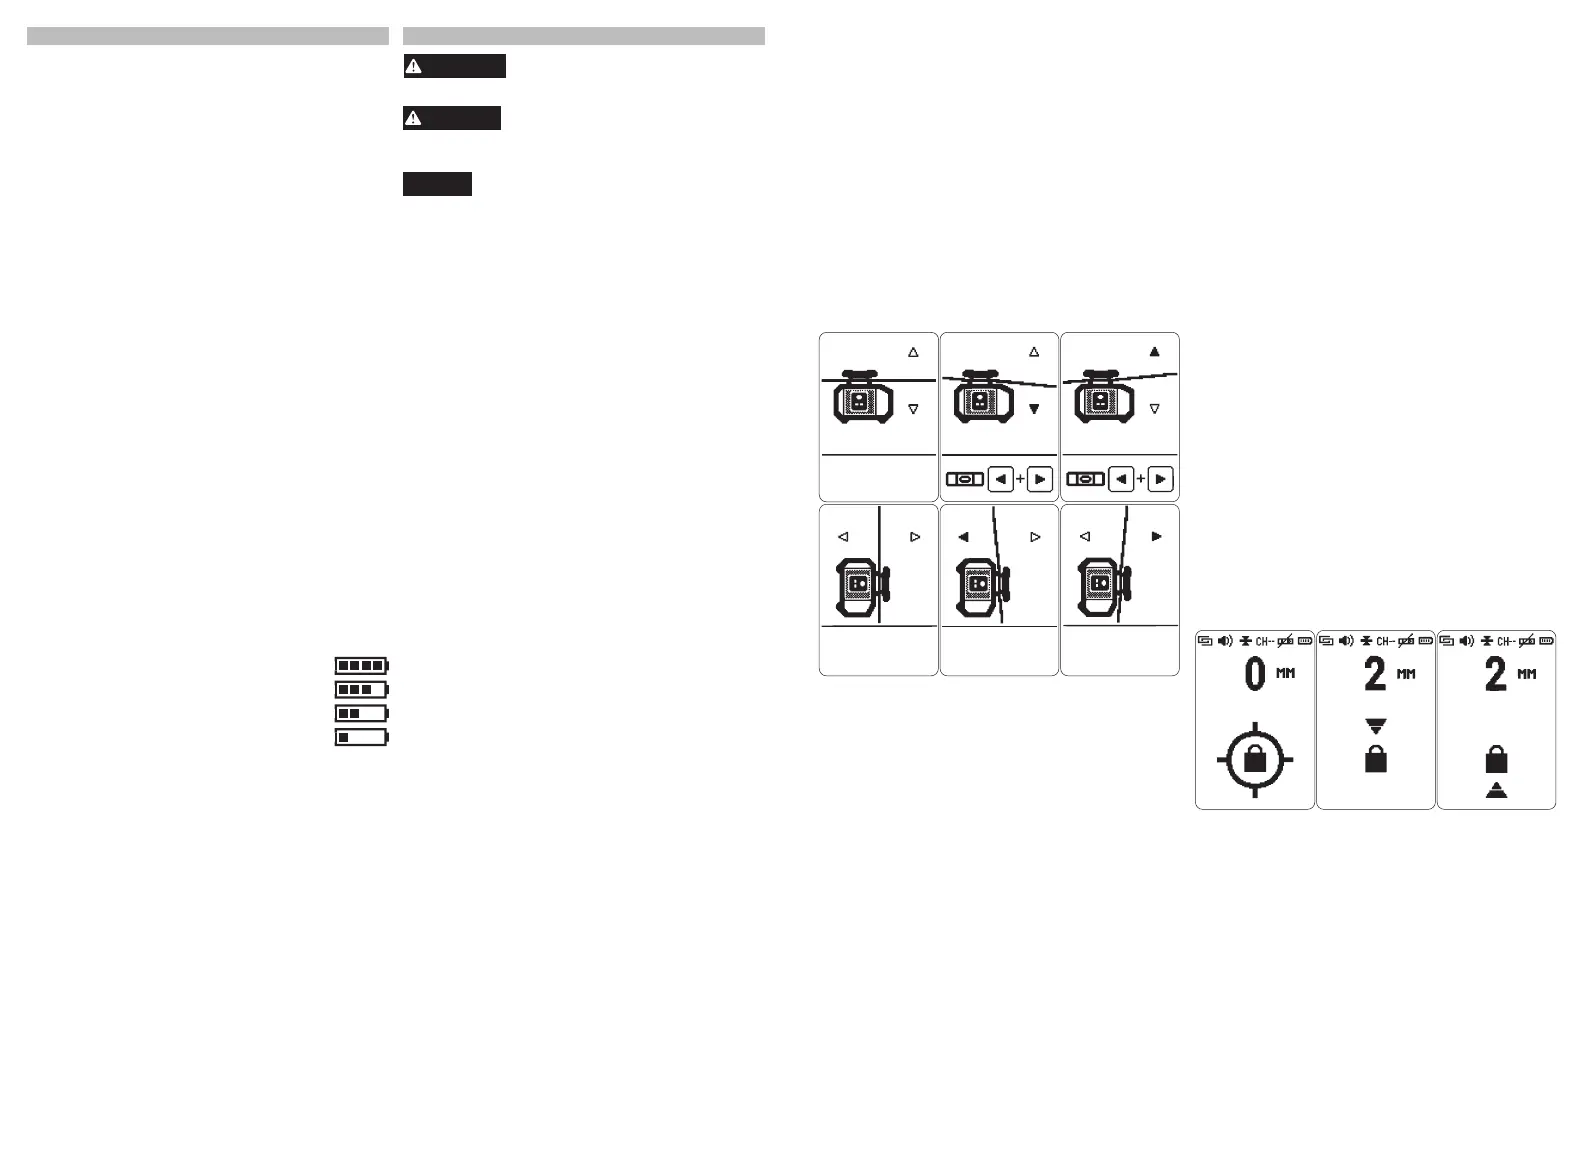
Alignment
Alignment mode can be used with the laser in
horizontal orientation (to slope), or vertical mode (to
align). The laser can only slope in the Y Axis.
1. Select the alignment icon from the main menu.
2. When in horizontal mode, press the up/down arrow
keys to slope. When in vertical orientation, press
the left/right arrow buttons to align. Press and hold
the arrow button to slope/align at a faster rate.
3. Press the OK button to conrm the current slope
selection.
4. After the laser is sloped (in horizontal orienta-
tion only), the left and right arrow buttons can
be pressed simultaneously to exit alignment and
re-level the laser plane.
NOTE: The laser locator indicator LEDs and audible
sounds will function during alignment if the user
wishes to use them to align the laser with the center
of the Remote/Receiver while in alignment mode.
Mask
The mask function can be used to turn o the laser in
certain quadrants to prevent interference with other
remote/receivers on the jobsite.
1. Select the mask icon from the main menu and
press the OK button. Four quadrants will appear
on the screen.
2. Press the up, down, left, or right arrow buttons to
select the desired quadrants to be masked. Masks
will be applied in real time to the laser.
3. To unselect a mask, press the arrow button in the
direction needed to unmask.
4. Press the OK button when mask selection is
complete.
NOTE: Up to 3 adjacent quadrants can be selected
at a time. If a fourth or non-adjacent quadrant is
masked, the selected quadrant will become masked.
All other previously masked sections will become
unmasked to resolve the conict.
Sweep
1. Press the sweep button or select the sweep icon
in the main menu.
2. Press the up arrow button to select which degree
of sweep is needed; 0°, 10°, 45°, and 90°. Use the
left and right arrow buttons to rotate the laser beam
counterclockwise or clockwise if needed. Single
ASSEMBLY
Attaching the Clamp
The clamp is an optional piece that can be attached
to the Remote/Receiver. The clamp can be used with
grade rods, and pieces of lumber up to 2.5" thick.
1. To attach the clamp to the receiver, align the
attachment posts on the clamp with the clamp
connection feature on the back of the receiver.
2. Align the screw on the back, and turn the knob
clockwise to tighten into place.
3. Attach the clamp to the workpiece by turning
the clamping knob counterclockwise to open the
clamping jaws. To tighten the clamp to the work-
piece, turn the clamping knob clockwise. Ensure
the clamp is snug before operation.
4. To remove the clamp from the workpiece, turn the
clamping knob counterclockwise until the clamp
jaws release from the workpiece. To remove the
clamp from the receiver, turn the clamping at-
tachment knob counterclockwise and remove the
clamp from the back of the receiver.
Changing the Batteries
Only use alkaline batteries. Do not use zinc-carbon
batteries. If the receiver will not be used for a long
time, remove the batteries to protect against corro-
sion. Change batteries when the fuel gauge shows
low batteries.
To change the batteries:
1. To open the battery door, turn the latch clockwise
to the unlocked position and then open the door.
2. Remove the old AA batteries, and dispose of
them properly.
3. Insert two AA batteries according to the +/- polarity
marked in the compartment.
4. To close the battery door, close the door and
then turn the latch counterclockwise to the locked
position.
Fuel Gauge
To determine the amount of charge left in
the batteries, turn the tool ON. The display
will show the battery charge: Full, 3/4, 1/2
and low battery warning. Battery life may
vary by brand/age. Replace the batteries as
soon as possible.
press the arrow button to move 1 step, or press
and hold the arrow button to move at a faster rate.
3. Use the down arrow button to snap the sweep
direction to the next quadrant. Press again to
proceed to next quadrant. And so on.
4. Press the OK button to conrm the selection. The
remote/receiver will return to the main menu.
Rotational Mode
1. Select the RPM icon from the main menu and
press the OK button. Three RPM options will ap-
pear; 300, 600 (default), and 1200.
NOTE: Slower RPM's are more visible, while faster
RPM's will yield a more continuous looking line that
is better for detection reaction time.
2. Press the up and down arrow buttons to select the
RPM as needed.
3. Press the OK button, and the RPM will change
according to the RPM selected.
Center Lock
Center lock is only compatible with certain RPM's and
accuracy settings and is not compatible with channel
link. Some settings may automatically change when
this function is being used. Press the OK button to
clear any setting change notication of the remote/
receiver.
1. Place the paired remote/receiver in the desired
location.
NOTE: The remote/receiver must be aligned with
the Y axis of the rotary laser. For best results, use
the iron sight on top of the laser to align directly
with the remote/receiver sensor.
2. To LOCK, select the center lock icon from the
main menu and press the OK button. The laser
will begin to slope in the Y axis searching for the
remote/receiver.
3. If the center is found, the remote/receiver will
display "Center Locked".
4. Once the center is locked, the laser will continue
to adjust it's slope to remain on the center of the
remote/receiver. If the remote/receiver is ever
blocked or moved such that the laser beam is no
longer on the sensor, this operation will fail and a
"not found" warning will be displayed.
NOTE: If center lock is not found, the remote/
receiver will display "not found". Press the OK
button, and the remote/receiver will go to the main
menu, and the laser will start the self-leveling
sequence. Select the center lock icon from the
menu, and try steps 1 - 3 again until center lock
is found.
5. To UNLOCK, select the center lock icon from the
main menu, and press the OK button. Hold the left
arrow and right arrow buttons simultaneously, the
center lock function will be aborted and the laser
will begin the auto-level sequence.
Bekijk gratis de handleiding van Milwaukee 3712, stel vragen en lees de antwoorden op veelvoorkomende problemen, of gebruik onze assistent om sneller informatie in de handleiding te vinden of uitleg te krijgen over specifieke functies.
Productinformatie
| Merk | Milwaukee |
| Model | 3712 |
| Categorie | Niet gecategoriseerd |
| Taal | Nederlands |
| Grootte | 2867 MB |


